There is something truly magical about this Vegan Chocolate Tart (Nut-Free) Recipe that feels like a special secret shared among dessert lovers who crave a luscious, creamy chocolate experience without any nuts. This tart beautifully balances a rich, fudgy chocolate filling with a tender cocoa crust, all while being entirely plant-based and perfectly nut-free for anyone with allergies or preferences. It’s an easy yet indulgent treat that will quickly become your go-to dessert when you want to impress family and friends with something both elegant and comforting.
Ingredients You’ll Need
These ingredients are wonderfully simple but essential, each playing a crucial role in delivering the perfect taste, texture, and color. The cocoa powder and dark chocolate provide deep chocolate flavor, while the chilled coconut milk creates that irresistibly creamy ganache filling without any dairy. The vegan butter brings richness, and the coffee granules enhance the chocolate’s depth.
- 120 g plain flour: Forms the sturdy yet tender base of the tart crust.
- 30 g Dutch processed cocoa powder: Adds intense chocolate flavor and a beautiful dark color to the crust.
- 30 g soft brown sugar: Gives mild sweetness with hints of molasses for a rich taste.
- 80 g vegan butter (nut-free brand): Binds the crust ingredients and adds buttery richness.
- ¼ teaspoon sea salt: Enhances the flavors and balances the sweetness.
- 250 g full fat chilled canned coconut milk: Creates the silky smooth, creamy ganache filling.
- 1 teaspoon instant coffee granules or espresso powder: Intensifies the chocolate’s depth without overpowering it.
- 220 g vegan dark chocolate: The star ingredient for a decadent, dairy-free chocolate filling.
- 2 tablespoons pure maple syrup: Natural sweetness that harmonizes perfectly with the chocolate.
- 2 teaspoons vanilla extract: Adds warmth and rounds out the flavors beautifully.
- 60 g vegan butter (cut into chunks, nut-free brand): Enriches the ganache for a velvety finish.
- 120 g vegan dark chocolate: Optional extra chocolate for garnish or decoration.
- Gold leaf sheets (optional): Add a touch of elegance and sparkle when serving.
How to Make Vegan Chocolate Tart (Nut-Free) Recipe
Step 1: Prepare the Crust
Start by preheating your oven to 175°C (350°F). Lightly grease your 9-inch tart tin and line the base with parchment paper to make removal easier. Combine the flour, cocoa powder, brown sugar, vegan butter, and salt in a food processor. Blitz until the mix clumps into a sticky dough, adding a tablespoon of water if it’s too crumbly. Press the dough evenly into the tin’s base and sides, then prick the base with a fork to allow steam to escape. Bake it for 15 minutes until it’s slightly browned and fragrant, then set it aside to cool without removing from the tin.
Step 2: Make the Filling
While your crust cools, combine the chilled coconut milk and coffee granules in a saucepan and gently bring to a simmer—avoid boiling as this can affect the texture. Finely chop your dark chocolate and place it in a heat-safe bowl. Pour the hot coconut milk mixture over the chocolate and let it sit for about 5 minutes to start melting the chocolate. Whisk the mixture smoothly, then stir in the maple syrup, vanilla extract, and salt. Add the chunks of vegan butter last and continue stirring until fully melted and silky smooth.
Step 3: Assemble and Chill
Pour the luscious ganache into your prepared tart crust, then tap the tin gently on your counter to release any trapped air bubbles. Let the tart cool for roughly 10 minutes at room temperature before transferring it to the fridge. It needs to set for at least 4 hours, but overnight chilling is best to achieve that perfect firmness and depth of flavor that melts in your mouth.
How to Serve Vegan Chocolate Tart (Nut-Free) Recipe
Garnishes
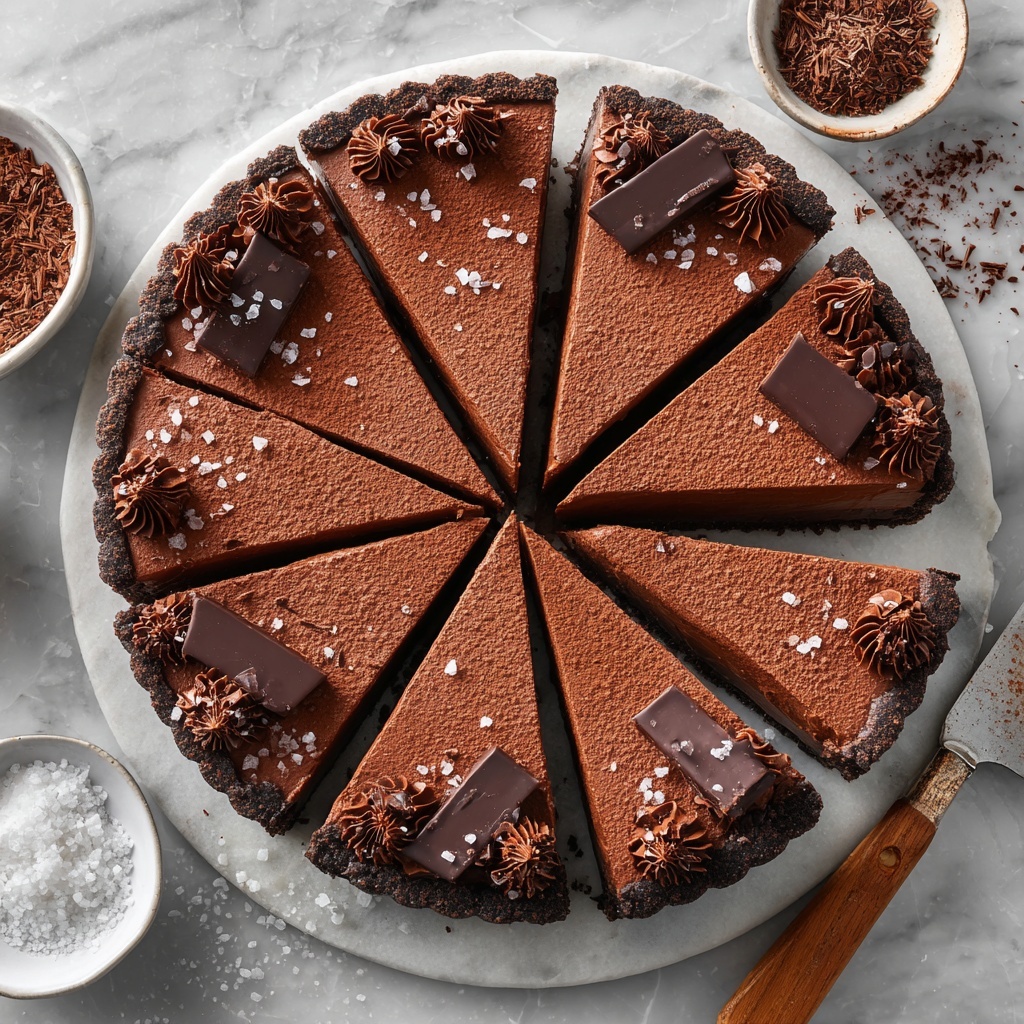
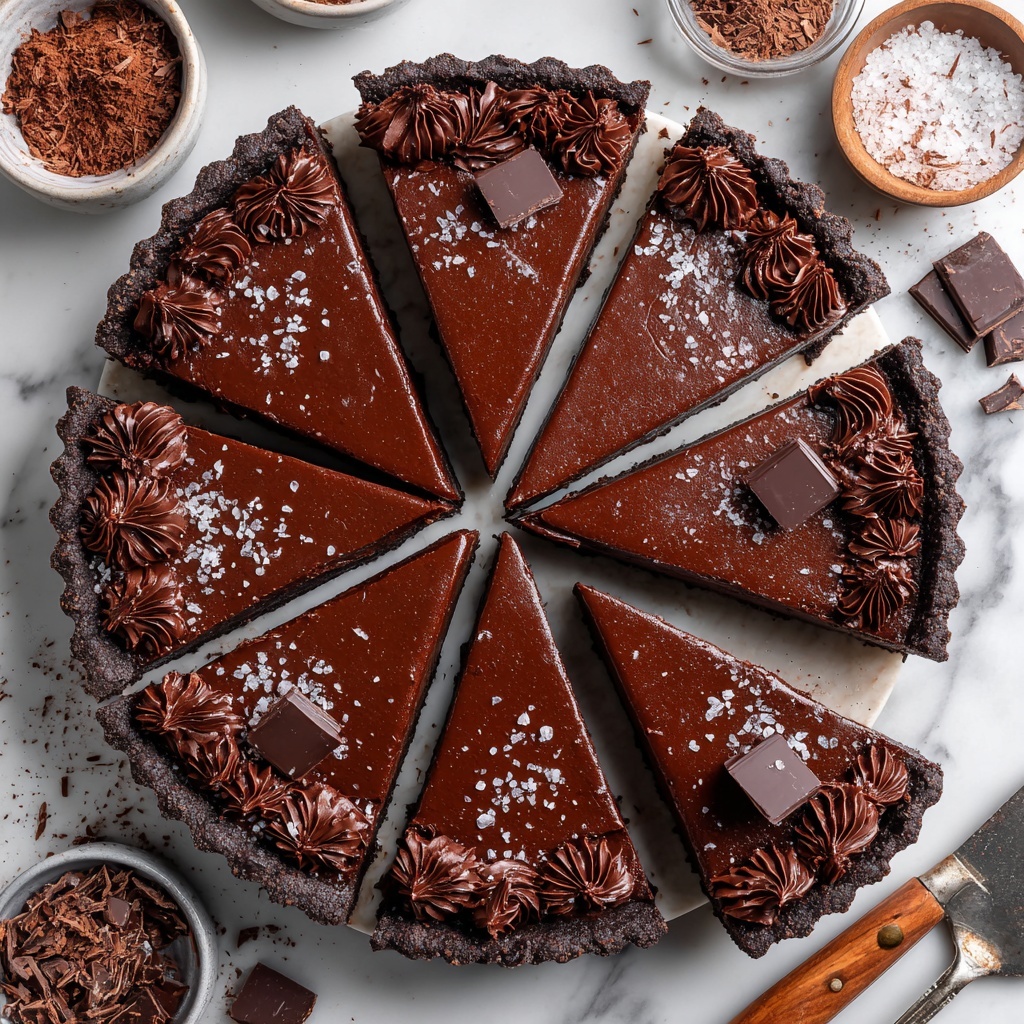
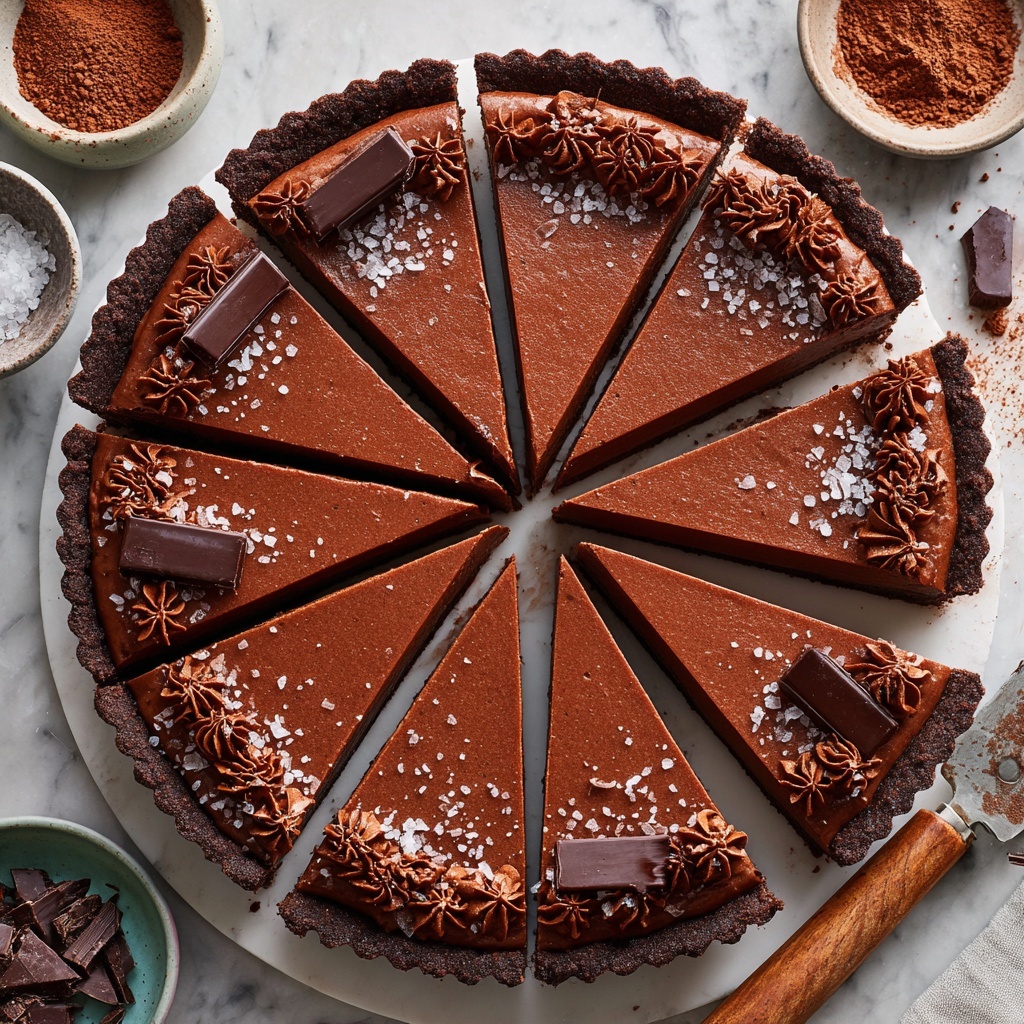
Once beautifully set, remove the tart from the tin and place it on a serving plate. You can get creative here—try grating some extra vegan dark chocolate on top, melting a drizzle over the surface, or placing chunks artfully on the tart. A sprinkle of flaky sea salt will highlight the chocolate’s richness, and for a truly stunning presentation, delicately add some gold leaf sheets that shimmer in the light and add a touch of celebration.
Side Dishes
This tart’s richness pairs wonderfully with light, refreshing sides. Think a scoop of vegan vanilla ice cream or some fresh berries like raspberries or strawberries for a bright contrast. A dollop of coconut yoghurt or a small serving of fresh mint leaves can also lift the flavors to make each bite more exciting and balanced.
Creative Ways to Present
For a fun twist, you can slice the tart into bite-sized squares and serve on a platter with skewers for sharing at a party. Alternatively, cut wedges and serve alongside espresso or your favorite plant-based milk latte for a café-style treat. If you want to impress, try layering thin slices with edible flowers or a sprinkling of chopped crystalized ginger for a zingy contrast.
Make Ahead and Storage
Storing Leftovers
Wrap your vegan chocolate tart securely in plastic wrap or store it in an airtight container to keep it fresh in the fridge for up to 5 days. Keeping it chilled ensures the ganache stays firm and luscious, and it remains just as delicious as when freshly made.
Freezing
You can freeze this tart for longer storage—wrap it tightly in cling film and then in foil to prevent freezer burn. It keeps well for 4 to 6 weeks frozen. When you’re ready to enjoy it again, simply defrost in the fridge for 1 to 2 hours before serving for the best texture and flavor.
Reheating
This vegan chocolate tart is best served chilled, so avoid reheating it. However, if you prefer a softer texture, you can let it sit at room temperature for 20–30 minutes before slicing and serving to take the chill off without compromising the ganache’s smoothness.
FAQs
Can I make this Vegan Chocolate Tart (Nut-Free) Recipe without a food processor?
Absolutely! You can mix the crust ingredients by hand using a sturdy spoon or your fingers, just be patient and ensure the dough holds together well. Adding a little water gradually helps bring it all together without a food processor.
What can I substitute for coconut milk in the filling?
Full fat canned coconut milk is ideal for that creamy texture, but if you need an alternative, try unsweetened soy or oat cream, though results might be a bit less rich. Avoid low-fat milks since they won’t set into the same luscious ganache consistency.
Is this tart suitable for kids?
Definitely! This Vegan Chocolate Tart (Nut-Free) Recipe is both nutritious and indulgent, making it a wonderful treat for kids and adults alike. Just keep an eye on portion sizes as the chocolate filling is quite rich.
Can I use milk chocolate instead of dark chocolate?
Yes, you can swap in vegan milk chocolate for a sweeter, creamier flavor. Just be mindful that the tart may be a bit less intense in chocolate flavor compared to using dark chocolate.
How do I know if my vegan butter is nut-free?
Check the packaging carefully for allergen information or contact the manufacturer. Many brands clearly label nut-free products, but it’s always best to double-check if allergies are a concern.
Final Thoughts
This Vegan Chocolate Tart (Nut-Free) Recipe is truly a gift to anyone who loves indulgent desserts without compromising on their dietary needs or preferences. The recipe is easy to follow, uses simple ingredients, and delivers a spectacularly rich and creamy dessert that feels special every single time you serve it. So why not dive in and spoil yourself and your loved ones with this beautiful tart? Trust me, it’s a little slice of chocolate heaven you’ll want to make again and again.
Print
Vegan Chocolate Tart (Nut-Free) Recipe
- Prep Time: 20 minutes
- Cook Time: 15 minutes
- Total Time: 4 hours 35 minutes
- Yield: 12 servings
- Category: Dessert
- Method: Baking
- Cuisine: Vegan
- Diet: Vegan
Description
This vegan chocolate tart is a rich, creamy, and indulgent dessert perfect for those avoiding nuts and animal products. Featuring a crisp cocoa-flavored crust and a luscious coconut milk-based chocolate ganache filling, it’s elegantly garnished and ideal for special occasions or everyday treats. The tart is free from nuts, dairy, and eggs, making it suitable for vegan diets and those with nut allergies.
Ingredients
Crust
- 120 g plain flour
- 30 g Dutch processed cocoa powder (or unsweetened cocoa powder)
- 30 g soft brown sugar (or light muscovado/coconut sugar)
- 80 g vegan butter (nut-free brand if required)
- ¼ teaspoon sea salt
Filling
- 250 g full fat chilled canned coconut milk
- 1 teaspoon instant coffee granules or espresso powder (or 1 tbsp for a more intense flavor)
- 220 g vegan dark chocolate (or 240 g vegan milk chocolate)
- 2 tablespoons pure maple syrup
- 2 teaspoons vanilla extract
- 60 g vegan butter (cut into chunks, nut-free brand if required)
Garnish
- 120 g vegan dark chocolate (for grating, melting, or chunks)
- Sea salt (to sprinkle)
- Gold leaf sheets (optional)
Instructions
- Prepare the Oven and Tin: Preheat your oven to 175°C (350°F). Lightly grease the base and sides of a 9-inch tart tin with oil or vegan butter and line the base with parchment paper to prevent sticking.
- Make the Crust Dough: Place all the crust ingredients into a food processor and blitz until the mixture sticks together forming a dough. If the dough is too dry, add a tablespoon of water to help it bind properly.
- Form and Bake the Crust: Evenly press the dough into the base and sides of the prepared tart tin. Prick several holes into the base using a fork to prevent bubbling. Bake the crust for 15 minutes until it is slightly browned. Remove from oven and allow to cool, keeping the tart in the tin.
- Prepare the Chocolate Filling: Pour the coconut milk and instant coffee granules or espresso powder into a saucepan and gently bring to a simmer over medium heat. Do not allow it to boil. While heating, finely chop the vegan chocolate and place it in a heatproof bowl.
- Create the Ganache: Pour the hot coconut milk mixture over the chopped chocolate and let it rest for 5 minutes to soften. Whisk the mixture until smooth and creamy. Stir in the maple syrup, vanilla extract, and a pinch of sea salt. Add the chunks of vegan butter and continue stirring until fully melted and incorporated.
- Assemble the Tart: Pour the chocolate ganache into the baked tart crust. Gently tap the tin on the countertop to release any air bubbles. Let the tart cool at room temperature for about 10 minutes before transferring it to the refrigerator to set for at least 4 hours or overnight for best results.
- Garnish the Tart: Once set, carefully remove the tart from the tin and place it on a serving dish. Garnish by grating, melting, or placing chunks of the reserved vegan dark chocolate on top. Sprinkle with a little sea salt and decorate with optional gold leaf sheets for a luxurious finish.
- Storage: Store the chocolate tart in an airtight container or wrap it tightly with cling film and refrigerate. It keeps well for up to 5 days in the fridge. For longer storage, freeze the tart for 4-6 weeks and defrost at room temperature for 1-2 hours before serving.
Notes
- Use full fat canned coconut milk chilled overnight for best ganache texture.
- Adjust coffee quantity to taste for intensity; 1 tbsp gives a stronger flavor.
- Opt for nut-free vegan butter brands if allergies are a concern.
- The tart can be garnished in multiple ways: grated, melted drizzle, or chunks of chocolate.
- Allow the tart to set thoroughly in the fridge for a firm texture before serving.
- Freezing the tart preserves its freshness but thaw adequately before enjoying.


