
There is nothing quite as delightful as mastering the art of making crepes, and with the Simple French Crepes: 5 Tips for Perfect Flips Recipe, you’re about to unlock that joy in your own kitchen. These crepes are wonderfully thin, delicately tender, and perfectly golden, providing a versatile base that’s equally delicious sweet or savory. This recipe not only guides you through the steps but shares crucial tips that will help you flip like a pro every single time, turning simple ingredients into a memorable treat that feels special yet wonderfully uncomplicated.

Ingredients You’ll Need
To make these beautiful crepes, you only need a handful of simple ingredients, each playing a key role in creating that perfect texture and flavor balance. The combination is straightforward but magical.
- All-purpose flour: The foundation of the batter, providing structure without weighing down the crepes.
- Eggs: They bind the batter and add richness for a tender bite.
- Milk: Gives the batter its characteristic fluidity, ensuring the crepes are thin and pliable.
- Butter (melted): Adds flavor and helps prevent sticking, giving crepes their beautiful, light crisp edges.
- Salt: A pinch to enhance flavor without overpowering the subtle taste.
- Sugar (optional): Just a little if you’re aiming for sweet crepes—it balances out fillings perfectly.
How to Make Simple French Crepes: 5 Tips for Perfect Flips Recipe
Step 1: Prepare Your Batter with Care
Start by whisking the eggs, then gradually incorporate the flour and milk. This slow mixing ensures a smooth, lump-free batter. Let it rest for at least 30 minutes so the flour hydrates and the gluten relaxes, making your crepes tender.
Step 2: Choose the Right Pan and Temperature
A non-stick skillet or crepe pan is your best friend here. Heat it to medium, and lightly grease with butter or oil. Getting the temperature right is essential; too hot, and the crepes burn, too cool, and they won’t cook evenly.
Step 3: Pour and Tilt for Thinness
Pour a small amount of batter into the pan and immediately tilt it in a circular motion to spread the batter into a thin, even layer. This quick action yields that signature delicate crepe texture.
Step 4: Master the Flip
Watch the edges closely; when they turn golden and start to lift, it’s time to flip. Using a thin spatula, loosen the edges gently and flip confidently in one smooth motion to avoid tearing.
Step 5: Keep Crepes Warm and Fresh
Stack your crepes on a warm plate covered with a towel to keep them soft and warm until serving. This step maintains their delicate texture and keeps them from drying out.
How to Serve Simple French Crepes: 5 Tips for Perfect Flips Recipe

Garnishes
Crepes love a little embellishment! Dust them with powdered sugar, drizzle with honey or chocolate sauce, or add fresh berries and a dollop of whipped cream for a simple yet irresistible finish.
Side Dishes
Pair sweet crepes with citrusy fruit salads or a scoop of vanilla ice cream for a delightful contrast. For savory versions, a crisp green salad or sautéed vegetables balance the richness beautifully.
Creative Ways to Present
Fold crepes into triangles or roll them around fillings for a pretty presentation. You can layer them with cream and fruits to create an elegant crepe cake that’s sure to impress friends and family alike.
Make Ahead and Storage
Storing Leftovers
Wrap cooled crepes tightly in plastic wrap and store in the refrigerator for up to two days. This storage method helps preserve moisture and prevents them from sticking together.
Freezing
Place wax paper between each crepe and freeze in an airtight container for up to two months. This way, you can enjoy fresh crepes anytime with minimal prep.
Reheating
Reheat crepes gently in a warm pan or microwave them briefly wrapped in a damp paper towel to maintain softness and avoid drying out.
FAQs
Can I make the batter ahead of time?
Absolutely! Preparing the batter a few hours ahead or even the night before allows the flour to fully hydrate, improving the texture. Just give it a gentle stir before cooking.
What’s the secret to flipping crepes without tearing?
The key lies in using a non-stick pan, waiting until the edges lift naturally, and flipping confidently with a thin spatula. It takes a little practice, but these tips will have you turning crepes like a pro.
Can I use gluten-free flour?
Yes, but results can vary. Gluten-free flours might affect the elasticity and texture, so consider adding a little xanthan gum or experimenting with blends designed for pancakes and crepes.
How do I prevent crepes from sticking to the pan?
Make sure your pan is well-heated and lightly greased. Using a small amount of melted butter or oil and wiping away excess can prevent sticking without making the crepes greasy.
Are these crepes suitable for breakfast and dessert?
Definitely! Their delicate flavor pairs wonderfully with sweet toppings like jam or Nutella, or savory fillings like ham and cheese, making them perfect for any meal.
Final Thoughts
Once you get comfortable with these techniques, the Simple French Crepes: 5 Tips for Perfect Flips Recipe will become your go-to for a quick yet impressive dish. The joy of watching those thin, golden discs come together and flipping them perfectly is unmatched. So grab your skillet and let’s make some unforgettable crepes that you’ll want to share with everyone you know!
Print
Simple French Crepes: 5 Tips for Perfect Flips Recipe
- Prep Time: 15 minutes
- Cook Time: 4 hours 30 minutes
- Total Time: 4 hours 45 minutes
- Yield: 4 servings
- Category: Main Course
- Method: Slow Cooking
- Cuisine: American
Description
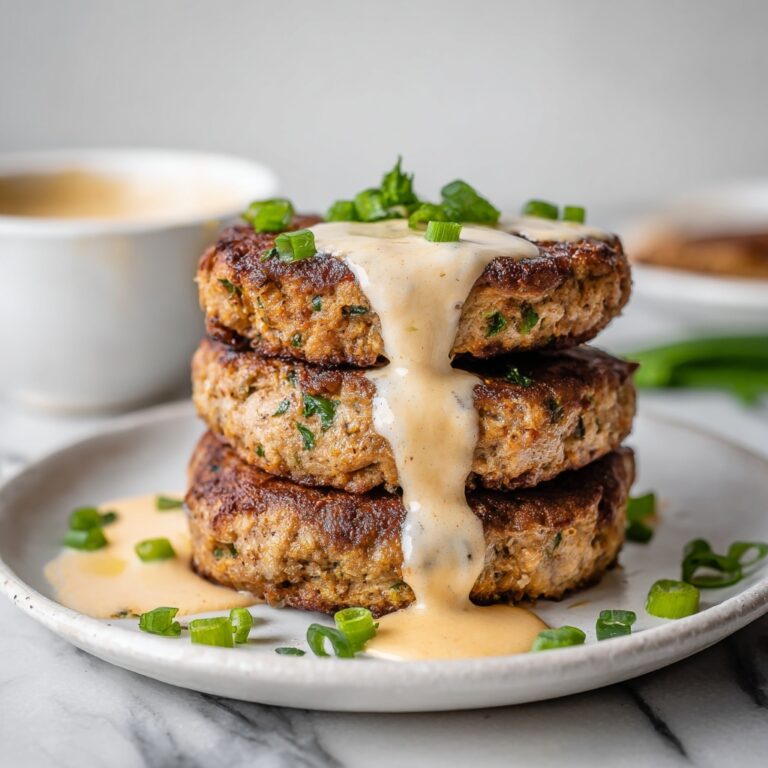
These Creamy Slow Cooker Salisbury Steak Meatballs are a comforting, hearty dish featuring tender beef meatballs cooked low and slow in a rich, savory gravy. Perfect for an easy weeknight meal, they’re delicious served over mashed potatoes, rice, or pasta.
Ingredients
Meatballs
- 1 lb ground beef
- ½ cup breadcrumbs
- ¼ cup finely chopped onion
- 1 large egg
- 1 tablespoon Worcestershire sauce
- ½ teaspoon garlic powder
- ½ teaspoon onion powder
- Salt and pepper, to taste
Gravy
- 2 cups beef broth
- 1 tablespoon cornstarch
Instructions
- Prepare the meatball mixture: In a large mixing bowl, combine ground beef, breadcrumbs, finely chopped onion, egg, Worcestershire sauce, garlic powder, onion powder, salt, and pepper. Mix well until all ingredients are fully incorporated.
- Form the meatballs: Shape the mixture into meatballs approximately 1 to 1.5 inches in diameter. Place them aside on a plate or tray.
- Arrange meatballs in slow cooker: Place the formed meatballs evenly into the slow cooker insert.
- Make the gravy: In a separate bowl, whisk together beef broth and cornstarch until completely smooth and free of lumps.
- Add gravy to slow cooker: Pour the beef broth and cornstarch mixture over the meatballs, making sure they are evenly covered.
- Cook: Cover the slow cooker and cook on the low setting for 4 to 5 hours, or until the meatballs are cooked through and tender, and the gravy has thickened.
- Serve: Once done, serve the meatballs with the creamy gravy spooned over mashed potatoes, rice, or pasta for a complete meal.
Notes
- For best texture, avoid overmixing the meatball mixture to keep them tender.
- The cooking time may vary slightly depending on your slow cooker model.
- You can substitute beef broth with a low-sodium option if preferred.
- Add a splash of cream or milk to the gravy for extra creaminess, if desired.
- Leftovers store well in the refrigerator for up to 3 days.
- Reheat gently in a saucepan to prevent the meatballs from drying out.


