
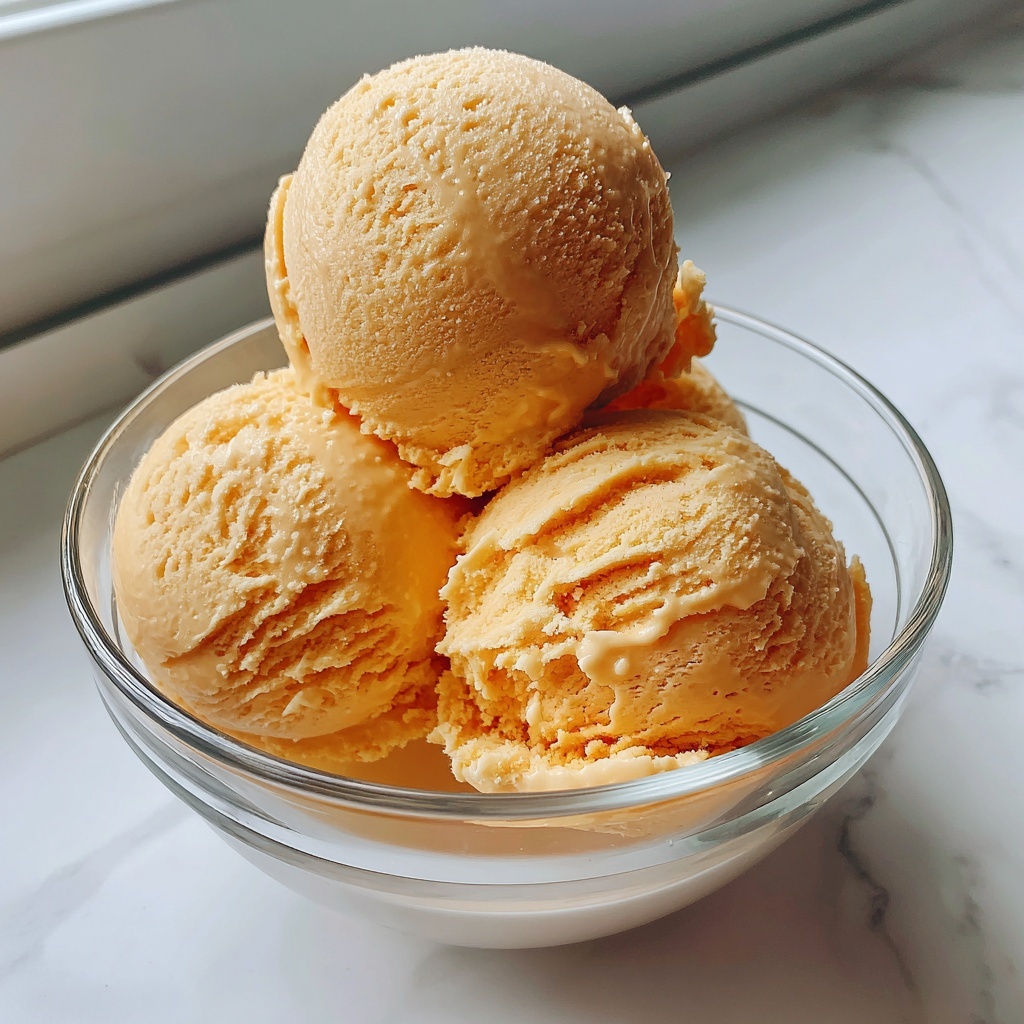
If you’re on the hunt for a deliciously creamy treat that feels indulgent but is actually wholesome, then you’re going to fall head over heels in love with the Peanut Butter Banana Ice Cream: 7 Steps to Pure Bliss Recipe. This delightful dessert combines the natural sweetness of ripe bananas with the rich, nutty flavor of peanut butter, all whipped up into a smooth, dreamy ice cream that you can enjoy guilt-free. It’s easy to make, requires just a few simple ingredients, and is perfect for those moments when you want something refreshing and nourishing at the same time. Trust me, once you try this recipe, it’ll quickly become your go-to frozen snack, especially on warm days or whenever you need a comforting pick-me-up.

Ingredients You’ll Need
Simple, wholesome, and utterly essential — these few ingredients create a magical combination that brings creamy texture, natural sweetness, and that irresistible peanut-tinged flavor to life.
- Ripe bananas: The star of the show, providing natural sweetness and creaminess that forms the base of the ice cream.
- Peanut butter: Adds rich, nutty depth and smooth texture that makes every bite decadent.
- Almond milk: A dairy-free choice that keeps things light and helps blend the mixture evenly.
- Honey (optional): A gentle sweetener to complement the bananas without overpowering the natural flavors.
How to Make Peanut Butter Banana Ice Cream: 7 Steps to Pure Bliss Recipe
Step 1: Freeze the Banana Slices
Start by peeling and slicing your ripe bananas into manageable pieces. Pop these slices into the freezer for at least two hours. This step is crucial because it transforms the bananas into the perfect frozen base, ensuring your ice cream will have a creamy, scoopable texture without the need for heavy cream or artificial stabilizers.
Step 2: Blend the Ingredients
Once the bananas are frozen solid, gather them together with half a cup of creamy peanut butter, a cup of almond milk, and a tablespoon of honey if you want a touch of extra sweetness. Toss everything into your blender and pulse until the mixture is beautifully smooth and velvety. This blending step marries the flavors into one harmonious, luscious blend.”
Step 3: Freeze the Mixture Again
To get that perfect firm yet creamy texture, transfer your blended banana and peanut butter mix to a container and freeze it for another two hours. This second round of freezing solidifies the ice cream, allowing you to scoop it easily while it retains that melt-in-your-mouth consistency.
Step 4: Scoop and Serve
After waiting patiently, it’s finally time for the best part: serving. Use a sturdy ice cream scoop to create generous portions of your homemade peanut butter banana ice cream. It’s thick, creamy, and ready to be devoured immediately – pure bliss in every bite.
How to Serve Peanut Butter Banana Ice Cream: 7 Steps to Pure Bliss Recipe
Garnishes
Think crunchy, nutty, or sweet to elevate your serving game. Sprinkle chopped peanuts, a drizzle of melted dark chocolate, or a dusting of cinnamon on top. These small touches add dimension and a bit of flair to an already spectacular dessert.
Side Dishes
Pair your ice cream with fresh fruit slices like strawberries or kiwi for a refreshing contrast. If you’re feeling indulgent, serve alongside warm brownies or a crispy cookie for a fabulous textural play. The Peanut Butter Banana Ice Cream: 7 Steps to Pure Bliss Recipe pairs beautifully with so many treats, making it a versatile companion for your dessert table.
Creative Ways to Present
For a fun twist, serve the ice cream in hollowed-out banana halves to keep the theme going. Or layer it in a parfait glass with granola and berries for a vibrant, inviting presentation that’s as pleasing to the eye as it is to the palate.
Make Ahead and Storage
Storing Leftovers
If you have leftovers (and you might, if you’re generous!), store them in an airtight container in the freezer. This keeps your ice cream fresh and ready to satisfy cravings on demand. Just remember to keep it well sealed to avoid picking up freezer odors or developing icy crystals.
Freezing
The beauty of this Peanut Butter Banana Ice Cream: 7 Steps to Pure Bliss Recipe is how well it freezes. Because it’s primarily banana and peanut butter, it freezes solid but still remains creamy once scooped, thanks to the natural fats and sugars. Make sure to freeze it for at least 2 hours before scooping for best texture.
Reheating
No need to heat your ice cream! Just let it sit at room temperature for 5-10 minutes before scooping if it’s too hard. This softens the texture just enough to make serving and enjoying easy without losing that refreshing ice cream feel.
FAQs
Can I use any other nut butter?
Absolutely! Almond butter, cashew butter, or even sunflower seed butter work wonderfully as alternatives, each bringing their own unique flavor twist to the Peanut Butter Banana Ice Cream: 7 Steps to Pure Bliss Recipe.
Do I have to use honey?
Honey is optional and acts as a mild sweetener, but ripe bananas are naturally sweet enough to make this dessert shine on their own if you prefer to skip added sugars.
Is almond milk necessary?
Almond milk adds creaminess while keeping it dairy-free, but you can substitute with any milk (cow’s, oat, soy) based on your dietary preference without sacrificing taste.
Can I make this ice cream ahead of time?
Definitely! This recipe is fantastic for prepping in advance. Just store it properly in the freezer and it will be fresh and delicious when you’re ready to serve.
How long will the ice cream last in the freezer?
For optimal taste and texture, enjoy your Peanut Butter Banana Ice Cream: 7 Steps to Pure Bliss Recipe within 1-2 weeks of freezing. After that, it might start to lose some creaminess.
Final Thoughts
There’s just something so comforting and satisfying about the Peanut Butter Banana Ice Cream: 7 Steps to Pure Bliss Recipe that makes it a standout in the world of frozen treats. It’s simple, nourishing, and utterly delicious — the kind of recipe you’ll want to share with friends and make again and again. So go ahead, gather your ingredients, freeze those bananas, blend up this magic, and enjoy a perfect scoop of pure bliss whenever you crave it. Your taste buds will thank you.
Print
Peanut Butter Banana Ice Cream: 7 Steps to Pure Bliss Recipe
- Prep Time: 10 minutes
- Cook Time: 0 minutes
- Total Time: 2 hours 10 minutes
- Yield: 4 servings
- Category: Dessert
- Method: Blending
- Cuisine: American
- Diet: Vegetarian
Description
This Peanut Butter Banana Ice Cream is a creamy, dairy-free frozen treat made with ripe bananas, peanut butter, almond milk, and a touch of honey. Perfect for a healthy dessert or snack, it combines natural sweetness and rich flavors in a simple, no-cook recipe that only requires blending and freezing.
Ingredients
Main Ingredients
- 2 ripe bananas
- 1/2 cup peanut butter
- 1 cup almond milk
- 1 tablespoon honey (optional)
Instructions
- Freeze Bananas: Slice the ripe bananas into coins and place them in the freezer for at least 2 hours until they are fully frozen, which helps create a creamy texture in the ice cream.
- Blend Ingredients: Add the frozen banana slices, peanut butter, almond milk, and optional honey to a high-speed blender or food processor. Blend until the mixture is completely smooth and creamy, with no chunks remaining.
- Freeze Mixture: Transfer the blended mixture into a container suitable for freezing. Place it in the freezer and let it set for about 2 hours to firm up, achieving the ideal ice cream consistency.
- Scoop and Serve: Once the mixture is frozen solid, scoop the peanut butter banana ice cream into bowls or cones and serve immediately for a refreshing and satisfying dessert.
Notes
- For creamier ice cream, use a high-powered blender and blend thoroughly.
- Honey is optional and can be omitted for a vegan version, or replaced with maple syrup.
- Store leftovers in an airtight container in the freezer for up to 1 week.
- Let the ice cream sit at room temperature for a few minutes before scooping if it’s too hard.

