
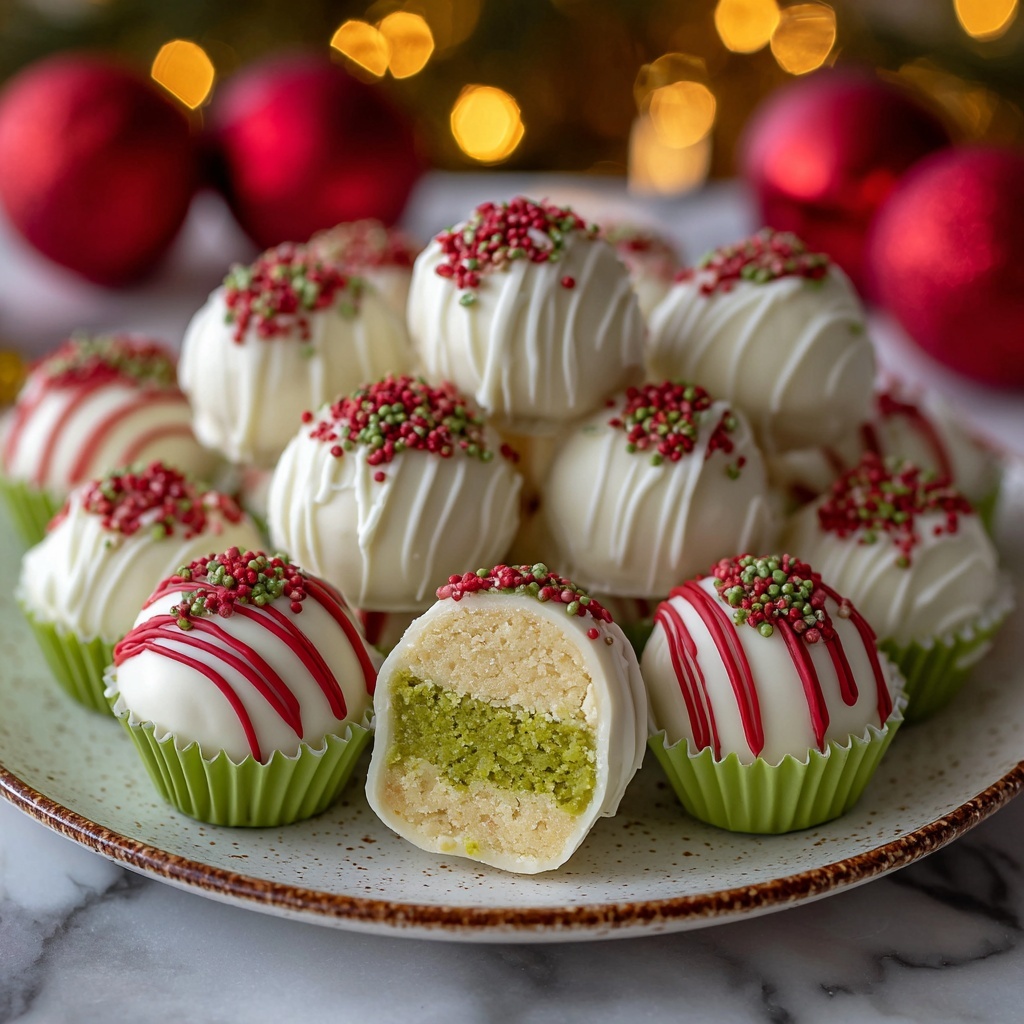
There is something truly magical about transforming a beloved holiday treat into an irresistible, bite-sized delight. The Little Debbie Christmas Tree Cake Truffles Recipe takes those nostalgic, festive cakes and turns them into creamy, chocolate-coated truffles that melt in your mouth with every bite. Perfect for holiday parties, thoughtful gifts, or simply indulging yourself, these truffles blend the classic flavors of the Christmas Tree Cakes with a luscious cream cheese base and an elegant white chocolate shell. Once you try this recipe, you’ll see why it’s become a fast favorite in my holiday dessert lineup.
Ingredients You’ll Need
Getting started with this festive treat is a breeze because the ingredients are simple, yet essential to achieving the perfect balance of flavor, texture, and visual appeal. Each one plays a crucial role, from the star dessert itself to the creamy and sweet coatings that make every bite special.
- Little Debbie Christmas Tree Cakes: The foundation of this recipe, offering that signature vanilla cake with creamy filling and colorful sprinkles inside.
- Cream cheese, softened: Adds a velvety texture and tangy richness that binds the cakes together beautifully.
- White chocolate chips: Provides a sweet, smooth coating that hardens into a glossy shell for the truffles.
- Vanilla extract: A touch of warmth and depth, enhancing the overall flavor profile.
- Sprinkles (optional): Fun and festive for extra color and holiday cheer on top of the truffles.
How to Make Little Debbie Christmas Tree Cake Truffles Recipe
Step 1: Crush the Little Debbie Christmas Tree Cakes
The first step is all about texture. Grab a big bowl and crumble the Christmas Tree Cakes into small pieces — this is where the magic begins, breaking the familiar treats down to perfect bite-sized fragments ready to be transformed.
Step 2: Mix in Cream Cheese
Next, add the softened cream cheese and vanilla extract to the crushed cake crumbs. Use a sturdy spoon or your hands to mix them until fully combined into a smooth, pliable dough. This combo gives the mixture binding power and a creamy richness that holds the truffles together.
Step 3: Chill the Mixture
Pop the mixture into the refrigerator for about 30 minutes. Chilling firms it up just enough to make shaping the truffles a true breeze, so don’t skip this crucial step!
Step 4: Shape Into Balls
Once chilled, scoop out small portions of the mixture and roll them gently between your palms to form smooth, uniform balls. This is where you start seeing those perfect little truffles taking shape — so satisfying!
Step 5: Melt the White Chocolate
While you shape, melt the white chocolate chips in a microwave-safe bowl in 20-second increments, stirring in between, until smooth and creamy. The warm chocolate will be used to coat the truffles, giving them an elegant, glossy finish.
Step 6: Dip and Decorate
Dip each truffle into the melted white chocolate, making sure it’s fully covered, then transfer it to a wax paper-lined baking sheet. If you want to add that festive sparkle, sprinkle with your choice of colorful sprinkles right after dipping.
Step 7: Set and Chill
Finally, let the truffles chill in the refrigerator until the chocolate hardens completely, usually around 15 to 20 minutes. Once set, they’re ready to be enjoyed or gifted!
How to Serve Little Debbie Christmas Tree Cake Truffles Recipe

Garnishes
I love adding a little flare with extra sprinkles, crushed candy canes, or edible glitter to make the truffles visually pop. Not only do these garnishes add texture and flavor contrast, but they also elevate the truffles into show-stopping treats perfect for holiday celebrations.
Side Dishes
Serve your truffles alongside a warm cup of cocoa, a creamy eggnog, or spiced tea. The creamy sweetness of the truffles pairs beautifully with warm beverages, making every bite a cozy holiday moment.
Creative Ways to Present
Try arranging the truffles on a festive platter lined with pine greenery or in mini cupcake liners wrapped in holiday foil. You can also place them in gift boxes or mason jars tied with ribbon for a charming edible present guaranteed to impress friends and family.
Make Ahead and Storage
Storing Leftovers
Keep any leftovers in an airtight container in the refrigerator. The truffles will stay fresh and creamy for up to one week — perfect for nibbling throughout the holiday season without losing their delightful texture.
Freezing
If you want to make these ahead even further, freeze them in single layers on a baking sheet, then transfer to a freezer-safe container. When properly stored, they’ll keep for up to 2 months and thaw quickly in the fridge before serving.
Reheating
Since truffles are best enjoyed chilled, simply let them come to room temperature for 15 minutes before indulging to soften the cream cheese center just a bit. Avoid microwaving as it can melt the chocolate shell and change the texture.
FAQs
Can I use a different cake instead of Little Debbie Christmas Tree Cakes?
While you can experiment, the specific texture and flavor of the Little Debbie Christmas Tree Cakes really shine in this recipe. Their colorful sprinkles inside add a signature festive touch that’s hard to replicate.
Is it necessary to use cream cheese?
Yes! Cream cheese gives the truffles their creamy, smooth texture and helps bind the cake crumbs together. Without it, the mixture wouldn’t hold its shape as well.
Can I use milk or dark chocolate for coating instead of white chocolate?
Absolutely! Milk or dark chocolate will work well and provide a different but delicious flavor profile. Just be sure to melt and temper the chocolate carefully for a shiny finish.
What if I don’t have sprinkles? Can I skip them?
Of course! The sprinkles are optional and mainly serve to enhance the festive look. The truffles will still taste amazing without them.
How long does it take to make these truffles?
The entire process takes about 55 minutes, including chilling time, making it a fantastic and relatively quick holiday project.
Final Thoughts
If you’re searching for a delightful holiday treat that’s both easy to make and sure to impress your loved ones, give the Little Debbie Christmas Tree Cake Truffles Recipe a try. Trust me, these truffles bring together the best of holiday flavors in a fun, bite-sized package that’s impossible to resist. I guarantee they’ll become one of your go-to festive desserts. Enjoy every joyful bite!
Print
Little Debbie Christmas Tree Cake Truffles Recipe
- Prep Time: 15 minutes
- Cook Time: 10 minutes
- Total Time: 55 minutes
- Yield: 24 servings
- Category: Dessert
- Method: No-Cook
- Cuisine: American
Description
These Little Debbie Christmas Tree Cake Truffles are a festive and delightful holiday treat combining the nostalgic flavor of Christmas tree cakes with creamy cream cheese and a sweet white chocolate coating. Easy to make and perfect for celebrations, they offer a rich, melt-in-your-mouth experience topped with colorful sprinkles for extra holiday cheer.
Ingredients
Main Ingredients
- 1 package Little Debbie Christmas Tree Cakes
- 8 oz cream cheese, softened
- 2 cups white chocolate chips
- 1 tsp vanilla extract
- 1 cup sprinkles (optional)
Instructions
- Crush the Cakes: Place the Little Debbie Christmas Tree Cakes in a large bowl and crush them into fine crumbs using your hands or a food processor, ensuring an even texture for the truffle base.
- Combine with Cream Cheese: Add the softened cream cheese and vanilla extract to the crushed cakes. Mix thoroughly until the mixture is well combined and smooth.
- Chill the Mixture: Cover the bowl with plastic wrap and chill the mixture in the refrigerator for about 30 minutes to firm up, making it easier to shape.
- Form Truffle Balls: Once chilled, scoop out small portions of the mixture and roll them into uniform balls using your hands.
- Melt the Chocolate: In a microwave-safe bowl, melt the white chocolate chips in 20-30 second intervals, stirring in between, until smooth and fully melted.
- Dip Truffles: Using a fork or dipping tool, dip each cake ball into the melted white chocolate to fully coat them. Shake off excess chocolate.
- Add Sprinkles: Place each coated truffle on a wax paper-lined baking sheet and immediately sprinkle with your choice of sprinkles for decoration.
- Set the Truffles: Refrigerate the truffles for about 15-20 minutes or until the chocolate coating is completely set and firm to the touch.
Notes
- Ensure the cream cheese is softened to room temperature for easier mixing.
- Use wax paper to prevent sticking when setting the truffles.
- You can substitute white chocolate chips with milk or dark chocolate if preferred.
- Store the truffles in an airtight container in the refrigerator and consume within 5 days for optimal freshness.
- Decorate creatively with holiday-themed sprinkles for added festivity.

