
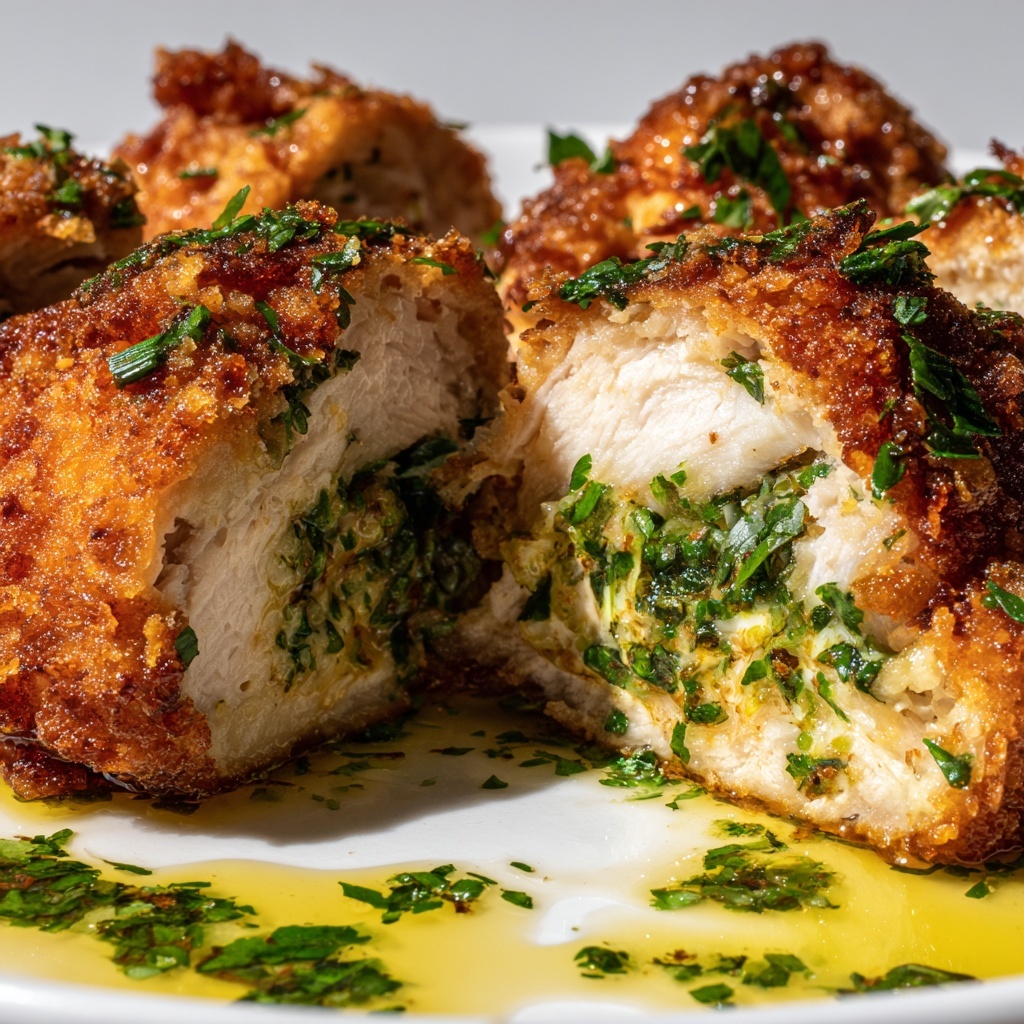
If you have ever wanted to impress family or friends with a classic comfort dish that bursts with flavor, then this Chicken Kiev with Garlic Butter Recipe is exactly what you need. Imagine tender chicken breasts wrapped around a luscious garlic parsley butter that oozes out the moment you cut into it—each bite is a perfect harmony of crispy coating and rich, savory filling. This recipe is not only a showstopper at the dinner table but also surprisingly manageable to prepare, making it a delightful project for home cooks eager to elevate their meal game with an elegant, juicy masterpiece.
Ingredients You’ll Need
Getting the ingredients right sets the foundation for a perfectly balanced Chicken Kiev with Garlic Butter Recipe. Though simple, each ingredient brings something essential to the table, whether it’s the richness of the butter, the fresh aroma of parsley and garlic, or the crunch of panko breadcrumbs that create the irresistible crust.
- Unsalted butter (90g, softened): This is the star of the garlic butter filling, providing smooth richness and a luscious melt.
- Fresh parsley (2 teaspoons, finely chopped): Adds a bright herbal note that lifts the flavor of the butter mixture beautifully.
- Garlic (2 cloves, finely minced): Infuses the butter with a sharp, aromatic punch that makes each bite unforgettable.
- Salt (¼ teaspoon): Enhances all the flavors in the garlic butter; omit if you use salted butter.
- Chicken breasts (2, skinless and boneless, about 220-250g each): The tender base for the dish, perfect for wrapping around the flavorful butter.
- Salt and black pepper (½ teaspoon salt, ¼ teaspoon pepper): Simple seasoning to bring out the natural taste of the chicken.
- Large egg (1, lightly whisked): Acts as the binding agent to make the breadcrumb coating stick perfectly.
- All-purpose flour (¼ cup): Provides a dry base to help the egg and breadcrumbs adhere evenly.
- Panko breadcrumbs (1 cup): The secret to that unbeatable crispiness and golden color.
- Canola or vegetable oil (around 1 liter): For deep frying to achieve the ideal crunchy exterior.
- Fresh parsley for garnish: Adds a fresh, leafy touch to the final presentation.
How to Make Chicken Kiev with Garlic Butter Recipe
Step 1: Prepare the Garlic Butter Filling
Start by mixing the softened butter with finely chopped parsley, minced garlic, and salt. This blend is your flavor bomb and will melt in the chicken, so take your time to mix everything until perfectly combined. Then, place the mixture onto baking paper, shaping it into a neat rectangle around 10 by 6 centimeters. Chill it until firm, and cut the butter into two equally sized batons—this step helps the butter hold its shape when stuffed inside the chicken.
Step 2: Flatten and Season the Chicken
Place each chicken breast between two sheets of parchment paper and gently pound them with a meat mallet until they reach about half a centimeter thick. This creates a uniform thickness, ensuring even cooking. Season both sides lightly with salt and freshly ground black pepper to enhance the chicken’s natural flavor, setting the stage for the rich filling.
Step 3: Stuff and Roll the Chicken
Place one baton of the chilled garlic butter in the center of each flattened chicken breast. Fold the sides over the butter to enclose it and then roll the chicken tightly, making sure the seam is at the bottom. Wrapping each roll snugly in cling film and twisting the ends helps keep the shape intact while chilling. Freeze these logs for about 30 minutes until they’re firm but not completely frozen—this helps hold the butter inside during cooking.
Step 4: Coat the Chicken
Set up a simple breading station with three bowls: one with flour, one with the whisked egg, and one with the panko breadcrumbs. Remove the chicken logs from the cling film and press them gently but thoroughly into the flour, egg, and breadcrumbs, in that order. Make sure the breadcrumbs cling well for a beautiful, crunchy crust. Return them to the freezer for another 30 minutes to firm up the coating so it stays crisp after frying and baking.
Step 5: Fry and Bake to Perfection
Preheat your oven to 180°C (350°F). Meanwhile, heat about 1 liter of oil in a heavy pot until it reaches 190°C (375°F). Carefully dunk each breaded chicken roll into the hot oil and fry for 2 to 3 minutes on each side, or until golden brown all over. Transfer the fried chicken to a rack placed over a baking sheet to drain excess oil. Finish cooking the chicken in the preheated oven for 15 minutes until it reaches an internal temperature of 65°C (150°F), then let it rest for a couple of minutes before serving.
How to Serve Chicken Kiev with Garlic Butter Recipe

Garnishes
Freshly chopped parsley sprinkled over the dish right before serving adds a lovely pop of color and a fresh, herbal aroma. It complements the richness of the garlic butter and brightens every bite.
Side Dishes
For sides, consider simple yet flavorful options like creamy mashed potatoes to soak up the buttery sauce, roasted seasonal vegetables for balanced texture and color, or a crisp green salad with a light vinaigrette to cut through the richness.
Creative Ways to Present
Impress your guests by slicing the Chicken Kiev just before serving to reveal the flowing garlic butter inside. Serve on a warm platter with freshly sprinkled parsley and a drizzle of lemon juice for an added zing. You could even plate each portion on a bed of buttery sautéed spinach for a restaurant-worthy look.
Make Ahead and Storage
Storing Leftovers
If you happen to have any leftovers, keep them in an airtight container in the refrigerator for up to 2 days. While the crispy texture might soften a bit, the flavor will remain delicious—perfect for a tasty next-day lunch.
Freezing
This Chicken Kiev with Garlic Butter Recipe also freezes beautifully. Freeze the prepared and breaded chicken rolls before frying by wrapping them tightly and placing them in a freezer-safe bag for up to 1 month. When ready to cook, skip the chilling steps and cook straight from frozen, just add a few extra minutes to the baking time.
Reheating
To reheat, bake in a preheated oven at 180°C (350°F) until warmed through and crisp again, usually about 10-12 minutes. Avoid microwaving, as it can make the coating soggy and the garlic butter lose its delightful texture.
FAQs
Can I use salted butter for the garlic butter filling?
Yes, you can use salted butter, but omit the additional salt in the garlic butter mixture to prevent the dish from becoming too salty.
How can I tell when the Chicken Kiev is cooked through?
The best way is to use a meat thermometer and cook until the internal temperature reaches 65°C (150°F). The chicken should be juicy and opaque, and the butter inside fully melted.
What is the secret to keeping the garlic butter from leaking during cooking?
Freezing the chicken rolls after stuffing and after breading helps the butter hold its shape, preventing it from oozing out when frying and baking.
Can I bake the Chicken Kiev without frying first?
While frying creates the irresistible golden crust, you can bake the breaded chicken rolls directly; however, the breading won’t be as crisp without the initial fry.
Are there any good alternatives to panko breadcrumbs?
If you don’t have panko, regular breadcrumbs can be used, but the texture will be less crunchy. For extra crispiness, mixing some crushed cornflakes into the breadcrumbs can be a tasty substitute.
Final Thoughts
I truly hope this Chicken Kiev with Garlic Butter Recipe inspires you to try something special in your kitchen. It’s one of those dishes that feels both indulgent and comforting, perfect for treating yourself or loved ones. Once you nail the technique, you’ll be amazed at how the simple ingredients come together to create such a spectacular meal. So go ahead, roll up your sleeves, and get ready to delight in every buttery, garlicky, crispy bite!
Print
Chicken Kiev with Garlic Butter Recipe
- Prep Time: 20 minutes
- Cook Time: 25 minutes
- Total Time: 1 hour 5 minutes
- Yield: 2 servings
- Category: Main Course
- Method: Frying
- Cuisine: European
Description
Chicken Kiev is a classic dish featuring tender, pounded chicken breasts stuffed with a flavorful garlic butter filling, then breaded and cooked to a golden crisp. This recipe includes a two-step cooking process: frying to create a crispy exterior, followed by baking to ensure the chicken is perfectly cooked inside, allowing the garlic butter to melt and infuse the meat with rich flavor.
Ingredients
For the Garlic Butter Filling:
- 90g unsalted butter, softened
- 2 teaspoons finely chopped fresh parsley
- 2 cloves garlic, finely minced (approximately 2 teaspoons)
- ¼ teaspoon salt (omit if using salted butter)
For the Chicken:
- 2 chicken breasts (220-250g each), skinless and boneless
- ½ teaspoon salt
- ¼ teaspoon freshly ground black pepper
- 1 large egg, lightly whisked
- ¼ cup all-purpose flour
- 1 cup panko breadcrumbs
- Canola or vegetable oil for frying (approximately 1 liter)
For Serving:
- Finely chopped parsley for garnish
Instructions
- Prepare the Garlic Butter Filling: In a bowl, combine softened butter, chopped parsley, minced garlic, and salt. Mix until thoroughly combined.
- Shape and Chill the Butter: Place the butter mixture onto a sheet of baking paper, shaping it into a rectangle approximately 10×6 cm. Refrigerate until firm, then cut the butter into two equal batons lengthwise.
- Prepare the Chicken: Lay the chicken breasts smooth side down between two sheets of parchment paper. Using a meat mallet, gently pound each breast to an even thickness of about 0.5 cm. Season both sides with salt and pepper.
- Stuff and Roll the Chicken: Place one butter baton in the center of each flattened chicken breast. Fold the sides of the chicken over the butter, then roll it up tightly, ensuring the seam is on the underside. Wrap each roll tightly in cling film, twisting the ends to form a firm log shape.
- Freeze the Rolls: Freeze for 30 minutes until firm but not fully frozen.
- Bread the Chicken: Set up three bowls: one with flour, one with the whisked egg, and one with panko breadcrumbs. Remove the chicken rolls from the cling film. Coat each roll first in flour, shaking off excess, then dip in egg, letting excess drip off, and finally roll in breadcrumbs, pressing gently to adhere.
- Freeze Again: Return the breaded chicken to the freezer for another 30 minutes to firm up.
- Fry the Chicken: Preheat oil in a heavy-based pot to 190°C (375°F). Carefully lower the chicken into the hot oil and cook until golden brown, approximately 2-3 minutes per side.
- Bake the Chicken: Preheat the oven to 180°C (350°F). Transfer the fried chicken to a rack set over a baking sheet. Bake for 15 minutes or until the internal temperature reaches 65°C (150°F).
- Rest and Serve: Allow the chicken to rest for 2 minutes before serving. Garnish with finely chopped parsley and serve hot.
Notes
- Ensure the butter filling is firm before stuffing the chicken to prevent leakage during cooking.
- Use a meat thermometer to verify the internal temperature for safe and perfectly cooked chicken.
- Freezing between steps helps maintain the shape and crispiness of the chicken rolls.
- Handle the chicken rolls gently to avoid ripping the coating before frying.
- Canola or vegetable oil is preferred for frying due to their high smoke points.


