
“`html
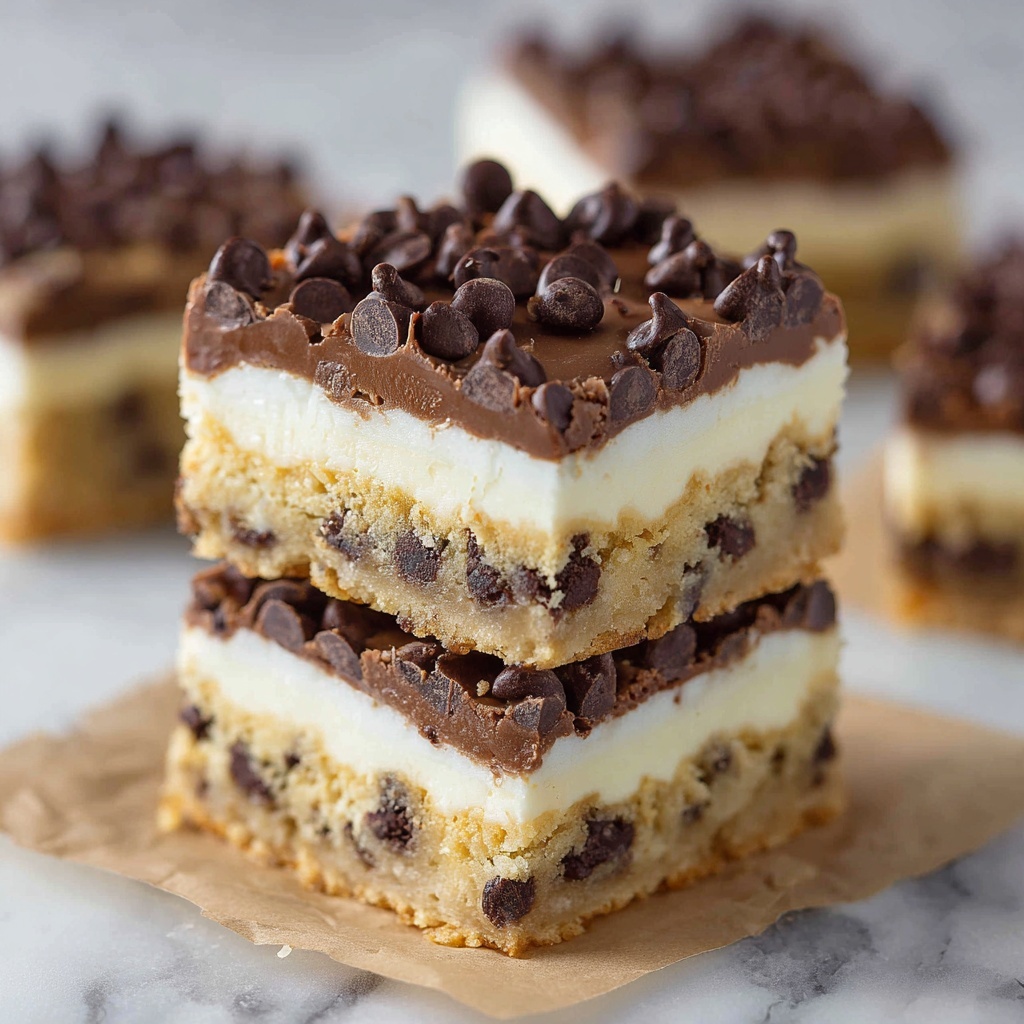
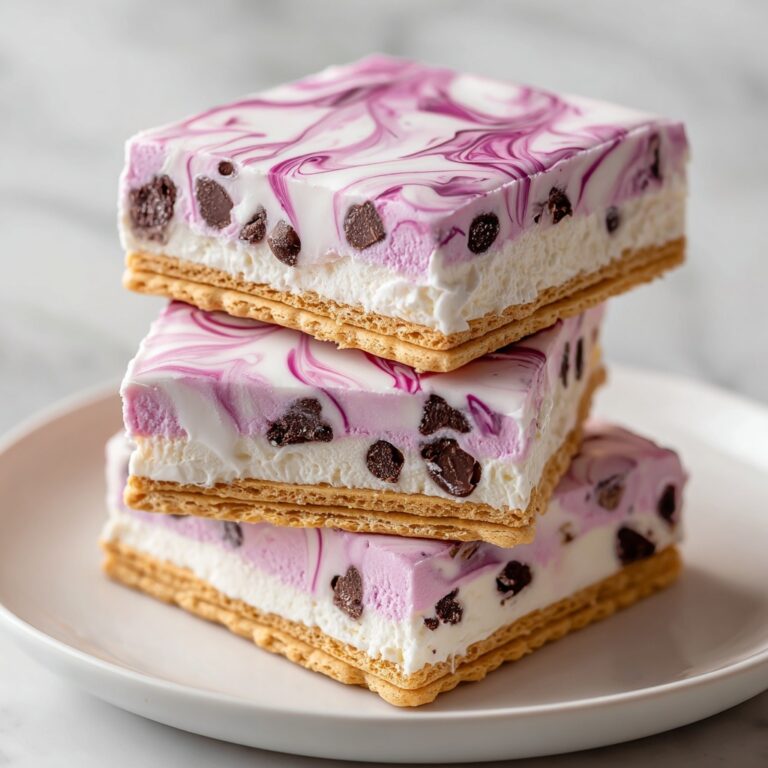
If you have a sweet tooth and love the idea of combining two of the most irresistible treats — cookie dough and cheesecake — then you are in for a real delight with this No-Bake Cookie Dough Cheesecake Bars Recipe. This decadent dessert layers rich, chewy edible cookie dough beneath a luscious, creamy cheesecake topping dotted with chocolate chips, creating a harmonious blend of textures and flavors that will amaze your taste buds. The best part? No oven is needed, making it perfect for warm days or when you want a show-stopping dessert without the fuss of baking. Trust me, once you try these cheesecake bars, they might just become your new favorite go-to recipe for special occasions or whenever a sweet craving hits.
Ingredients You’ll Need
The magic behind this No-Bake Cookie Dough Cheesecake Bars Recipe lies in its simple, pantry-friendly ingredients. Each component plays a crucial role, from lending that classic cookie dough chewiness to providing the smooth, creamy cheesecake texture that melts in your mouth. Whether you’re a seasoned baker or just starting, these ingredients come together with ease to create a homemade dessert that looks and tastes like a dream.
- Unsalted butter (1 cup total): Softened butter is key for creamy cookie dough and smooth cheesecake layers.
- Brown sugar (1 cup total): Adds a subtle caramel undertone and moistness to the cookie dough.
- Granulated sugar (3/4 cup total): Sweetens both the cookie dough and cheesecake, balancing flavors perfectly.
- Milk (2 tablespoons): Helps bind the cookie dough for that soft, melt-in-your-mouth texture.
- Vanilla extract (2 teaspoons total): Infuses both layers with warm, comforting flavor.
- All-purpose flour (1 cup): Essential for that authentic cookie dough feel without risking raw eggs.
- Salt (1/4 teaspoon): Enhances sweetness and balances the richness of the dessert.
- Mini chocolate chips (1 cup total): Adds bursts of chocolatey goodness throughout both layers.
- Cream cheese (16 ounces): The star of the cheesecake layer, providing that signature tangy creaminess.
- Whipped cream or whipped topping (1 cup): Lightens the cheesecake layer for a fluffy, airy finish.
How to Make No-Bake Cookie Dough Cheesecake Bars Recipe
Step 1: Prepare the Cookie Dough Layer
Begin by creaming together the softened butter, brown sugar, granulated sugar, milk, and vanilla extract until silky smooth and beautifully combined. This creates the perfect base for your edible cookie dough. Gradually add the all-purpose flour and salt, mixing gently to reach a smooth, pliable dough that isn’t too sticky. Fold in half of the mini chocolate chips for pockets of chocolate throughout. Carefully press this dough into your prepared baking dish, forming an even layer that will become the sturdy base of your cheesecake bars.
Step 2: Make the Cheesecake Layer
Next, it’s time to whip up the cheesecake layer, which provides that luscious creaminess you’re craving. Beat the softened cream cheese with sugar and vanilla extract until completely smooth and fluffy. Then carefully fold in the whipped cream or topping, which adds airiness and light texture. Spread this dreamy mixture evenly over the cookie dough layer, ensuring every corner is covered. This delicate, creamy topping contrasts beautifully with the chewy base, making every bite rich and satisfying.
Step 3: Add the Final Touch and Chill
To finish, sprinkle the remaining mini chocolate chips generously on top of the cheesecake layer for that extra burst of chocolate in every bite. Place the entire dish in the refrigerator and let it chill for at least four hours, or until firm. This chilling step allows the cheesecake to set beautifully and the layers to meld together, giving you those perfect slices that hold their shape and look professionally crafted.
How to Serve No-Bake Cookie Dough Cheesecake Bars Recipe

Garnishes
For an extra touch of flair and flavor, try garnishing your No-Bake Cookie Dough Cheesecake Bars with a drizzle of chocolate syrup or a dusting of cocoa powder. Fresh mint leaves or a sprinkle of crushed nuts can also provide a delightful contrast in texture and color, making each serving even more irresistible.
Side Dishes
These bars are rich and decadent on their own, but pairing them with a scoop of vanilla ice cream or a dollop of freshly whipped cream really elevates the dessert experience. If you want to balance the sweetness, a bowl of fresh berries on the side offers a bright, tangy contrast that complements the creamy cheesecake and sweet cookie dough.
Creative Ways to Present
For a fun twist, cut the bars into bite-sized squares and serve them on a platter as finger food at your next party—guests will love it! Alternatively, layer crumbled bars into parfait glasses alternating with whipped cream and chocolate chips for an elegant presentation that’s both easy and stunning. You can also try topping individual bars with freshly shaved chocolate or edible gold dust for a truly special occasion.
Make Ahead and Storage
Storing Leftovers
Any leftover No-Bake Cookie Dough Cheesecake Bars should be stored in an airtight container in the refrigerator to keep them fresh and prevent the cookie dough from drying out. Properly stored, they will stay delicious for up to 4 days, perfect for enjoying little slices of joy throughout the week.
Freezing
If you want to make these bars ahead of time or save some for later, freezing is a great option. Wrap individual servings tightly in plastic wrap and place in a freezer-safe container. They freeze well for up to one month and thaw beautifully in the refrigerator overnight, maintaining their texture and flavor with minimal effort.
Reheating
Since this is a no-bake dessert, reheating is not necessary nor recommended as it can affect texture and taste. Instead, enjoy these bars chilled straight from the fridge or after slightly softening them at room temperature for 10 to 15 minutes to enhance their creamy softness.
FAQs
Can I use regular chocolate chips instead of mini?
Absolutely! Regular chocolate chips work just fine, but mini ones distribute more evenly throughout the bars, giving you consistent bites of chocolate. If you only have regular chips, consider chopping them smaller for a similar effect.
Is the cookie dough safe to eat since it isn’t baked?
This recipe uses heat-treated flour and no eggs, making the cookie dough safe to enjoy raw. However, if you want added safety, you can toast the flour gently before mixing to eliminate any potential bacteria.
Can I substitute whipped cream with something else?
Yes, you can substitute whipped topping or even use stabilized whipped cream. For a lighter version, some use Greek yogurt, but that will change the texture and flavor slightly. Stick to whipped cream or topping for best results.
How thick should I make the layers?
A good guideline is to have about 1/2 to 3/4 inch of cookie dough layer and about 1 inch of cheesecake topping. This balance ensures every bite has the perfect ratio of creamy cheesecake to chewy cookie dough.
Can I make this recipe gluten-free?
Definitely! Just swap the all-purpose flour with a gluten-free alternative that’s suitable for no-bake treats. Make sure the flour is heat-treated to keep the cookie dough safe to eat.
Final Thoughts
There is something truly special about combining cookie dough and cheesecake, and this No-Bake Cookie Dough Cheesecake Bars Recipe nails it every single time. It’s easy to make, doesn’t require an oven, and delivers a dessert that tastes like it came from a fancy bakery. If you’re looking to wow your friends and family or just treat yourself to something exceptional, don’t hesitate to try these bars. Once you do, I’m sure you’ll find yourself making them again and again!
“`
Print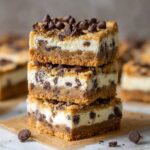
No-Bake Cookie Dough Cheesecake Bars Recipe
- Prep Time: 20 minutes
- Cook Time: 0 minutes
- Total Time: 4 hours 20 minutes
- Yield: 16 servings
- Category: Dessert
- Method: No-Cook
- Cuisine: American
Description
Delicious and easy No-Bake Cookie Dough Cheesecake Bars featuring a buttery cookie dough base layered with creamy cheesecake and topped with mini chocolate chips. Perfect for a sweet treat without using the oven, these bars are chilled until firm and sliced into 16 servings.
Ingredients
Cookie Dough Layer
- 1/2 cup unsalted butter, softened
- 1/2 cup brown sugar
- 1/4 cup granulated sugar
- 2 tablespoons milk
- 1 teaspoon vanilla extract
- 1 cup all-purpose flour
- 1/4 teaspoon salt
- 1/2 cup mini chocolate chips
Cheesecake Layer
- 16 ounces cream cheese, softened
- 1/2 cup granulated sugar
- 1 teaspoon vanilla extract
- 1 cup whipped cream or whipped topping
- 1/2 cup mini chocolate chips (for topping)
Instructions
- Prepare the Cookie Dough Layer: Cream together butter, brown sugar, granulated sugar, milk, and vanilla extract until smooth and fluffy using a hand mixer or stand mixer.
- Add Dry Ingredients: Gradually add the all-purpose flour and salt to the creamed mixture, mixing until fully combined and a smooth dough forms.
- Incorporate Chocolate Chips: Fold in the mini chocolate chips gently to distribute evenly throughout the dough.
- Press Dough into Pan: Firmly press the cookie dough mixture into the bottom of a baking dish to form an even layer.
- Make the Cheesecake Layer: Beat the softened cream cheese, granulated sugar, and vanilla extract together until smooth and creamy.
- Fold in Whipped Cream: Gently fold in the whipped cream or whipped topping until fully incorporated and light in texture.
- Spread Cheesecake Mixture: Evenly spread the cheesecake mixture over the cookie dough layer in the baking dish.
- Add Topping: Sprinkle the remaining mini chocolate chips evenly over the cheesecake layer as a finishing touch.
- Chill Bars: Refrigerate the assembled bars for at least 4 hours or until firm and set for easy slicing and serving.
Notes
- Ensure the cream cheese and butter are softened to room temperature for smooth mixing.
- You can substitute mini chocolate chips with your preferred type of chocolate or nuts for variation.
- Use full-fat cream cheese and whipped topping for best creamy texture.
- Store bars covered in the refrigerator for up to 3 days for optimal freshness.
- If desired, chill longer than 4 hours for even firmer bars.

