
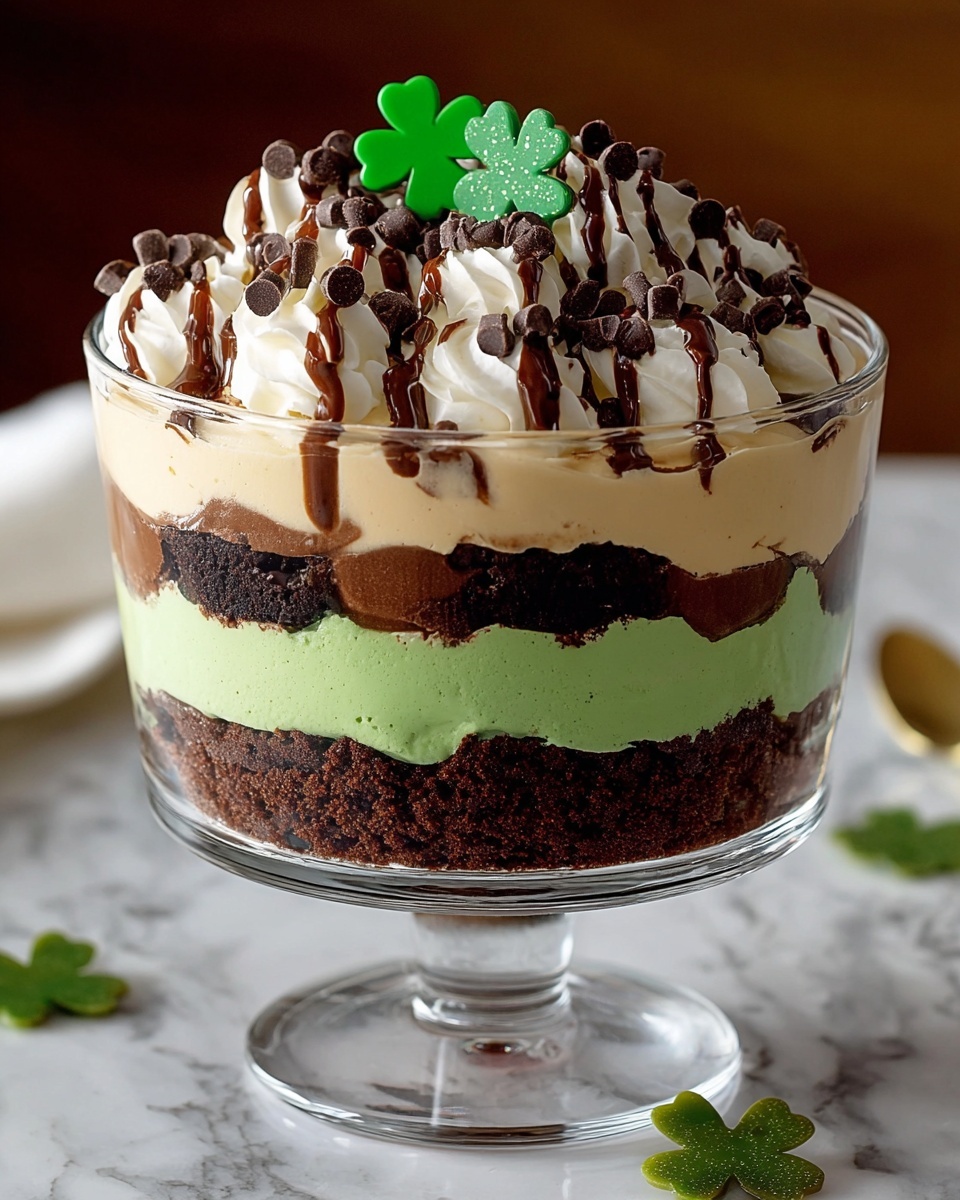
If you are searching for a dessert that bursts with festive cheer and tantalizing flavors, this St. Patrick’s Day Brownie Trifle Recipe is exactly what you need. It’s the kind of treat that combines the richness of fudgy brownies, the creaminess of chocolate pudding, and the fluffy sweetness of whipped topping into a heavenly layered dessert. The playful touch of green sprinkles and chocolate chips adds color and texture, making it a delightful centerpiece for your holiday table. Whether you are celebrating with family or just want to indulge, this recipe is a guaranteed crowd-pleaser that’s as fun to make as it is to eat.
Ingredients You’ll Need
The ingredients for this St. Patrick’s Day Brownie Trifle Recipe are wonderfully simple yet essential to build the luscious layers and perfect combination of textures and flavors. Each element brings its own magic to the trifle — from dense, chocolatey brownies to smooth pudding and light whipped topping with festive sprinkles.
- Brownie mix (or homemade): Choose your favorite brownie mix or make your own for a personal touch with rich chocolate flavor.
- Whole milk: This adds creaminess and helps the pudding set perfectly for smooth layers.
- Instant chocolate pudding mix: Quick and convenient, it’s the decadent filling that contrasts beautifully with brownies.
- Whipped topping: Light and airy, it balances the dessert and adds softness to each bite.
- Green sprinkles: Festive and fun, they bring the perfect pop of color for that St. Patrick’s Day look.
- Semi-sweet chocolate chips: Add a bit of texture and extra chocolate flavor to the top.
- Optional: Mint extract: A few drops give a subtle minty freshness that complements the chocolate layers beautifully.
How to Make St. Patrick’s Day Brownie Trifle Recipe
Step 1: Bake the Brownies
Start by preheating your oven to 350°F (175°C) and greasing an 8×8 inch baking pan. Prepare the brownie mix according to the package instructions or your homemade recipe, then bake for about 20 to 25 minutes. You know the brownies are ready when a toothpick inserted in the center comes out clean. Once baked, let them cool completely — this is key to maintaining the structure of your trifle’s layers.
Step 2: Prepare the Chocolate Pudding
While the brownies cool down, whisk together whole milk and the instant chocolate pudding mix in a bowl for about two minutes. This step ensures the pudding thickens nicely and will provide that creamy layer that contrasts so well with the denser brownies.
Step 3: Layer the Trifle
Cut the cooled brownies into neat squares. In a clear trifle bowl or glass serving dish, begin layering: place half the brownie squares at the bottom, spread half the chocolate pudding over them, and then dollop and smooth half the whipped topping on the pudding layer. This layering not only looks stunning through the glass but builds a delicious texture combination.
Step 4: Repeat and Finish with Toppings
Repeat the layering process with the remaining brownies, pudding, and whipped topping. Finish by scattering green sprinkles and semi-sweet chocolate chips over the top to add a festive St. Patrick’s Day flair and some delightful crunch.
Step 5: Chill Before Serving
Refrigerate your trifle for at least 30 minutes before serving. This chilling time allows the flavors to meld into a harmonious and sumptuous treat that will wow everyone at your gathering.
How to Serve St. Patrick’s Day Brownie Trifle Recipe

Garnishes
Garnishing your St. Patrick’s Day Brownie Trifle Recipe can be as simple or as creative as you like. Aside from the green sprinkles and chocolate chips included in the recipe, consider adding fresh mint leaves or a light dusting of cocoa powder for an elegant touch. These accents keep the presentation vibrant and add a little extra flavor zing.
Side Dishes
This indulgent dessert pairs beautifully with lighter sides such as fresh fruit or a crisp salad to balance the richness. If you’re looking to keep the celebration purely sweet, a scoop of vanilla ice cream or a glass of Irish cream liqueur can be wonderful companions to this trifle.
Creative Ways to Present
Try serving the trifle in individual clear glasses for a lovely personal touch at parties. Layer the ingredients just as you would in the big bowl, but in smaller portions so guests can see every delicious layer. Alternatively, decorating with edible gold leaf or festive St. Patrick’s themed toppers can elevate the presentation and impress your guests even more.
Make Ahead and Storage
Storing Leftovers
If you happen to have leftovers, cover the trifle bowl tightly with plastic wrap or transfer the dessert into an airtight container. Store it in the refrigerator for up to 3 days. The flavors will continue to meld, making your treat even more delightful the next day.
Freezing
While this St. Patrick’s Day Brownie Trifle Recipe shines best fresh or chilled, you can freeze it for up to one month if necessary. To freeze, store in an airtight container and thaw overnight in the refrigerator before serving. Keep in mind that the whipped topping might lose a bit of its light texture after freezing.
Reheating
Because this is a chilled dessert, reheating is not recommended. The best way to enjoy the trifle is cold right from the refrigerator to preserve its creamy texture and fresh flavors.
FAQs
Can I make the brownies from scratch instead of using a mix?
Absolutely! Homemade brownies work wonderfully and let you customize the flavor and texture. Just ensure they are fully cooled before layering in the trifle to keep the structure intact.
What can I use instead of whipped topping?
You can whip heavy cream with a little sugar and vanilla extract to create fresh whipped cream, which adds a lovely homemade touch and a richer flavor.
Can I add mint extract to the pudding?
Yes! Adding a few drops of mint extract to the pudding layer can enhance the St. Patrick’s theme with a fresh note that pairs beautifully with chocolate. Just don’t overdo it — start with half a teaspoon and adjust to your taste.
Is it okay to prepare this dessert ahead of time?
Definitely. Preparing the trifle a few hours ahead or even the day before allows the flavors to meld perfectly. Just be sure to cover it well and refrigerate until ready to serve.
How do I make this dessert gluten-free?
To make the St. Patrick’s Day Brownie Trifle Recipe gluten-free, choose a gluten-free brownie mix or bake gluten-free brownies. Confirm that all other ingredients, such as pudding mix and toppings, are gluten-free as well.
Final Thoughts
This St. Patrick’s Day Brownie Trifle Recipe is such a joyful way to celebrate with loved ones and indulge your sweet tooth. It’s simple enough to make for any dessert lover but special enough to feel like a treat for the holidays. I encourage you to give it a try — the layers of chocolatey goodness and festive green accents are sure to become a favorite for many St. Patrick’s Day gatherings. Happy celebrating and happy indulging!
Print
St. Patrick’s Day Brownie Trifle Recipe
- Prep Time: 10 minutes
- Cook Time: 25 minutes
- Total Time: 55 minutes
- Yield: 12 servings
- Category: Dessert
- Method: Baking
- Cuisine: American
Description
Celebrate St. Patrick’s Day with this festive Brownie Trifle featuring layers of rich homemade or boxed brownies, creamy instant chocolate pudding, and fluffy whipped topping, topped with green sprinkles and semi-sweet chocolate chips for a delightful treat perfect for parties and gatherings.
Ingredients
Brownie Layer
- 1 box brownie mix or homemade brownie batter sufficient for 8×8 inch pan
Pudding Layer
- 2 cups whole milk
- 1 package instant chocolate pudding mix (about 3.9 oz)
- Optional: 1/2 teaspoon mint extract
Topping and Garnish
- 1 container (about 8 oz) whipped topping (such as Cool Whip)
- Green sprinkles, as needed for decoration
- 1/4 cup semi-sweet chocolate chips
Instructions
- Preheat and Prepare Brownies: Preheat your oven to 350°F (175°C). Grease an 8×8 inch baking pan to prevent the brownies from sticking.
- Bake Brownies: Prepare the brownie mix according to package instructions or your homemade recipe. Pour the batter into the prepared pan and bake for 20 to 25 minutes, or until a toothpick inserted in the center comes out clean. Remove from oven and allow to cool completely.
- Make Chocolate Pudding: In a mixing bowl, whisk together whole milk and instant chocolate pudding mix until the pudding thickens, about 2 minutes. Optionally, stir in 1/2 teaspoon of mint extract for a refreshing twist. Set aside.
- Cut Brownies: Once cooled, cut the brownies into squares suitable for layering.
- Assemble Trifle – First Layer: In a trifle bowl or a large glass serving dish, arrange half of the brownie squares to form the first layer. Spoon half of the prepared chocolate pudding evenly over the brownies, followed by half of the whipped topping spread on top.
- Assemble Trifle – Second Layer and Garnish: Repeat the layering process with the remaining brownie squares, chocolate pudding, and whipped topping. Finish by sprinkling green sprinkles and semi-sweet chocolate chips over the top for a festive look.
- Chill and Serve: Refrigerate the assembled trifle for at least 30 minutes to allow the flavors to meld together before serving. Enjoy your delicious St. Patrick’s Day themed dessert!
Notes
- Using homemade brownies allows customization of sweetness and texture.
- Mint extract is optional but adds a festive St. Patrick’s Day flavor.
- For best results, ensure brownies are completely cool before layering to prevent melting the pudding or whipped topping.
- Trifle can be prepared a few hours ahead and refrigerated up to 24 hours before serving.
- For a dairy-free option, substitute whole milk, pudding mix, and whipped topping with suitable dairy-free alternatives.


