
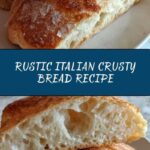
If you are craving a bread that carries the heart and soul of traditional Italian baking, this Rustic Italian Crusty Bread Recipe will quickly become your go-to favorite. Picture a loaf with a perfectly golden, crisp crust giving way to a tender, airy crumb inside—simple ingredients coming together with just a little patience to create something magical. Whether fresh from the oven for a cozy dinner or turned into the base for your next delicious sandwich, this bread offers an authentic rustic charm that feels like a warm hug on a plate.

Ingredients You’ll Need
The beauty of this Rustic Italian Crusty Bread Recipe is that it requires only a handful of simple, pantry-ready ingredients. Each one plays a crucial role: flour builds the structure, yeast brings life through fermentation, salt enhances flavor, water hydrates, and olive oil adds just a touch of richness to the crust and crumb.
- 4 cups all-purpose flour: The foundation of your loaf, providing structure and chewiness.
- 1 ½ tsp active dry yeast: The natural leavening agent that creates airy bubbles and a light texture.
- 1 ½ cups warm water (110°F / 43°C): Activates the yeast and hydrates the flour for dough development.
- 2 tsp sea salt: Raises flavor complexity and tightens gluten for a better crumb.
- 2 tbsp extra virgin olive oil: Just enough to nourish dough for tenderness and add a subtle fruity aroma.
How to Make Rustic Italian Crusty Bread Recipe
Step 1: Activate the Yeast
Start by combining the warm water and active dry yeast in a large mixing bowl. Allow this mixture to sit for about 5 minutes until it becomes frothy and bubbly, signaling that your yeast is alive and ready to work its magic in your dough. This activation step is essential for achieving that lovely rise and texture.
Step 2: Form the Base Dough
Next, stir the flour and salt into the yeast mixture until a shaggy dough begins to form. This step might feel a bit rough around the edges, but that’s perfectly normal. This initial mix sets up the gluten structure that will develop with kneading.
Step 3: Knead for Perfection
Transfer the dough to a lightly floured surface and knead it for about 10 minutes until it becomes smooth and elastic. This kneading process is your chance to feel the dough transform—it should pass the “windowpane” test, signaling that it’s ready to rise beautifully with a chewy crumb.
Step 4: First Rise
Place the kneaded dough into an oiled bowl, turning once to coat the surface lightly with oil, then cover with a damp cloth. Set it somewhere warm to rise until doubled in size, roughly one hour. This patient rise allows the yeast to develop flavor and texture in your Rustic Italian Crusty Bread Recipe.
Step 5: Shape the Loaf
Once puffed up, gently punch down your dough to release any large air bubbles. Shape it into a round, rustic loaf. This shaping preserves the bread’s character and ensures even baking.
Step 6: Let the Dough Rest
Preheat your oven to 450°F (230°C), then allow your shaped loaf to rest under a cloth for 30 minutes. This final proof helps the dough relax and finish rising just before baking, which is key for that signature crust and crumb texture.
Step 7: Score and Bake
Carefully make shallow slashes on the top of your loaf with a sharp knife. These slashes are not just for decoration; they allow steam to escape and the bread to expand properly while baking.
Step 8: Bake to Golden Perfection
Bake your loaf on a preheated stone or baking sheet for 30 to 35 minutes, until the crust has turned beautifully golden brown and sounds hollow when tapped underneath. Allow the bread to cool completely before slicing—this step is crucial to avoid gummy texture and to fully develop flavor in your Rustic Italian Crusty Bread Recipe.
How to Serve Rustic Italian Crusty Bread Recipe

Garnishes
This rustic bread truly shines on its own, but when you want to add a little extra pizzazz, try brushing the crust lightly with good quality olive oil or rubbing a fresh garlic clove over the top after baking. A sprinkle of flaky sea salt or a dusting of Parmesan can elevate the experience even further.
Side Dishes
Rustic Italian Crusty Bread pairs beautifully with simple sides like fragrant olive oil for dipping, a bowl of hearty soup, or a fresh tomato and basil bruschetta topping. It’s also the perfect accompaniment to charcuterie and cheeses for an easy, crowd-pleasing appetizer.
Creative Ways to Present
Slice thickly and toast the bread for an irresistible crunch, or hollow out the center to turn it into a rustic bread bowl for creamy dips or soups. You can even transform leftovers into delicious croutons, giving your Rustic Italian Crusty Bread Recipe a second life woven into salads and pastas.
Make Ahead and Storage
Storing Leftovers
Store your leftover Rustic Italian Crusty Bread Recipe wrapped loosely in a clean kitchen towel or paper bag at room temperature for up to two days. Avoid airtight containers that trap moisture and soften the crust.
Freezing
If you want to preserve your bread longer, slice it and freeze it in a resealable freezer bag. Removing excess air helps maintain the bread’s quality so you can enjoy it fresh whenever you want with minimal effort.
Reheating
To revive frozen or day-old bread, pop slices in a toaster or warm the whole loaf in a 350°F oven for about 10 minutes. This method refreshes the crust’s crunch while warming the crumb, bringing your Rustic Italian Crusty Bread Recipe back to life.
FAQs
What makes this bread “rustic”?
The term “rustic” refers to the simple ingredients, natural fermentation, and free-form shaping that embody traditional, artisanal Italian bread-making. It’s less about precise shapes and more about authentic flavor and texture.
Can I use whole wheat flour instead of all-purpose?
Whole wheat flour can be substituted, but keep in mind it will produce a denser loaf with a nuttier flavor. You may want to blend half whole wheat with half all-purpose to maintain some lightness.
Why is it important to let the bread cool before slicing?
Cooling allows the starches in the bread to set, preventing the crumb from becoming gummy or doughy and enhancing both texture and flavor.
Can I make this bread without olive oil?
Olive oil enriches the dough and contributes to the crust’s tenderness, but it can be omitted in a pinch. The bread will still be delicious, just a bit less rich.
What is the best way to score the bread?
Use a sharp knife or a lame to make quick, confident slashes about ¼ inch deep. The cuts guide expansion during baking and create that classic rustic look.
Final Thoughts
Baking this Rustic Italian Crusty Bread Recipe is like inviting a little piece of Italy right into your kitchen. It’s approachable, satisfying, and endlessly rewarding—a perfect canvas for countless meals. So roll up your sleeves, gather those simple ingredients, and enjoy the joyful process of making fresh, crusty bread that will surely become a cherished classic in your home.
Print
Rustic Italian Crusty Bread Recipe
- Prep Time: 15 minutes
- Cook Time: 30-35 minutes
- Total Time: 1 hour 50 minutes
- Yield: 12 servings
- Category: Bread
- Method: Baking
- Cuisine: Italian
- Diet: Vegetarian
Description
This Rustic Italian Crusty Bread recipe yields a beautifully golden, crusty loaf with a tender and chewy crumb. Using simple ingredients and traditional techniques, this bread is perfect for sandwiches, dipping, or enjoying on its own with olive oil and herbs.
Ingredients
Ingredients
- 4 cups all-purpose flour
- 1 ½ tsp active dry yeast
- 1 ½ cups warm water (110°F / 43°C)
- 2 tsp sea salt
- 2 tbsp extra virgin olive oil
Instructions
- Activate Yeast: In a large mixing bowl, combine warm water and active dry yeast. Let sit until the mixture becomes frothy, approximately 5 minutes, indicating the yeast is active and ready.
- Form Dough: Stir in all-purpose flour and sea salt until a shaggy dough forms. This initial mixing brings all ingredients together before kneading.
- Knead Dough: Transfer dough onto a floured surface and knead for about 10 minutes until it becomes smooth and elastic. Kneading develops the gluten structure essential for bread texture.
- First Rise: Place the dough in a lightly oiled bowl, cover it with a damp cloth, and let it rise in a warm place until it doubles in size, about 1 hour. This fermentation develops flavor and volume.
- Shape Loaf: Gently punch down the risen dough to release gases and shape it into a round loaf, preparing it for the final rise and baking.
- Second Rise: Preheat your oven to 450°F (230°C). Allow the shaped loaf to rest for another 30 minutes under a cloth to relax the dough and rise slightly.
- Score Loaf: Make slashes on top of the loaf with a sharp knife. This allows controlled expansion and creates the characteristic rustic appearance.
- Bake Bread: Bake the loaf on a preheated baking stone or sheet for 30-35 minutes until the crust is golden brown and the bottom sounds hollow when tapped. Cool completely before slicing to ensure the crumb sets properly.
Notes
- Use a baking stone if possible to help achieve a crispy crust by distributing heat evenly.
- Ensure water is warm but not too hot to avoid killing the yeast.
- Covering the dough during rising helps to keep it moist and prevents a skin from forming.
- Slicing the loaf only after it cools prevents the bread from becoming gummy inside.

