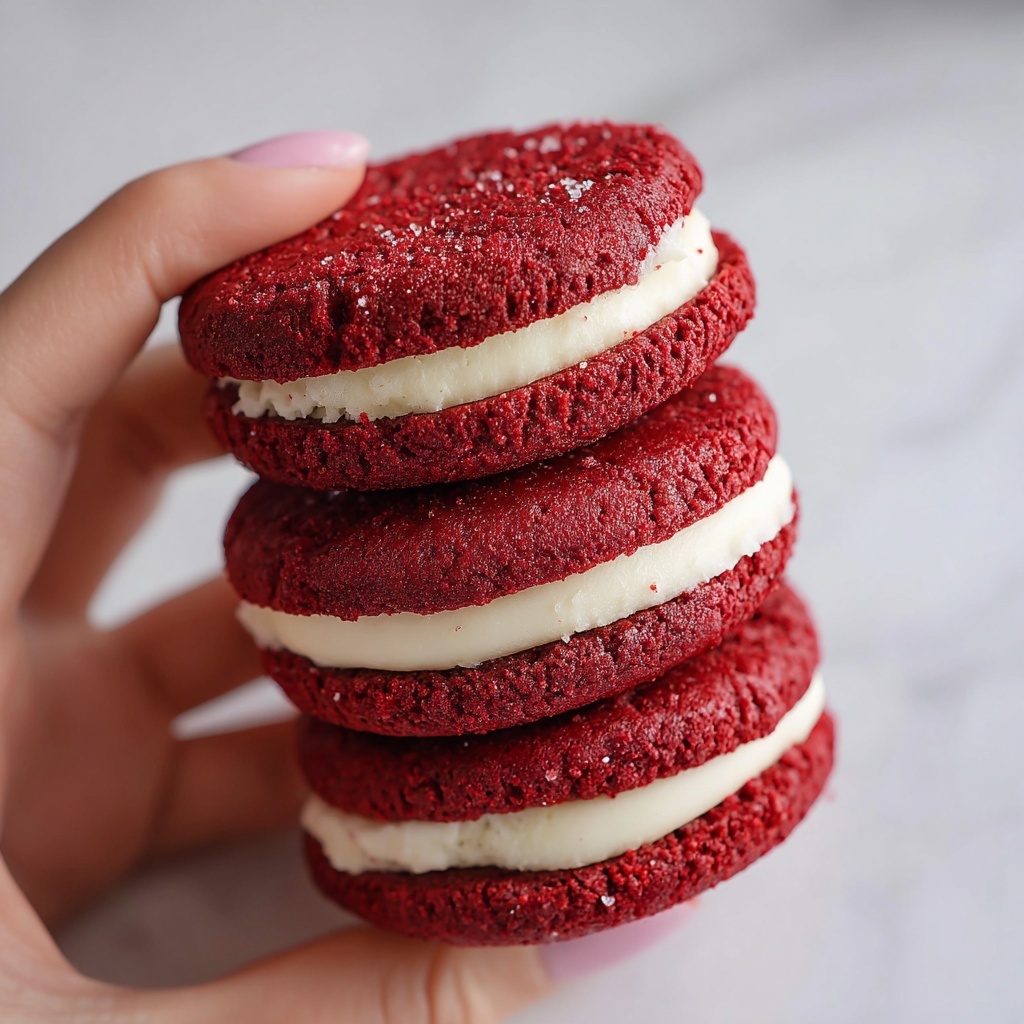
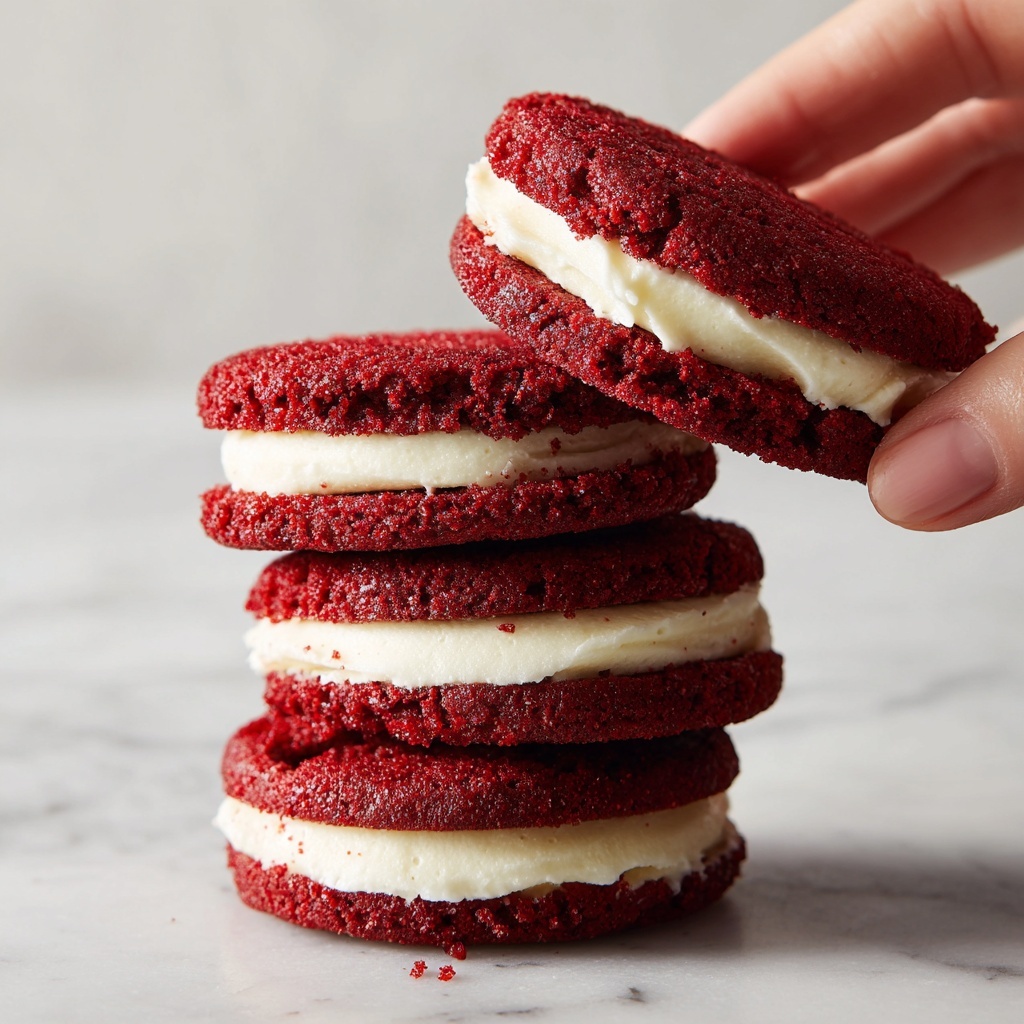
If you’ve ever dreamed of a dessert that’s as charming as it is delicious, then the Red Velvet Whoopie Pies with Cream Cheese Filling Recipe is exactly what you need to try next. These little cake sandwiches boast that classic, vibrant red velvet flavor paired perfectly with a silky, tangy cream cheese filling. Each bite is a beautiful balance of soft, moist cake and smooth frosting, making these whoopie pies an irresistible treat that your friends and family will rave about. Whether you’re baking for a special occasion or just to sweeten your day, this recipe will quickly become a beloved staple in your kitchen.
Ingredients You’ll Need
Getting started with this recipe is a joy because the ingredients are both simple and purposeful. Each one plays a key role in delivering the perfect texture, vibrant color, and rich flavor of these delightful whoopie pies.
- 2 cups all-purpose flour: The foundation that gives structure to the soft cakes.
- ¼ cup unsweetened natural cocoa powder: Adds a subtle chocolate depth to the red velvet flavor.
- 1 teaspoon baking soda: Helps the cakes rise and become fluffy.
- ½ teaspoon salt: Balances sweetness and enhances the flavors.
- ½ cup (1 stick) unsalted butter, room temperature: Brings richness and tenderness to the cakes.
- 1 cup light brown sugar: Adds a caramel-like sweetness and moisture.
- 1 large egg, room temperature: Binds ingredients for a smooth, cohesive batter.
- 1 teaspoon vanilla extract: Adds warmth and enhances the overall taste.
- ¾ cup buttermilk, room temperature: Ensures a moist crumb and slight tanginess.
- 1 teaspoon gel red food coloring: Gives that iconic red velvet hue without affecting texture.
- 1 cup (8 oz) block-style cream cheese, room temperature: The star of the filling, creamy and tangy.
- ¼ cup unsalted butter, room temperature: Gives the filling a smooth and spreadable consistency.
- 2 cups confectioners’ sugar, sifted: Sweetens and thickens the cream cheese filling perfectly.
- ½ teaspoon vanilla extract: Adds a delicate fragrance and flavor to the filling.
- Pinch of salt: Balances the sweetness of the filling so it’s never overpowering.
How to Make Red Velvet Whoopie Pies with Cream Cheese Filling Recipe
Step 1: Prep Your Oven and Dry Ingredients
Start by preheating your oven to 350 °F and line a baking sheet with parchment paper for easy cleanup. In a medium bowl, whisk together the flour, cocoa powder, baking soda, and salt. This mix ensures even distribution of the leavening agent and cocoa for that rich red velvet flavor.
Step 2: Cream Butter and Sugar
Beat the butter and brown sugar together until the mixture is light and fluffy. This step is crucial because it creates air pockets that help the cakes rise beautifully and gives the final texture a wonderful tenderness you’ll love.
Step 3: Add Egg, Vanilla, and Red Food Coloring
Next, add your egg, vanilla extract, and the gel red food coloring to the creamed mixture. Mix until everything is fully incorporated and the batter has achieved that vibrant, signature red color that makes red velvet so eye-catching.
Step 4: Incorporate Buttermilk
Slowly stir in the buttermilk. The batter might look slightly curdled at this point — don’t worry, that’s perfectly normal. The acidity in the buttermilk tenderizes the cake and balances the sweetness.
Step 5: Combine Wet and Dry Ingredients
Add the dry ingredients to the wet mixture and gently mix just until everything comes together. Overmixing can toughen the cakes, so stop as soon as you see no more flour patches.
Step 6: Portion the Dough and Bake
Using a tablespoon or cookie scoop, drop about 1½ tablespoons of dough per whoopie cake onto the prepared baking sheet, spacing them about two inches apart. Bake for 10 to 12 minutes until the cakes are soft and slightly springy to the touch. Let them cool completely — this step ensures the cakes hold their shape when you assemble the pies.
Step 7: Make the Cream Cheese Filling
While the cakes cool, beat the cream cheese and butter together until smooth and creamy. Add the sifted confectioners’ sugar, vanilla extract, and a pinch of salt, then mix until you have a luscious, spreadable filling. This is what transforms these cakes into dreamy whoopie pies.
Step 8: Assemble the Whoopie Pies
Match up the cooled cakes in pairs by size. Pipe or spoon a generous amount of filling onto one cake of each pair, then sandwich with the other. Press gently to spread the filling evenly to the edges without squishing it out. Repeat until all your whoopie pies are assembled and ready to be devoured.
How to Serve Red Velvet Whoopie Pies with Cream Cheese Filling Recipe

Garnishes
Sprinkle a little extra confectioners’ sugar or finely grated white chocolate on top for an elegant touch. You can even add a few red velvet crumbs to each pie’s exterior for a rustic, homemade feel that guests will appreciate.
Side Dishes
These whoopie pies pair wonderfully with a glass of cold milk or a cup of warm coffee or tea. For a party, consider serving them alongside fresh berries or a light fruit salad to balance out the richness.
Creative Ways to Present
Get creative by stacking a few whoopie pies on a tiered stand for a beautiful dessert display. Wrap individual whoopie pies in parchment paper tied with a ribbon for charming, edible gifts. You could even sandwich the filling between cupcakes or brownies to mix things up at your next bake sale or family gathering.
Make Ahead and Storage
Storing Leftovers
You can store any leftover whoopie pies in an airtight container in the refrigerator for up to 4 days. Refrigeration keeps the cream cheese filling fresh and the cakes moist, so they taste just as wonderful the next day.
Freezing
These pies freeze beautifully! Place them in a single layer on a baking sheet and freeze until solid, then transfer to a zip-top freezer bag. They will keep well for up to 2 months. When you’re ready to enjoy, thaw in the fridge overnight.
Reheating
If you prefer to enjoy warm whoopie pies, simply let the thawed pies sit at room temperature for 15-20 minutes or give them a quick zap in the microwave for about 10 seconds. This helps to soften the filling and brings back that freshly baked feel.
FAQs
Can I use regular red food coloring instead of gel?
Yes, but gel food coloring is preferred because it delivers deeper color without affecting the batter’s consistency. If using liquid food coloring, add a little less to avoid making the batter too wet.
What makes red velvet cake red?
The red color traditionally comes from a reaction between cocoa powder and acidic ingredients like buttermilk or vinegar. Adding red food coloring enhances this natural hue to make it more vibrant.
Can I make the filling ahead of time?
Absolutely! You can prepare the cream cheese filling up to 2 days in advance and store it tightly covered in the refrigerator. Just give it a quick stir before assembling the whoopie pies.
Are Red Velvet Whoopie Pies gluten-free?
This recipe uses all-purpose flour, so it’s not gluten-free as is. However, you can experiment by substituting a gluten-free flour blend designed for baking, but you may need to adjust liquid amounts slightly.
How soft are the whoopie cakes supposed to be?
The cakes should be soft and tender with a slight spring when pressed gently. They are more cake-like and less dense than cookies, which makes these whoopie pies especially delightful to bite into.
Final Thoughts
There’s something truly special about the Red Velvet Whoopie Pies with Cream Cheese Filling Recipe that makes it a winner every single time. The balance of rich, velvety cake and smooth, tangy filling feels like a little celebration in your mouth. Whether you’re sharing with loved ones or indulging yourself, these whoopie pies bring smiles and satisfied sighs. Don’t wait to give this recipe a whirl — it might just become your new favorite go-to dessert!
Print
Red Velvet Whoopie Pies with Cream Cheese Filling Recipe
- Prep Time: 15 minutes
- Cook Time: 12 minutes
- Total Time: 52 minutes
- Yield: 12 servings (12 whoopie pies)
- Category: Dessert
- Method: Baking
- Cuisine: American
Description
These Red Velvet Whoopie Pies are soft, cake-like sandwiches filled with a smooth and tangy cream cheese filling. With a vibrant red cocoa-spiced cake and sweet creamy center, these treats are perfect for parties, holidays, or any special occasion craving a classic Southern-inspired dessert.
Ingredients
For the Red Velvet Whoopie Cakes
- 2 cups all-purpose flour
- ¼ cup unsweetened natural cocoa powder
- 1 teaspoon baking soda
- ½ teaspoon salt
- ½ cup (1 stick) unsalted butter, room temperature
- 1 cup light brown sugar
- 1 large egg, room temperature
- 1 teaspoon vanilla extract
- ¾ cup buttermilk, room temperature
- 1 teaspoon gel red food coloring
For the Cream Cheese Filling
- 1 cup (8 oz) block-style cream cheese, room temperature
- ¼ cup unsalted butter, room temperature
- 2 cups confectioners’ sugar, sifted
- ½ teaspoon vanilla extract
- Pinch of salt
Instructions
- Preheat and Prepare: Preheat oven to 350 °F (175 °C) and line a baking sheet with parchment paper to prevent sticking and for easy cleanup.
- Mix Dry Ingredients: In a bowl, whisk together the flour, cocoa powder, baking soda, and salt. Set this mixture aside for later use.
- Cream Butter and Sugar: Beat the unsalted butter and light brown sugar together until the mixture is light and fluffy, which will give the cakes a tender texture.
- Add Wet Ingredients: Mix in the large egg, vanilla extract, and gel red food coloring until everything is well combined, creating the base batter color and flavor.
- Incorporate Buttermilk: Stir in buttermilk slowly; the batter may look slightly curdled at this stage, which is normal and helps achieve the desired moist crumb.
- Combine Dry and Wet Ingredients: Add the dry ingredients into the wet mixture, blending just until all ingredients come together without overmixing to keep the cakes tender.
- Portion the Batter: Using about 1½ tablespoons of batter per cake, drop spoonfuls onto the prepared baking sheet, spacing them about 2 inches apart to allow for spreading.
- Bake: Bake the cakes in the preheated oven for 10 to 12 minutes, until they are soft to the touch and spring back slightly when pressed lightly.
- Cool the Cakes: Remove from the oven and let the cakes cool completely on the baking sheet or a wire rack before assembling.
- Prepare the Filling: Beat cream cheese and butter together until creamy and smooth. Gradually add sifted confectioners’ sugar, vanilla extract, and a pinch of salt, mixing until the filling is fluffy.
- Assemble Whoopie Pies: Pair the cooled cakes by size. Pipe or spread the cream cheese filling onto one cake and gently top with its mate to form a sandwich.
- Serve or Store: Enjoy immediately or store the assembled whoopie pies in an airtight container in the refrigerator for up to 3 days for best freshness.
Notes
- Room temperature ingredients ensure even mixing and better texture.
- Gel food coloring provides a vibrant red without thinning the batter.
- Don’t overmix the batter to keep the whoopie cakes soft and fluffy.
- Let the cakes cool completely before filling to prevent melting the cream cheese frosting.
- Whoopie pies are perfect for make-ahead; store refrigerated and bring to room temperature before serving.


