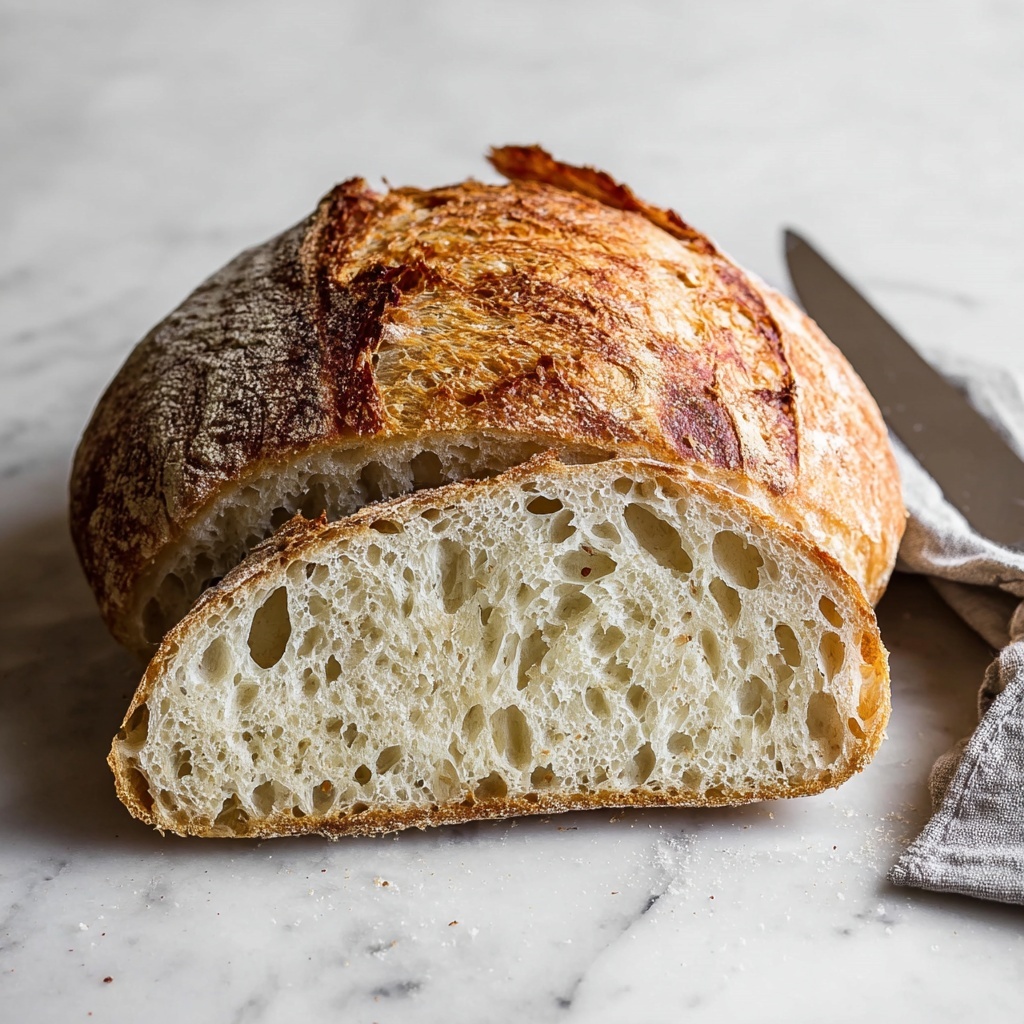
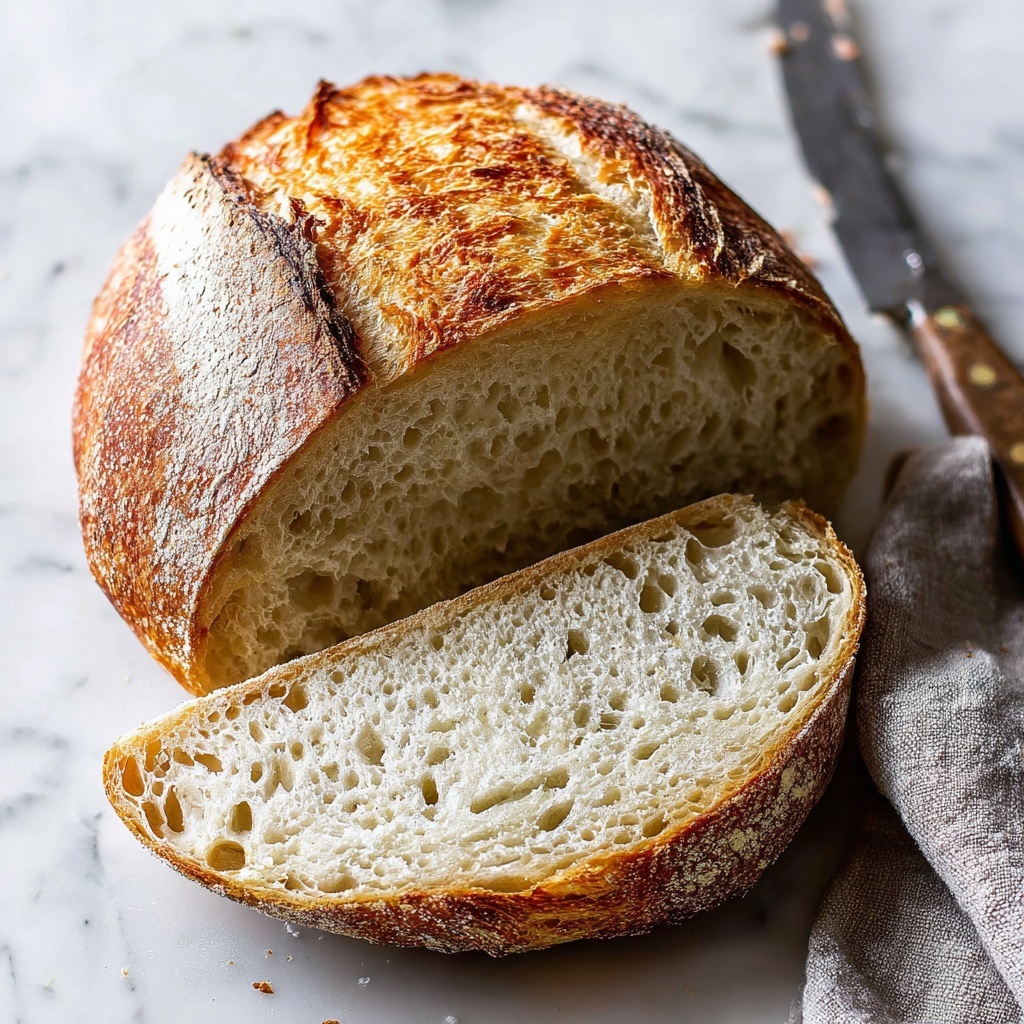
If you’ve ever dreamed of biting into a crusty, fragrant loaf of sourdough made fresh in your own kitchen, this Perfect Homemade Sourdough Bread Recipe is your new best friend. It’s not just about the bread; it’s about the magic of transforming a simple starter into a golden masterpiece that cracks with flavor and boasts a chewy, open crumb. Whether you’re a seasoned baker or a hopeful beginner, this recipe walks you through every loving step of crafting sourdough that’s impressively rustic and irresistibly delicious.
Ingredients You’ll Need
Believe it or not, this recipe relies on just a handful of simple, high-quality ingredients that come together to create incredible depth of flavor and perfect texture. Each ingredient plays a critical role—from developing the structure to building that signature tangy sourdough taste.
- Active sourdough starter: Use 50 to 100 grams of bubbly, ripe starter; this is the powerhouse that ferments and flavors the bread.
- Warm water: Around 350 to 375 grams; warm water helps to activate the yeast activity in the starter for a beautiful rise.
- Bread flour: 500 grams of bread flour (or all-purpose); high-protein flours offer a strong gluten network for the bread’s chewy texture.
- Fine sea salt: About 10 to 12 grams; salt enhances flavor and tightens the dough for a nice crust.
How to Make Perfect Homemade Sourdough Bread Recipe
Step 1: Feed Your Starter
The foundation of every great sourdough is a lively starter. Feed your starter ahead of making the dough—if refrigerated, bring it out the night before and refresh it twice before baking. You’ll know it’s ready when it doubles in size and becomes bubbly, primed to infuse your bread with that vibrant tangy flavor.
Step 2: Make The Dough
Begin by mixing your active starter with warm water and salt in a large bowl until combined. Then add the bread flour and stir everything to form a wet, sticky dough. Cover it lightly with a damp towel and allow it to rest for 30 minutes. This rest period lets the flour hydrate fully, setting the stage for good gluten development.
Step 3: Stretches and Folds
After resting, use wet hands to pull and fold the dough edges into the center, going around the bowl several times. This technique encourages gluten strength without heavy kneading. Repeat this process every 30 minutes for about two hours if you can—no worries if shorter, your bread will still be amazing!
Step 4: Rest (Bulk Fermentation)
Once your dough has been folded, cover it thoroughly and let it rise for 6 to 9 hours at room temperature, depending on how warm your kitchen is. The dough is ready when it has noticeably increased in volume, feels airy with bubbles forming beneath the surface, and jiggles slightly when shaken.
Step 5: Pre-shape
Turn your dough out onto a lightly floured surface and gently shape it into a round. You can fold the edges to the center and rotate to create tension along the dough’s surface—a crucial step for a great rise and beautiful crust.
Step 6: Bench Rest
Flip the dough ball smooth side up and let it rest for 30 minutes. This relaxes the gluten so the final shaping is easier and leads to a lighter loaf.
Step 7: Shaping
Prepare your proofing basket or bowl by flouring it generously or lining it with a floured towel. Shape the dough again by folding it round and placing it seam side up into your basket. Cover with plastic wrap or a shower cap to keep it moist for the next rise.
Step 8: Cold Fermentation (Second Rise)
Pop the dough in the refrigerator for at least 12 hours, ideally 18 to 24. This slower ferment adds complexity to the flavor and creates a lighter, airier crumb. If you’re short on time, let it rise at room temperature for 1 to 2 hours until it looks puffed up.
Step 9: Baking Your Sourdough
Preheat your oven along with a Dutch oven to 450°F. Carefully invert your dough onto parchment paper, score the top with a sharp blade in your favorite pattern, and transfer the dough and parchment into the hot Dutch oven. Bake covered for 30 minutes, then remove the lid and bake for another 20 to 30 minutes until golden brown and hollow when tapped.
How to Serve Perfect Homemade Sourdough Bread Recipe

Garnishes
While this bread shines on its own, sprinkling flaky sea salt or brushing a thin layer of melted butter on the crust just as it comes out of the oven takes it to another level. Herbs or garlic-infused olive oil brushed on warm slices add so much flavor.
Side Dishes
This bread pairs beautifully with simple, fresh accompaniments like creamy butter, tangy cheeses, or your favorite jam. It’s also incredible alongside soups, stews, or as a base for open-faced sandwiches loaded with fresh veggies and meats.
Creative Ways to Present
Turn your loaf into centers of attention on your table by slicing it into thick slabs and toasting them to make bruschetta or crostini. For special occasions, hollow out the middle and fill the loaf with a warm dip or cheese spread for a deliciously inviting presentation.
Make Ahead and Storage
Storing Leftovers
Wrap your bread in a clean linen towel or store it in a paper bag to keep the crust crisp while the inside stays soft for a day or two. Avoid plastic bags unless you prefer a softer crust.
Freezing
You can freeze fully cooled sourdough by wrapping it tightly in plastic wrap and then foil or placing it in a freezer-safe bag. Slice before freezing for easy toasting later on.
Reheating
Warm your bread in a preheated 350°F oven for 10 to 15 minutes to refresh the crust and awaken that irresistible aroma. Slices can be toasted directly for a quick fix any time.
FAQs
How do I know if my sourdough starter is ready to use?
Your starter is ready when it has doubled in size and is bubbly throughout. It should have a pleasant, tangy smell and not appear sluggish or flat. This indicates strong yeast activity.
Can I use all-purpose flour instead of bread flour?
Yes, all-purpose flour works fine, but bread flour’s higher protein content gives your bread better structure and chewiness. If using all-purpose, you might notice a softer crumb.
Why is my sourdough bread dense?
Dense bread can result from underproofing, too little fermentation time, or a starter that isn’t active enough. Make sure to allow adequate rising and use a lively starter for best results.
Do I have to do the cold fermentation step?
Cold fermentation isn’t mandatory but highly recommended. It enhances flavor complexity and improves crumb texture. If short on time, a longer room temperature rise works, but the loaf may be less airy.
How should I score the bread?
Scoring helps the bread expand and creates beautiful patterns. Use a sharp blade to make shallow cuts on the dough’s surface just before baking. Traditional patterns like a simple “X” or parallel lines work wonderfully.
Final Thoughts
There is something profoundly satisfying in baking your own loaf from a few humble ingredients and watching it transform into a stunning, aromatic sourdough masterpiece. This Perfect Homemade Sourdough Bread Recipe brings you every step of the way with simple instructions and achievable methods so you can enjoy rustic, fresh bread as often as you like. Trust me, once you try it, you will never want to buy bread again!
Print
Perfect Homemade Sourdough Bread Recipe
- Prep Time: 45 minutes
- Cook Time: 50 to 60 minutes
- Total Time: 29 hours
- Yield: 28 servings (1 large loaf)
- Category: Bread
- Method: Baking
- Cuisine: Artisan / Western
- Diet: Vegetarian
Description
This classic sourdough bread recipe guides you through making a naturally fermented, crusty loaf with a light and airy crumb. Using an active sourdough starter, bread flour, water, and sea salt, the dough undergoes a series of stretch and folds, long bulk fermentation, and cold proofing for enhanced flavor and texture. Baked in a Dutch oven for optimal crust development, this artisan bread is perfect for sandwiches, toasts, or enjoying on its own.
Ingredients
Sourdough Starter
- 50 to 100 grams ripe bubbly active starter (¼ cup to ½ cup; I use 100 grams)
Wet Ingredients
- 350 to 375 grams warm water (I use 375 grams, less in humid summer months)
Dry Ingredients
- 500 grams bread flour (or all-purpose flour – approx. 4 cups plus 2 tbsp; I prefer organic King Arthur Bread Flour)
- 10 to 12 grams fine sea salt (I use pink Himalayan sea salt)
Instructions
- Feed Your Starter: The day you plan to make the dough, feed your sourdough starter. If it has been refrigerated, take it out the night before and feed it. Feed it again the morning of or a few hours before making your dough. Your starter is ready when it has doubled in size and starts to recede.
- Make The Dough: In a large mixing bowl, combine the active sourdough starter with warm water and salt. Mix with a spoon until well blended. Add the bread flour and mix until a wet, sticky dough forms and all ingredients are incorporated. Cover with a damp kitchen towel and let rest for 30 minutes at room temperature.
- Stretches and Folds: After resting, use a wet hand to gently pull a corner of the dough near the bowl’s edge and fold it into the center. Rotate the bowl and repeat 4-5 times until the dough starts to form a ball. Let rest covered for 30 minutes. Repeat this process three more times every 30 minutes for a total of 2 hours of folding and resting, or do it twice if short on time.
- Bulk Fermentation (Rest): Cover the dough with a damp towel and a lid or plate to prevent drying. Let it rise for 6 to 7 hours at room temperature, or up to 8 to 9 hours in cooler conditions. The dough is ready when it has increased by 50% to 70% in volume, jiggles when shaken, and has visible bubbles on the surface.
- Pre-shape: Turn the dough onto a lightly floured surface. Gently fold the top down to the center while rotating to form a round shape. Use a bench scraper if available to tuck edges under and create surface tension.
- Bench Rest: Flip the dough ball so the smooth side is up. Let it rest for 30 minutes. Then, gently pull the dough toward you to tighten its surface tension, rotating and repeating until you achieve a tight ball shape.
- Shaping and Proof Basket Preparation: Dust a proofing basket generously with flour, or line a medium mixing bowl (~8 inches across) with a floured towel or sprayed and floured surface. Repeat the folding motion as in pre-shaping to form a round loaf. Place the dough smooth side down into the basket or bowl and cover with a shower cap, plastic wrap, or towel.
- Cold Fermentation (Second Rise): Refrigerate the dough overnight, or for 18 to 24 hours. For same-day baking, allow the dough to rest 1 to 2 hours at room temperature until puffy.
- Preheat Oven and Prepare Dutch Oven: Preheat your oven to 450°F (232°C). Cut a piece of parchment paper to fit your Dutch oven.
- Transfer Dough to Parchment: Gently turn the dough out onto the parchment paper. To do this easily, place the parchment on a plate and invert the basket or bowl over it, then flip both together.
- Score the Dough: Using a razor blade, lame, or sharp serrated knife, score the top of the dough in your preferred design (a simple “X” is classic). This allows the bread to expand while baking.
- Bake Covered: Carefully transfer the dough with parchment paper into the preheated Dutch oven. Cover with the lid and place in the oven’s center rack. Bake at 450°F for 30 minutes.
- Bake Uncovered: Remove the lid, reduce oven temperature to 400°F (204°C), and bake for another 20 to 30 minutes uncovered until the crust is deeply browned and the bread sounds hollow when tapped or reaches an internal temperature of 205–210°F (96–99°C).
- Cool: Remove the bread from the Dutch oven and transfer it to a wire rack. Let it cool completely for at least 1 hour before slicing to allow the crumb to set.
Notes
- The amount of water can be adjusted slightly based on the humidity and flour type; stickier dough results in airier bread.
- Multiple stretch and folds strengthen dough structure and gluten development without kneading.
- Cold fermentation overnight improves flavor depth and results in a lighter crumb.
- Use a Dutch oven to mimic a steam environment essential for crust development.
- Allowing the bread to cool completely before slicing prevents a gummy texture.


