
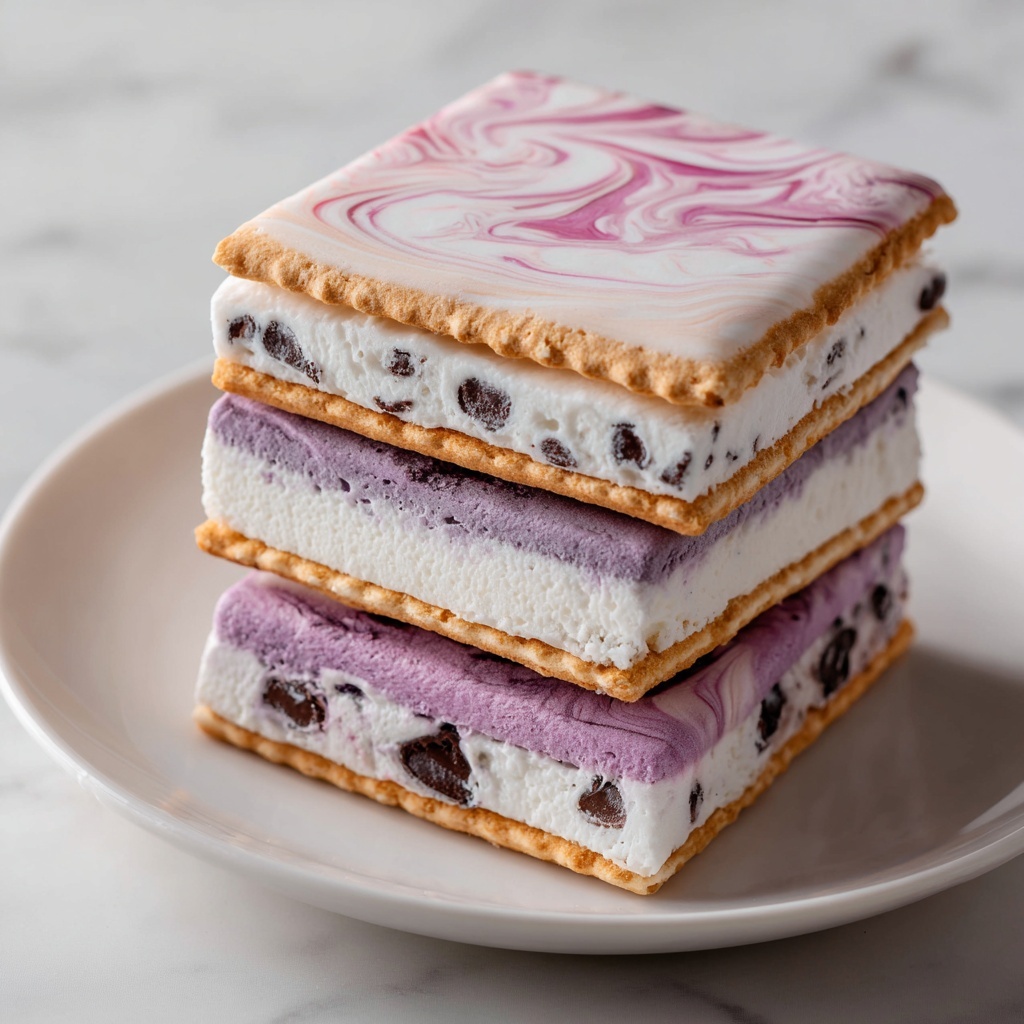
If you’re looking to brighten up your dessert game, the Glow Swirl Ice Cream Sandwiches Recipe is an absolute showstopper. Imagine soft, vividly colored cookies hugging a neon-hued swirl of ice cream that practically glows under party lights. This treat is not only a feast for your eyes but also a delightful mix of creamy, tender, and sweet flavors that will have everyone reaching for seconds. Whether you’re planning a fun summer gathering or just want to add an exciting twist to your dessert rotation, these glowing ice cream sandwiches bring joy and whimsy to every bite.
Ingredients You’ll Need
These ingredients are wonderfully simple yet essential to create the perfect balance of tender cookies and smooth, vibrant ice cream that defines the Glow Swirl Ice Cream Sandwiches Recipe. Each one plays a key role, from the buttery softness of the cookies to the playful neon colors that make this dessert pop.
- 1 1/2 cups all-purpose flour: The sturdy base that gives structure to the cookies without making them tough.
- 1 teaspoon baking soda: Ensures your cookies rise slightly and stay light.
- 1/2 teaspoon salt: Balances the sweetness and enhances flavor depth.
- 1/2 cup unsalted butter, softened: Adds richness and tenderness to the dough.
- 1 cup granulated sugar: Sweetens the cookies and helps with browning.
- 1 large egg: Binds the dough and contributes moisture.
- 1 teaspoon vanilla extract: Infuses a warm, familiar flavor.
- 1 tablespoon milk (optional): Helps soften the dough if needed for easier shaping.
- Neon food coloring (red, blue, green, or your choice): Creates those eye-popping colors in both cookies and ice cream.
- 4 cups vanilla ice cream (softened): The creamy, cool filling that’s perfect for swirling colors into.
- 1 tablespoon powdered sugar (optional): Stabilizes the ice cream for less melting during assembly and storage.
How to Make Glow Swirl Ice Cream Sandwiches Recipe
Step 1: Prepare the Cookie Dough
Start by preheating your oven to 350°F (175°C) and lining a baking sheet with parchment paper to prevent sticking. In a medium bowl, whisk together the all-purpose flour, baking soda, and salt. In a separate large bowl, cream your softened butter and sugar until the mixture is light and fluffy—this usually takes about 2 to 3 minutes. Then, beat in the egg and vanilla extract until everything is fully combined.
Step 2: Combine Ingredients and Add Color
Gradually add the dry flour mixture to your wet ingredients, mixing just until everything comes together. If the dough feels a bit stiff, stir in a tablespoon of milk for extra softness. Now comes the fun part: divide the dough into as many sections as the colors you want to use. For a classic rainbow effect, 3 or 4 portions work beautifully. Add a few drops of neon food coloring to each portion and knead the dough until the colors are vibrant and fully blended—you might want gloves for this step to avoid staining your hands!
Step 3: Shape and Bake the Cookies
Roll small balls of each neon-colored dough and place them close together on your prepared baking sheet, making sure they’re touching but not mixed together. Press these dough balls gently with your palm to slightly flatten and bond them into multi-colored mounds. Bake in the oven for 8 to 10 minutes or until the edges turn lightly golden—too long and the cookies might lose their soft, sandwich-worthy texture. Let them cool completely on a wire rack before moving on.
Step 4: Color and Prepare the Ice Cream Filling
Divide your softened vanilla ice cream into several bowls, one for each color you used in your cookies. Add neon food coloring drops to each and stir well to create bold shades perfect for swirling. For added stability (which helps the ice cream hold its shape better), fold in a tablespoon of powdered sugar. The color mixing here is where your creativity can really shine—feel free to combine shades for unique swirl effects.
Step 5: Assemble and Freeze
Take one cooled cookie and scoop a generous portion of your neon ice cream onto its flat side. Place another cookie on top, pressing gently to create a sandwich. Repeat for all your cookies. Lay the finished sandwiches on a parchment-lined baking sheet and pop them in the freezer for at least 1 to 2 hours. This chilling step firms up the ice cream, making your Glow Swirl Ice Cream Sandwiches Recipe all the more delightful and ready to dazzle!
How to Serve Glow Swirl Ice Cream Sandwiches Recipe

Garnishes
To elevate your Glow Swirl Ice Cream Sandwiches, consider sprinkling a bit of edible glitter or sanding sugar on top right before serving. This adds a sparkly finishing touch that catches the light beautifully and complements the neon colors perfectly. Fresh mint leaves or small edible flowers on the side also add an elegant contrast and a pop of fresh flavor.
Side Dishes
Pairing these ice cream sandwiches with light, fruity sides works wonderfully. Think fresh berries, a simple fruit salad, or even a tangy sorbet to balance out the rich sweetness. If you want to keep with a party vibe, colorful cocktail drinks or mocktails enhance the festive feel and make your dessert table truly pop.
Creative Ways to Present
For a real party showstopper, serve the sandwiches under UV or black light to make those neon hues glow vibrantly, turning your dessert into an interactive experience. You can also stack them on a whimsical tiered stand or wrap them in parchment and tie with bright ribbons for a grab-and-go treat at gatherings. Another fun idea is to serve each with a small wooden stick pierced through, turning them into glow-in-the-dark ice cream sandwich pops!
Make Ahead and Storage
Storing Leftovers
If you end up with more Glow Swirl Ice Cream Sandwiches than you can eat right away, wrap each sandwich tightly in plastic wrap or store them in an airtight container. This prevents freezer burn and keeps each bite as fresh and colorful as the first.
Freezing
These sandwiches freeze exceptionally well for up to a week. For best results, freeze them individually before stacking to avoid them sticking together. When you’re ready to indulge, just unwrap and enjoy straight from the freezer or let them sit out for a few minutes to soften slightly.
Reheating
Since this is an ice cream-based treat, reheating isn’t necessary. However, if your cookies feel too firm straight from the freezer, allowing the sandwiches to rest at room temperature for 5 to 10 minutes will bring out the perfect creamy texture without melting the ice cream too much.
FAQs
Can I use different flavors of ice cream in the Glow Swirl Ice Cream Sandwiches Recipe?
Absolutely! While vanilla works best to showcase the neon colors, feel free to experiment with your favorite flavors. Just be sure to soften them first before adding any food coloring for the best swirl effect.
Is there a way to make these sandwiches vegan or dairy-free?
Yes! Substitute the butter with a plant-based margarine and use dairy-free ice cream alternatives like coconut or almond milk-based ice cream. The dough and assembly steps remain the same, so you won’t miss out on the fun or flavor.
Do I need special neon food coloring for the swirling effect?
Bright gel food coloring works perfectly and is often easier to mix without changing the dough or ice cream texture. Neon or UV-reactive colors enhance the glow effect especially under black light, but any vibrant coloring will make these treats pop.
Can I make the cookie dough ahead of time?
Definitely! Making the dough a day ahead and refrigerating it wrapped tightly really helps develop flavors and can make shaping easier. Just bring the dough back to room temperature before coloring and baking.
What’s the best way to keep the ice cream from melting during assembly?
Work quickly with softened but still firm ice cream and keep your workspace cool. Chilling your baking sheet before assembling can help, and adding a bit of powdered sugar to stabilize the ice cream is a great trick to slow down melting.
Final Thoughts
The Glow Swirl Ice Cream Sandwiches Recipe is an absolute delight to make and share. It delivers an eye-catching treat that’s bursting with personality and flavor, perfect for any occasion that calls for a little extra fun. I can’t wait for you to try it and see the smiles it brings; these glowing goodies truly turn dessert time into a celebratory moment!
Print
Glow Swirl Ice Cream Sandwiches Recipe
- Prep Time: 25 minutes
- Cook Time: 10 minutes
- Total Time: 1 hour 40 minutes
- Yield: 12 servings
- Category: Dessert
- Method: Baking
- Cuisine: American
- Diet: Vegetarian
Description
Glow Swirl Ice Cream Sandwiches are vibrant, multi-colored cookie sandwiches filled with neon-tinted vanilla ice cream. Perfect for parties, these soft cookies combined with colorful, stabilized ice cream create a fun and eye-catching treat that glows under UV light. The recipe involves baking soft, swirled cookies and assembling them with tinted ice cream before freezing, resulting in playful and delicious sandwiches.
Ingredients
For the Cookies
- 1 1/2 cups all-purpose flour
- 1 teaspoon baking soda
- 1/2 teaspoon salt
- 1/2 cup unsalted butter, softened
- 1 cup granulated sugar
- 1 large egg
- 1 teaspoon vanilla extract
- 1 tablespoon milk (optional, for extra softness)
- Neon food coloring (red, blue, green, or your choice of colors)
For the Ice Cream Filling
- 4 cups vanilla ice cream (or any ice cream of your choice, softened)
- Neon food coloring (same colors as the cookies or any desired shades)
- 1 tablespoon powdered sugar (optional, for stabilization)
Instructions
- Prepare the Cookie Dough: Preheat your oven to 350°F (175°C) and line a baking sheet with parchment paper for easy cookie removal. In a medium bowl, whisk together the flour, baking soda, and salt to evenly distribute the leavening agents and salt.
- Cream Butter and Sugar: In a separate large bowl, beat the softened butter and granulated sugar together until the mixture is light, fluffy, and pale, which should take about 2-3 minutes. This step incorporates air for a tender cookie.
- Add Egg and Vanilla: Beat in the egg and vanilla extract until fully combined, ensuring a smooth cookie dough base.
- Combine Dry and Wet Ingredients: Gradually add the flour mixture to the butter mixture and mix until just incorporated to prevent overworking the dough. If the dough feels too stiff, stir in a tablespoon of milk to soften it slightly.
- Color the Dough: Divide the cookie dough into 3-4 small portions depending on how many colors you want to use. Add a few drops of neon food coloring to each portion and knead until the color is evenly distributed. Wear gloves or cover your hands to avoid staining.
- Form the Swirl Cookies: Roll small balls of each colored dough and arrange them closely on the baking sheet so colors touch but do not mix. Gently press the balls together and flatten slightly with your palm to create multi-colored mounds that will form swirled cookies.
- Bake the Cookies: Bake in the preheated oven for 8-10 minutes or until the edges just start turning golden. Take care not to overbake, as the cookies should remain soft and chewy.
- Cool Completely: Remove the cookies from the oven and transfer to a wire rack to cool completely before assembling the sandwiches.
- Prepare the Neon Ice Cream: In separate bowls, divide the softened vanilla ice cream and add a few drops of neon food coloring to each to create vibrant shades. Stir well to combine. Optionally, add 1 tablespoon powdered sugar to each bowl to stabilize the ice cream and reduce melting.
- Assemble Ice Cream Sandwiches: Once cookies are fully cooled, scoop a generous portion of your neon-colored ice cream onto the flat side of one cookie. Gently top with another cookie, pressing lightly to sandwich the ice cream evenly.
- Freeze to Set: Place the assembled ice cream sandwiches on a parchment-lined baking sheet and freeze for 1-2 hours until firm. This step is essential for the ice cream to solidify and hold shape.
- Serve and Enjoy: Serve the Glow Swirl Ice Cream Sandwiches chilled. Their neon colors will appear especially vibrant under UV light, making them ideal for glow-in-the-dark or neon-themed celebrations.
Notes
- Use gloves or utensils when coloring dough and ice cream to avoid staining your hands.
- The milk in the dough is optional and only needed if the dough is too thick or dry.
- Do not overbake the cookies as they should stay soft to complement the creamy ice cream.
- Let cookies cool completely before adding ice cream to prevent melting.
- Powdered sugar in the ice cream helps stabilize it for longer-lasting sandwiches.
- Customize colors and ice cream flavors as desired for different party themes.
- Freeze assembled sandwiches well before serving to ensure they maintain structure.

