
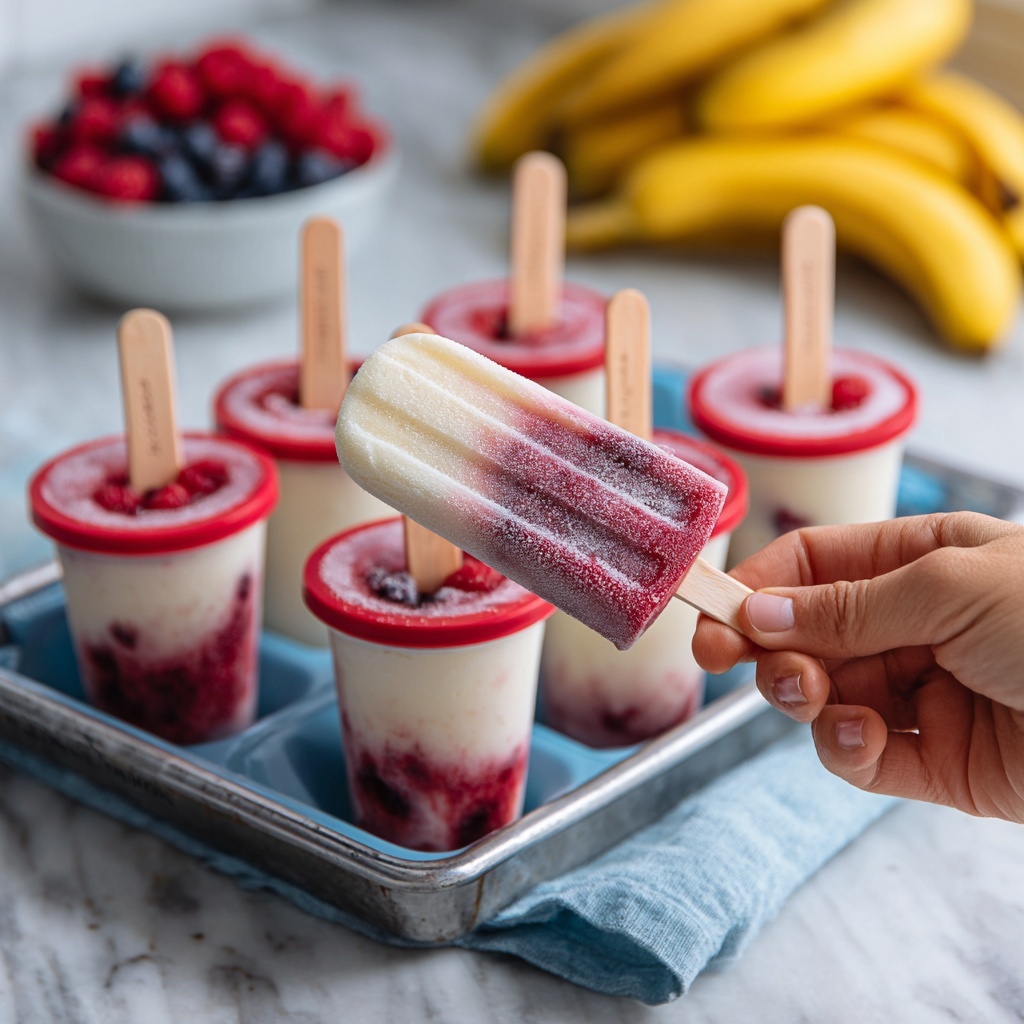
If you’re craving a cool, creamy, and fruity treat, look no further than Frozen Yogurt Pops: The Ultimate Guide to Homemade Treats Recipe. This delightful dessert is bursting with fresh flavors, balanced sweetness, and a pleasant tang from Greek yogurt. Whether you want a refreshing snack on a hot day or a healthier alternative to ice cream, these frozen yogurt pops are super easy to make and endlessly customizable. I can’t wait to share how simple ingredients come together to create a popsicle that’s as fun to eat as it is to make!
Ingredients You’ll Need
The magic of this recipe lies in its simplicity. Each ingredient plays a key role in building the perfect texture, flavor, and overall experience of your frozen yogurt pops. From creamy Greek yogurt adding richness and protein to fresh fruit bringing natural sweetness and color, every element makes a difference.
- 4 cups plain Greek yogurt: Provides a thick, creamy base packed with protein and probiotics for that signature tangy taste.
- 1 cup fresh or frozen fruit: Adds vibrant color, bursts of natural sweetness, and fresh flavor; berries, mango, or peaches work wonderfully.
- ½ cup honey or maple syrup: A natural sweetener to balance the tartness of yogurt; adjust the amount to suit your taste buds.
- 1 teaspoon vanilla extract (optional): Adds subtle warmth and depth of flavor, enhancing the overall taste.
- ¼ cup milk or additional yogurt: Used to thin the mixture if it’s too thick; ensures smooth pouring into molds.
- Pinch of salt: Intensifies sweetness and balances flavors beautifully.
- Optional toppings: Granola, chocolate chips, shredded coconut, or chopped nuts add texture and a fun surprise with each bite.
How to Make Frozen Yogurt Pops: The Ultimate Guide to Homemade Treats Recipe
Step 1: Prepare the Fruit
Start by washing and chopping your fresh fruit into small, manageable pieces. If you’re using frozen fruit, no need to thaw—just use it straight from the freezer. For a smoother texture, puree about half of the fruit before mixing; this gives lovely swirls and a bit of softness while still leaving chunkier bits for a fun contrast.
Step 2: Make the Yogurt Mixture
In a big bowl, whisk together the Greek yogurt, honey or maple syrup, and vanilla extract if you choose to use it. Stir everything until it’s perfectly smooth and creamy. This mixture is the heart of your frozen treat, so taste it to make sure it’s just right before moving on.
Step 3: Adjust Sweetness
Sweetness is a personal thing, so take a moment to taste your yogurt blend. Add a little more honey or maple syrup if you prefer a sweeter pop. This step ensures your Frozen Yogurt Pops: The Ultimate Guide to Homemade Treats Recipe will satisfy any sweet tooth without overpowering the fresh fruit flavors.
Step 4: Thin the Mixture (if needed)
If you find your yogurt mixture too thick to pour smoothly, simply add milk or extra yogurt a tablespoon at a time. This little adjustment makes filling your popsicle molds easier and guarantees a nice freeze without icy lumps.
Step 5: Add a Pinch of Salt
Salt is a secret weapon in dessert-making! Adding just a pinch helps bring out the natural sweetness of your ingredients and balances the flavors, making every bite more enjoyable.
Step 6: Combine Fruit and Yogurt
Gently fold the prepared fruit into your yogurt mixture. Use a gentle hand to distribute the fruit evenly without breaking up the pureed part too much. This creates a beautiful visual texture and keeps that fresh fruity punch.
Step 7: Fill Popsicle Molds
Pour the combined mixture carefully into your popsicle molds, leaving a little room at the top for expansion as they freeze. This helps prevent spills and makes sure your pops come out cleanly once frozen.
Step 8: Add Toppings (Optional)
If you want to add something extra special, sprinkle toppings like granola, chocolate chips, shredded coconut, or chopped nuts on top before inserting sticks. These add delightful crunch and surprise textures to your frozen pops.
Step 9: Insert Popsicle Sticks
Place a popsicle stick in the center of each mold. Make sure they are sturdy and standing upright to facilitate easy enjoyment later.
Step 10: Freeze
Pop your molds into the freezer and let them chill for at least 4 to 6 hours, ideally overnight. This slow freeze ensures your pops reach the perfect hardness and texture for enjoyment.
Step 11: Remove from Molds
When you’re ready for your first bite, run the molds under warm water for just a few seconds to loosen the frozen yogurt pops. Gently pull the sticks and watch your homemade delights pop out effortlessly!
Step 12: Enjoy
Serve your pops right away or keep them stored in the freezer until it’s time for a delicious, guilt-free treat. These frozen yogurt pops are bound to brighten any day!
How to Serve Frozen Yogurt Pops: The Ultimate Guide to Homemade Treats Recipe

Garnishes
Add an extra layer of fun with garnishes. Sprinkle finely chopped fresh mint, a drizzle of honey, or a dusting of cinnamon on your frozen yogurt pops for a fresh twist. Garnishes not only add visual appeal but also complement the fruit and yogurt flavors perfectly.
Side Dishes
Serve your frozen yogurt pops alongside fresh fruit salad or a light nut-based granola bowl for a satisfying snack that covers all bases—sweet, crunchy, and creamy. They also pair wonderfully with iced green tea or lemonade for an ultimate summer treat.
Creative Ways to Present
Get creative with your presentation! Serve the pops in a colorful wooden tray lined with parchment paper or stand them up in a chilled glass filled with crushed ice for that fancy ice cream shop vibe. You can also wrap them individually in parchment and tie with pretty ribbons if you’re sharing as party favors.
Make Ahead and Storage
Storing Leftovers
Leftover pops can be stored in an airtight container or zip-lock bag in the freezer for up to two weeks. Make sure to separate them with parchment paper if stacking to keep them from sticking together.
Freezing
Freezing the popsicles slowly is key to a smooth texture. Avoid opening the freezer door too often to prevent ice crystals from forming. Leaving them overnight ensures they’re perfectly firm for the best experience.
Reheating
Frozen yogurt pops are best enjoyed straight from the freezer. If you want a softer texture, let them sit at room temperature for a few minutes before eating but avoid microwaving or heating, as it will alter their creamy texture and delicious flavor.
FAQs
Can I use flavored yogurt instead of plain Greek yogurt?
While plain Greek yogurt provides the best balance of tartness and creaminess, you can use flavored yogurt if you prefer. Just keep in mind it will affect the final sweetness and flavor of the pops.
What fruits work best in this recipe?
Berries, mango, peaches, and even pineapple are fantastic options. Use fresh fruit for the best flavor or frozen if fresh isn’t available. Mixed fruit combinations can also be a real showstopper.
How do I prevent popsicles from sticking to the mold?
Running the mold under warm water for a few seconds before pulling the popsicles out is the easiest trick. Also, silicone molds or flexible plastic molds help with easy removal.
Can I make these popsicles vegan?
Absolutely! Swap Greek yogurt for coconut or almond yogurt and use maple syrup as a sweetener. The texture and flavor will be slightly different but still delicious and refreshing.
How long do these frozen yogurt pops last in the freezer?
For best quality, consume within 1 to 2 weeks. After that, they might develop ice crystals or lose some of their fresh flavor, but they will still be safe to eat.
Final Thoughts
There’s something incredibly satisfying about whipping up your own frozen treats at home, especially when they turn out as delicious as this. I hope you enjoy making and sharing your own batch following this Frozen Yogurt Pops: The Ultimate Guide to Homemade Treats Recipe. It’s a winning combination of simplicity, flavor, and fun that’s perfect for hot days, family gatherings, or anytime you want to brighten your snack routine.
Print
Frozen Yogurt Pops: The Ultimate Guide to Homemade Treats Recipe
- Prep Time: 15 minutes
- Cook Time: 4 hours 0 minutes (freezing time)
- Total Time: 4 hours 15 minutes
- Yield: 8 servings
- Category: Dessert
- Method: Freezing
- Cuisine: American
- Diet: Low Fat
Description
These Frozen Yogurt Pops are a refreshing and healthy homemade treat made with creamy Greek yogurt, fresh or frozen fruit, and natural sweeteners. Perfect for a cool snack on a hot day, they combine the tanginess of yogurt with the sweetness of fruit and optional crunchy toppings. Easy to customize and simple to prepare, these popsicles are a fun way to enjoy wholesome ingredients all year round.
Ingredients
Yogurt Mixture
- 4 cups plain Greek yogurt (full-fat or non-fat)
- ½ cup honey or maple syrup (adjust to taste)
- 1 teaspoon vanilla extract (optional)
- ¼ cup milk or yogurt (if needed, to thin the mixture)
- Pinch of salt
Fruit
- 1 cup fresh or frozen fruit (berries, mango, peaches, etc.)
Optional Toppings
- Granola
- Chocolate chips
- Shredded coconut
- Chopped nuts
Instructions
- Prepare the Fruit: Wash and chop fresh fruit into small pieces. If using frozen fruit, use it directly from frozen. Puree half of the fruit for a smoother texture if you prefer. Combine all prepared fruit in a bowl.
- Make the Yogurt Mixture: In a large bowl, mix together the Greek yogurt, honey or maple syrup, and vanilla extract (if using) until smooth and well combined.
- Adjust Sweetness: Taste the mixture and add additional honey or maple syrup to your preferred sweetness level.
- Thin the Mixture if Needed: If the mixture is too thick to pour, add milk or extra yogurt a tablespoon at a time until it reaches a pourable consistency.
- Add Salt: Stir in a pinch of salt to enhance the sweetness and flavor balance of the pops.
- Combine Fruit and Yogurt: Gently fold the prepared fruit into the yogurt mixture until evenly distributed throughout.
- Fill Popsicle Molds: Pour the combined yogurt and fruit mixture into your popsicle molds, leaving a small amount of space at the top for expansion.
- Add Toppings (Optional): Sprinkle your chosen toppings such as granola, chocolate chips, shredded coconut, or chopped nuts over the filled molds.
- Insert Popsicle Sticks: Place the popsicle sticks firmly into the center of each mold.
- Freeze: Put the molds into the freezer and freeze for at least 4 to 6 hours, or preferably overnight, until solidly frozen.
- Remove from Molds: To remove the popsicles, briefly run warm water over the outside of the molds to loosen, then gently pull the sticks to release the pops.
- Enjoy: Serve immediately or store extra popsicles in the freezer for later enjoyment.
Notes
- Using full-fat Greek yogurt gives a creamier texture, but non-fat works fine for a lighter option.
- Pureeing half the fruit provides a smoother texture while still keeping chunks for interest.
- Adjust the sweetness according to your taste and the sweetness of the fruit used.
- Adding a pinch of salt helps balance and enhance the overall flavors.
- Be sure not to overfill molds to prevent spills during freezing.
- To easily remove popsicles, let molds sit at room temperature for a couple of minutes or run warm water over them briefly.
- Customize toppings based on your preference or dietary needs.


