
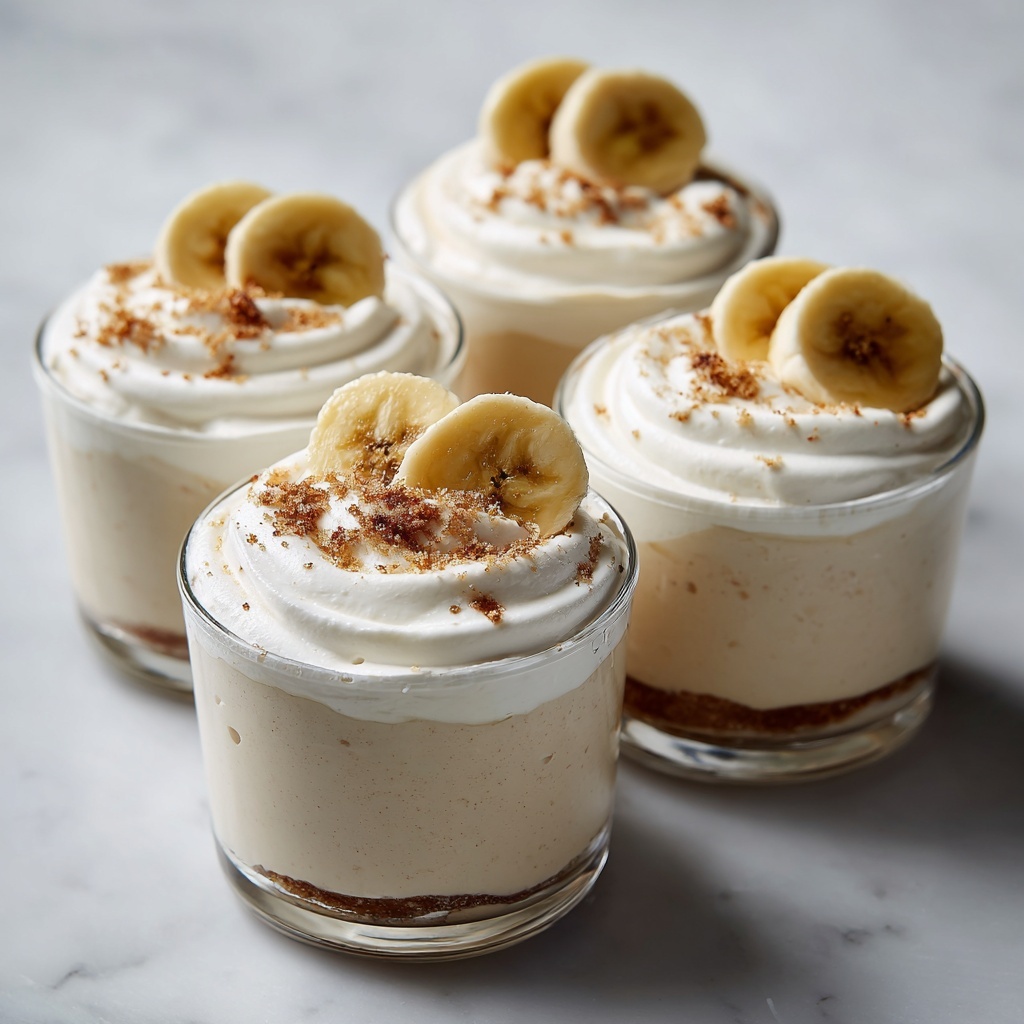
If you’re searching for a delightful, crowd-pleasing treat that feels both indulgent and effortlessly charming, look no further than this Banana Pudding Cups Recipe. It’s a creamy, dreamy dessert featuring layers of luscious vanilla pudding, fresh banana slices, and classic vanilla wafer cookies all nestled snugly in individual cups. This recipe brings a nostalgic Southern favorite into neat, portable servings that are perfect for any occasion—whether it’s a casual family gathering or an elegant dessert buffet. The combination of textures and flavors will have you coming back for seconds, and with this easy recipe, whipping it up is pure joy.
Ingredients You’ll Need
Gathering simple but quality ingredients is the key to making these Banana Pudding Cups outstanding. Each one plays a crucial role—vanilla pudding for creaminess, ripe bananas for natural sweetness and freshness, and whipped cream for that light, airy texture that sets this dessert apart.
- Instant vanilla pudding mix: Provides a quick and smooth base that thickens wonderfully.
- Cold milk: Activates the pudding mix for creamy consistency.
- Sweetened condensed milk: Adds richness and a lovely sweetness that deepens the vanilla flavor.
- Heavy whipping cream: Whipped to fluffy peaks, it lightens the pudding for a luscious mouthfeel.
- Vanilla extract: Enhances the overall flavor with warm, inviting notes.
- Ripe bananas, sliced: The star fruit that adds freshness and a natural sweetness balancing the creaminess.
- Vanilla wafer cookies: Bring crunch and a touch of vanilla aroma, layering perfectly with the pudding and bananas.
- Whipped cream (optional): Perfect for topping and adding that extra cloud-like touch to your cups.
- Crushed wafers or banana slices: Decorative and tasty garnishes that add visual appeal and texture.
How to Make Banana Pudding Cups Recipe
Step 1: Prepare the Vanilla Pudding Mixture
Start by whisking together the instant vanilla pudding mix and cold milk in a large bowl. Whisk steadily for about two minutes until the mixture thickens to a smooth, luxurious texture. Then, stir in the sweetened condensed milk, which will amplify the sweetness and silkiness of the pudding, blending everything until perfectly smooth.
Step 2: Whip the Cream
In a separate bowl, pour the heavy whipping cream and add vanilla extract. Beat until stiff peaks form—this means the cream holds its shape firmly without drooping. This light and airy whipped cream will be gently folded into the pudding mixture in the next step, giving the dessert its irresistible fluffiness.
Step 3: Combine Pudding and Whipped Cream
Carefully fold the whipped cream into the pudding base with a spatula using gentle motions. This ensures that the mixture stays airy and smooth, creating the perfect creamy consistency that makes this Banana Pudding Cups Recipe so special.
Step 4: Layer the Cups
Now the fun part: assembling the cups! Start by placing a layer of vanilla wafer cookies at the bottom of your small cups or jars. Add a layer of banana slices, then spoon over a generous layer of the pudding mixture. Keep layering—vanilla wafers, bananas, pudding—until the cups are full, finishing with a layer of pudding on top. This layering technique delivers a beautiful and delicious balance of textures in every spoonful.
Step 5: Chill and Garnish
Chill the assembled cups in the refrigerator for at least two hours. This chilling time allows the flavors to meld and the pudding to set properly. Just before serving, top each cup with a dollop of whipped cream and garnish with crushed wafers or fresh banana slices for a visually stunning and tasty finish.
How to Serve Banana Pudding Cups Recipe

Garnishes
Garnishes are your chance to make these Banana Pudding Cups shine even brighter. Beyond the classic whipped cream, consider adding a sprinkle of crushed vanilla wafers or a thin banana slice on top. For a fun twist, a light dusting of cinnamon or a few chocolate shavings can add a surprising pop of flavor and color that impresses every guest.
Side Dishes
Because these cups are rich and creamy, they pair beautifully with lighter, fresh sides. Try serving them alongside a crisp fruit salad or a tangy citrus sorbet to balance the sweetness. For gatherings, a few simple nuts or biscotti can add complementary crunch without overwhelming the signature banana pudding taste.
Creative Ways to Present
Presentation elevates this Banana Pudding Cups Recipe from everyday dessert to party showstopper. Use petite mason jars, clear glass cups, or even colorful small bowls to highlight the appealing layers. You could also add a decorative spoon tied with a ribbon for gifting or create a dessert bar where guests can customize their own cups with additional toppings like chocolate chips, nuts, or caramel drizzle.
Make Ahead and Storage
Storing Leftovers
If you have any leftover Banana Pudding Cups after your event, store them in airtight containers in the refrigerator. They will keep well for up to two days, though the wafer cookies may soften over time. To preserve the best texture, store the garnishes separately and add them just before serving.
Freezing
While this dessert tastes best fresh or chilled, you can freeze the pudding mixture itself for up to one month in a sealed container. However, after thawing, the texture might change slightly, so it’s best to freeze the ingredients separately and assemble the cups fresh for optimum flavor and consistency.
Reheating
This Banana Pudding Cups Recipe is designed to be served chilled, so reheating is not recommended. Instead, simply allow leftovers to come to a comfortable serving temperature straight from the fridge for the best experience.
FAQs
Can I use fresh homemade pudding instead of instant vanilla pudding mix?
Absolutely! Homemade pudding works beautifully and adds a fresh touch, though instant pudding is wonderfully convenient and consistent for this recipe. Just make sure your homemade version is thick enough to hold the layers well.
What bananas are best for this recipe?
Choose ripe bananas that are firm but have a few brown spots. They offer the perfect sweetness and texture without becoming mushy in the pudding cups.
How long can I prepare the Banana Pudding Cups in advance?
To keep the vanilla wafers slightly crisp, prepare the pudding mixture up to one day ahead and assemble the cups just before your event. Once assembled, refrigerate for at least two hours before serving.
Can I substitute the vanilla wafers for another cookie?
Yes! While vanilla wafers are classic, shortbread or graham crackers also make delicious alternatives, adding new flavors and textures to the Banana Pudding Cups Recipe.
Is this dessert suitable for vegetarian diets?
Yes, this recipe is vegetarian-friendly as it contains no meat or gelatin. Just ensure your vanilla wafers and pudding mix are vegetarian-certified if strict adherence is required.
Final Thoughts
There’s something truly magical about this Banana Pudding Cups Recipe—the way creamy pudding, fresh bananas, and crisp wafers come together in one harmonious spoonful is pure joy. Whether you’re making it for family dinner, a party, or just because, this dessert is sure to delight. Give it a try soon, and I promise it will become a beloved staple that you’ll want to make again and again.
Print
Banana Pudding Cups Recipe
- Prep Time: 20 minutes
- Cook Time: 0 minutes
- Total Time: 20 minutes (plus at least 2 hours chilling time)
- Yield: 6 servings
- Category: Dessert
- Method: No-Cook
- Cuisine: American
- Diet: Vegetarian
Description
Delight in these easy-to-make Banana Pudding Cups, a creamy and luscious no-bake dessert featuring layers of instant vanilla pudding, ripe bananas, and crunchy vanilla wafers. Topped with whipped cream and garnished for extra indulgence, these individual pudding cups are perfect for any occasion and can be prepared ahead of time.
Ingredients
Pudding Mixture
- 1 package (3.4 ounces) instant vanilla pudding mix
- 2 cups cold milk
- 1 can (14 ounces) sweetened condensed milk
- 1 1/2 cups heavy whipping cream
- 1 teaspoon vanilla extract
Filling and Toppings
- 4 ripe bananas, sliced
- 1 box vanilla wafer cookies
- Whipped cream for topping (optional)
- Crushed wafers or banana slices for garnish
Instructions
- Prepare the pudding: In a large bowl, whisk together the instant vanilla pudding mix and cold milk for about 2 minutes until the mixture thickens.
- Incorporate condensed milk: Stir in the sweetened condensed milk thoroughly until the pudding mixture is smooth.
- Whip the cream: In a separate bowl, beat the heavy whipping cream with vanilla extract until stiff peaks form, creating a light and fluffy texture.
- Combine whipped cream and pudding: Gently fold the whipped cream into the pudding mixture until fully blended and fluffy.
- Assemble the cups: In small cups or jars, layer vanilla wafers, banana slices, and pudding mixture. Repeat the layering until the cups are filled, finishing with a layer of pudding on top.
- Chill: Refrigerate the assembled cups for at least 2 hours to allow flavors to meld and the dessert to set.
- Garnish and serve: Before serving, top with whipped cream and garnish with crushed vanilla wafers or additional banana slices if desired.
Notes
- For best texture, assemble the pudding cups shortly before serving to keep the vanilla wafers slightly crisp.
- The pudding mixture can be prepared up to a day in advance; assemble right before serving.
- Use ripe bananas for optimal flavor and sweetness.
- If desired, substitute some vanilla wafers with other cookies for varied texture or flavors.
