
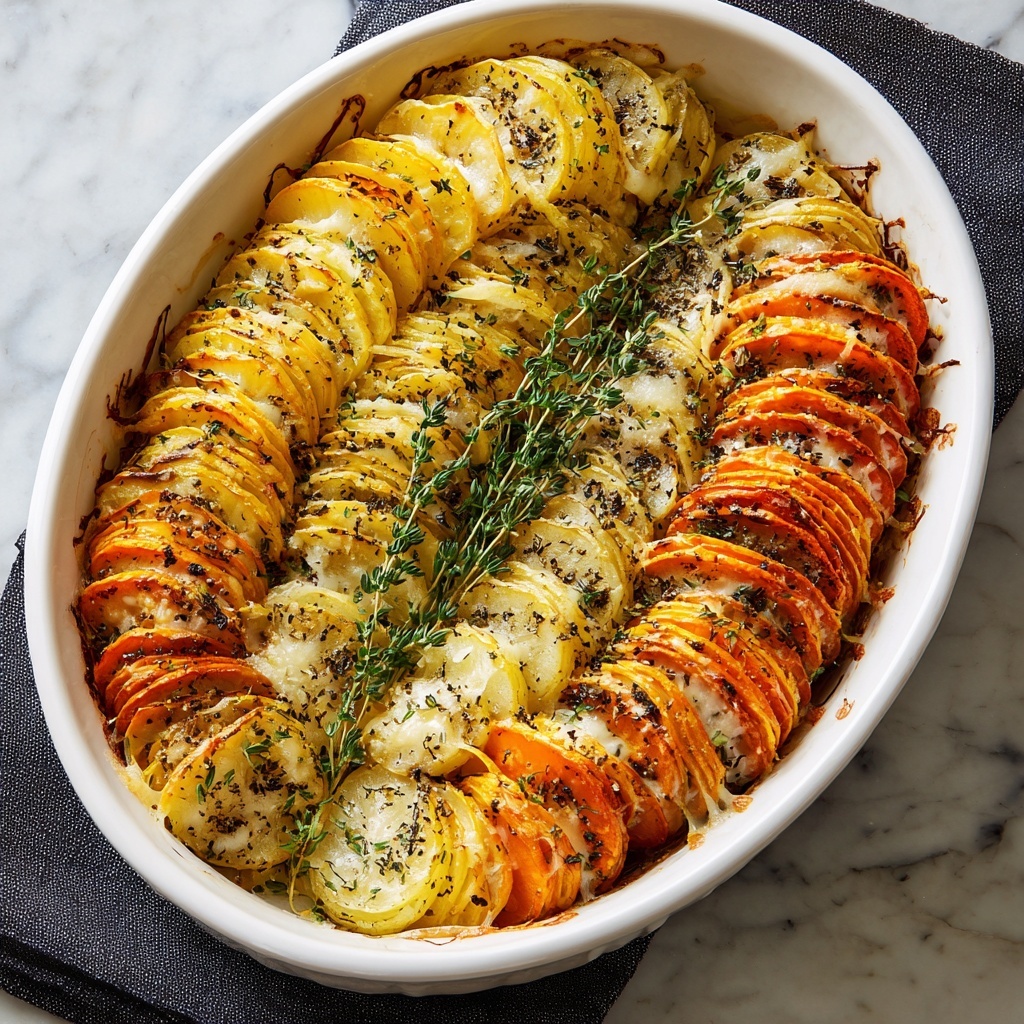
If you are searching for a comforting dish that feels like a warm hug on a plate, this Cheesy Root Vegetable Gratin Recipe is an absolute must-try. It combines tender layers of potatoes, carrots, and parsnips bathed in creamy, garlicky goodness, then topped with a bubbly, golden crust of both sharp cheddar and nutty Parmesan cheese. Each bite reveals a perfect harmony of earthy sweetness and cheesy richness, making it an ideal centerpiece or side for any meal. Trust me, once you make this Cheesy Root Vegetable Gratin Recipe, it will soon become one of your go-to favorites for cozy dinners or holiday feasts.
Ingredients You’ll Need
Getting to know the ingredients is part of the fun, especially since they come together so simply to create a vibrant and flavorful dish. Each root vegetable brings its unique sweetness and texture, while the creamy cheese and aromatic herbs enhance every bite with richness and depth.
- Potatoes (2 cups peeled and thinly sliced): The hearty base that adds creamy softness after baking.
- Carrots (2 cups peeled and thinly sliced): These add a touch of natural sweetness and vivid orange color.
- Parsnips (2 cups peeled and thinly sliced): Offering a slightly nutty flavor to balance out the dish.
- Cheddar cheese (1 cup shredded): Provides sharp, melty goodness that binds the layers together wonderfully.
- Heavy cream (1 cup): Creates the luscious, silky sauce that glues the roots and cheese into a creamy masterpiece.
- Garlic (2 cloves minced): Adds fragrant, savory warmth without overpowering the vegetables.
- Salt (1 teaspoon): Enhances and balances the natural sweetness of the vegetables.
- Black pepper (1/2 teaspoon): Gives a subtle kick to brighten the flavors.
- Fresh thyme (1 teaspoon chopped): Offers an herbaceous note that lifts the richness of the cream and cheese.
- Parmesan cheese (1/2 cup grated): Sprinkled on top for a crisp, golden crust with a nutty tang.
How to Make Cheesy Root Vegetable Gratin Recipe
Step 1: Preheat and Prepare
First things first, get your oven warmed up to 375°F (190°C) to ensure it’s ready when your dish is prepared. Meanwhile, peel and thinly slice your potatoes, carrots, and parsnips—aim for even slices so they cook uniformly and layer beautifully.
Step 2: Mix the Vegetables
In a spacious mixing bowl, gently toss the sliced potatoes, carrots, and parsnips together. This step ensures the layers will be balanced with a mix of textures and flavors in every bite.
Step 3: Create the Creamy Sauce
In a separate bowl, whisk together the heavy cream, minced garlic, salt, pepper, and freshly chopped thyme. This mix will infuse the gratin with delightful aromatic flavors and a luxurious texture that ties the dish together.
Step 4: Assemble the Layers
Grease your baking dish lightly to prevent sticking. Layer half of your root vegetables on the bottom, pour over half the creamy sauce, then sprinkle half the shredded cheddar cheese to start building your cheesy layers.
Step 5: Repeat for a Perfect Stack
Repeat the layering process with the remaining vegetables, cream sauce, and cheddar cheese. This repetition guarantees every portion has that signature creamy-cheesy goodness throughout.
Step 6: Top It Off
To finish, sprinkle the grated Parmesan cheese evenly on top. This will create a tantalizing golden crust that’s crunchy, cheesy, and irresistible once baked.
Step 7: Bake to Perfection
Bake your gratin for 45 to 60 minutes, or until the vegetables are tender throughout and the top is bubbling and beautifully browned. The aroma alone will have you counting down the minutes!
Step 8: Let It Rest
Once out of the oven, give your gratin a few minutes to cool slightly. This resting time helps the dish set, making it easier to serve and savor every rich, creamy layer.
How to Serve Cheesy Root Vegetable Gratin Recipe

Garnishes
A sprinkle of freshly chopped parsley or thyme leaves adds a fresh pop of color and herbal brightness that complements the creamy richness. You can also add a light drizzle of extra virgin olive oil or a dash of smoked paprika if you want an extra flavor twist.
Side Dishes
This gratin pairs wonderfully with simply roasted meats like chicken or pork, as well as crisp green salads or steamed greens to contrast the rich, cheesy layers. For a vegetarian meal, pair it with a bright beet salad or sautéed mushrooms to keep everything balanced.
Creative Ways to Present
For a rustic look, serve directly from the baking dish with a wooden spoon for a cozy, family-style vibe. Alternatively, portion it into individual ramekins for a dinner party—it’s an elegant touch that makes everyone feel special. You could also turn leftovers into a delicious gratin crumble the next day, topping with breadcrumbs and extra cheese then crisping in the oven.
Make Ahead and Storage
Storing Leftovers
Simply cover any leftover gratin tightly with foil or transfer to an airtight container and store in the refrigerator. It will keep beautifully for up to 3 days while maintaining its creamy texture and flavor.
Freezing
You can freeze the gratin before baking for up to one month. Just cover it well with two layers of foil or place in a suitable freezer-safe container. When ready to enjoy, thaw overnight in the fridge before baking.
Reheating
Reheat leftovers in a 350°F (175°C) oven for 20-25 minutes or until warmed through and the top regains its crispness. Using the oven rather than a microwave preserves the texture, so every bite tastes as fresh as the first.
FAQs
Can I use other root vegetables in this recipe?
Absolutely! Sweet potatoes, turnips, or rutabagas are excellent alternatives that bring their own unique sweetness and texture. Just slice them thinly like the others for even cooking.
Is it possible to make this dish dairy-free?
Yes, to create a dairy-free version, substitute the heavy cream with coconut cream or cashew cream, and choose dairy-free cheeses that melt well. The flavors will adjust slightly but remain deliciously creamy.
How do I get a crispy top without burning the cheese?
Bake the gratin covered with foil for the first 40 minutes, then remove the foil for the last 10-15 minutes to allow the cheese to brown evenly without burning.
Can this be prepared in advance for a holiday meal?
Definitely! Prepare and assemble the gratin up to 24 hours ahead, cover, and store in the fridge. On the day, simply bake as directed—this makes holiday cooking stress-free and efficient.
What wine pairs best with this gratin?
A crisp white wine like Chardonnay or a light Pinot Noir complements the rich, creamy layers beautifully, cutting through the cheese with refreshing acidity.
Final Thoughts
Making this Cheesy Root Vegetable Gratin Recipe is one of those simple joys in the kitchen that results in a dish everyone will rave about. Its comforting layers and irresistible flavors make it perfect for any occasion, whether a quiet night in or a festive gathering. I can’t wait for you to try this recipe, share it with your loved ones, and make cozy memories around the table!
Print
Cheesy Root Vegetable Gratin Recipe
- Prep Time: 30 minutes
- Cook Time: 50 minutes
- Total Time: 1 hour 20 minutes
- Yield: 6 servings
- Category: Side Dish
- Method: Baking
- Cuisine: American
- Diet: Vegetarian
Description
A creamy and delicious Cheesy Root Vegetable Gratin featuring layers of tender potatoes, carrots, and parsnips baked in a savory garlic and thyme-infused cream sauce, topped with melted cheddar and Parmesan cheese for a perfect golden crust. This hearty, comforting dish is ideal as a side for any meal or a satisfying vegetarian main.
Ingredients
Vegetables
- 2 cups peeled and thinly sliced potatoes
- 2 cups peeled and thinly sliced carrots
- 2 cups peeled and thinly sliced parsnips
Cheese & Dairy
- 1 cup shredded cheddar cheese
- 1 cup heavy cream
- 1/2 cup grated Parmesan cheese
Seasonings
- 2 cloves garlic, minced
- 1 teaspoon salt
- 1/2 teaspoon black pepper
- 1 teaspoon fresh thyme, chopped
Instructions
- Preheat Oven: Preheat your oven to 375°F (190°C) to ensure it reaches the correct temperature for baking your gratin evenly.
- Prepare Vegetables: In a large mixing bowl, combine the peeled and thinly sliced potatoes, carrots, and parsnips to prepare for layering.
- Make Cream Mixture: In a separate bowl, whisk together the heavy cream, minced garlic, salt, black pepper, and fresh thyme until well combined to infuse the dish with flavor.
- Layer Vegetables: Grease a baking dish and layer half of the root vegetables evenly at the bottom to create the first base layer.
- Add Cream and Cheese: Pour half of the cream mixture over the vegetable layer, then sprinkle half of the shredded cheddar cheese evenly on top for creaminess and richness.
- Repeat Layers: Repeat layering with the remaining vegetables, cream mixture, and cheddar cheese to build a stacked gratin with balanced flavors.
- Top with Parmesan: Sprinkle the grated Parmesan cheese over the top for a flavorful, golden crust once baked.
- Bake: Place the baking dish in the preheated oven and bake for 45-60 minutes, or until the vegetables are tender and the top is golden brown and bubbling.
- Cool and Serve: Remove from oven and let the gratin cool for a few minutes before serving to let the flavors meld and prevent burns.
Notes
- For uniform cooking, slice all root vegetables to a similar thickness.
- Feel free to substitute heavy cream with half-and-half for a lighter version, though texture will be slightly less rich.
- Fresh thyme can be replaced with dried thyme; just use about 1/3 the amount since dried herbs are more concentrated.
- This dish can be prepared a few hours ahead and refrigerated; bake just before serving for best freshness.
- Leftovers can be chilled and reheated in the oven to maintain texture and flavor.


