
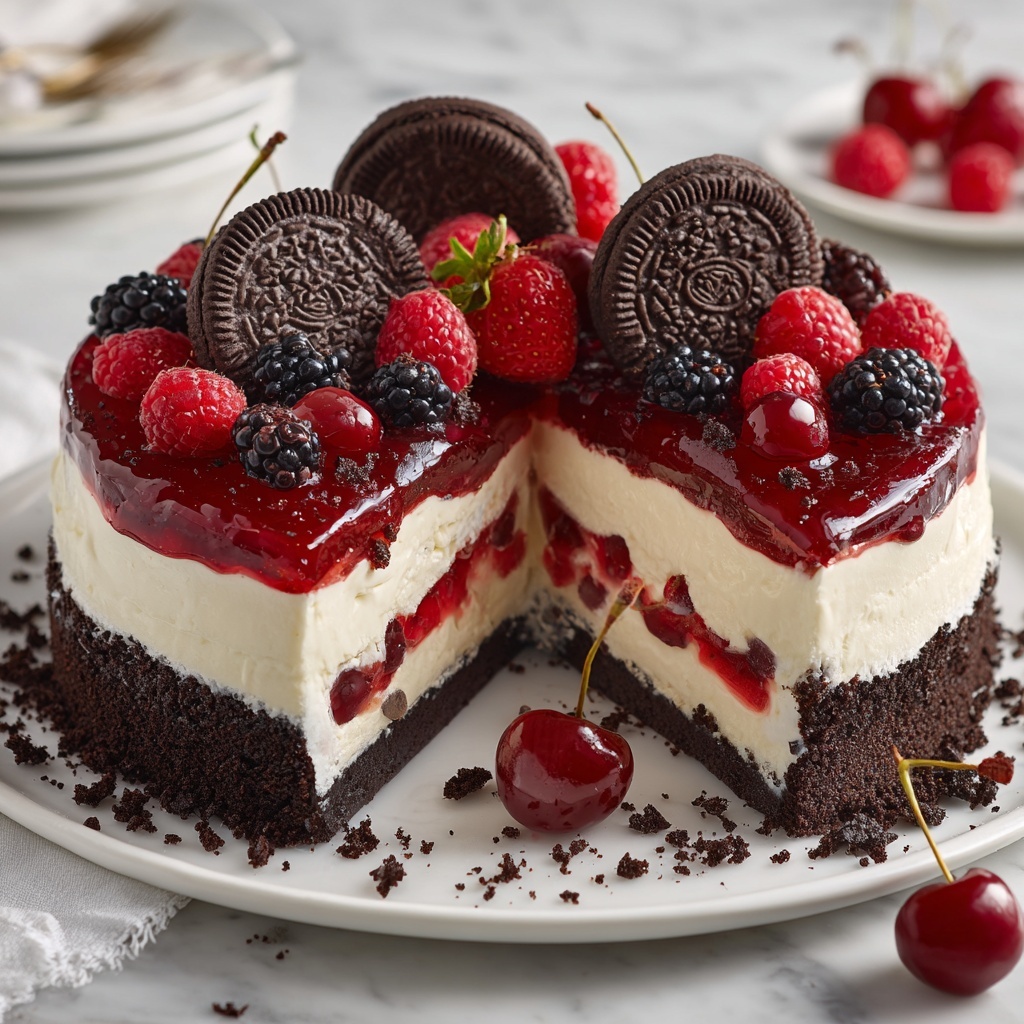
If you’re dreaming of a dessert that perfectly blends the classic richness of cheesecake with the playful indulgence of red velvet cookie dough, you’re in for a treat. This Cheesecake with Red Velvet Cookie Dough Recipe is pure magic—imagine a creamy, velvety cheesecake nestled atop a crunchy chocolate cookie crust, with luscious red velvet cookie dough swirled right in. Every bite delivers a delightful mix of flavors and textures that will have you coming back for more. Whether it’s for a special celebration or simply to satisfy your sweet tooth, this recipe is a guaranteed crowd-pleaser that’s bound to become a new favorite.
Ingredients You’ll Need
Gathering the right ingredients is like assembling the perfect team—each one plays a crucial role in delivering the taste, texture, and vibrant color that make this cheesecake shine. From the rich cream cheese that forms the creamy foundation to the burst of cocoa and vivid red from the cookie dough, every element is essential and thoughtfully chosen.
- All-purpose flour: Provides structure for the red velvet cookie dough to hold its shape beautifully.
- Cocoa powder: Adds that deep, chocolatey flavor signature to red velvet.
- Unsalted butter (softened): Brings richness and tenderness to the cookie dough and crust.
- Granulated sugar: Sweetens the cookie dough just right without overpowering.
- Brown sugar (packed): Enhances moisture and adds a subtle caramel note.
- Milk: Keeps the dough soft and easy to spread.
- Vanilla extract: Lifts all flavors with a warm, fragrant touch.
- Red gel food coloring: Delivers that eye-catching red hue without watering down the dough.
- Mini chocolate chips: Little bursts of chocolate surprise in every bite of cookie dough.
- Cream cheese (softened): The star ingredient of the cheesecake filling, silky and tangy.
- Powdered sugar: Sweetens and smooths the cheesecake mixture perfectly.
- Whipped cream (or whipped topping): Lightens the cheesecake for a fluffy, dreamy texture.
- Chocolate sandwich cookies (crushed): The crunchy base that adds chocolate cookie goodness.
- Unsalted butter (melted): Binds the crust ingredients together beautifully.
How to Make Cheesecake with Red Velvet Cookie Dough Recipe
Step 1: Prepare the Chocolate Cookie Crust
Start by mixing the crushed chocolate sandwich cookies with the melted butter until every crumb is coated and sticks together nicely. Press this mixture firmly into the bottom of a 9-inch springform pan to create a sturdy, flavorful crust. Pop it in the fridge while you whip up the luscious red velvet cookie dough and cheesecake filling—this chilling step helps the crust set perfectly.
Step 2: Whisk Together Dry Ingredients for Cookie Dough
In a separate bowl, whisk the all-purpose flour and cocoa powder. This ensures even distribution of chocolate flavor and a smooth texture in your red velvet cookie dough, preventing any unwanted lumps.
Step 3: Cream Butter and Sugars for Red Velvet Cookie Dough
Using a mixer, beat the softened butter with granulated and brown sugars until the mixture is light, fluffy, and full of promise. This step is key for a tender, melt-in-your-mouth cookie dough base that perfectly complements the cheesecake filling.
Step 4: Add Wet Ingredients and Color
Mix in the milk, vanilla extract, and red gel food coloring to the butter and sugar mixture. The color will become vibrant, signaling the classic red velvet look while the vanilla adds that subtle richness characteristic of this beloved dessert.
Step 5: Combine Dry and Wet Ingredients, Add Chocolate Chips
Slowly stir in the flour and cocoa powder mix until just combined, being careful not to overwork the dough. Then fold in the mini chocolate chips, giving your cookie dough a fun and tasty texture that will surprise with every bite.
Step 6: Prepare the Creamy Cheesecake Filling
Beat the softened cream cheese with powdered sugar and vanilla extract until smooth and creamy. A good whip here ensures a luscious cheesecake layer with the perfect balance of sweetness and tang.
Step 7: Fold in Whipped Cream
Gently fold the whipped cream into the cream cheese mixture to lighten it up. This yields a fluffy, airy texture that makes your cheesecake feel indulgent but not heavy—a delightful finish to the creamy center.
Step 8: Assemble the Layers
Spread half of the red velvet cookie dough evenly over the cooled crust, pressing it down lightly to create a solid base. Pour the cheesecake filling on top and smooth the surface with a spatula. Finally, crumble the remaining red velvet cookie dough over the cheesecake topping, pressing some of the pieces together for added texture and visual appeal.
Step 9: Chill and Set
Cover the pan and refrigerate for at least 4 hours, preferably overnight. This step is crucial because it allows the cheesecake to firm up and the flavors to meld, making slicing easier and the taste even more decadent.
How to Serve Cheesecake with Red Velvet Cookie Dough Recipe

Garnishes
Think fresh and festive! Garnish your cheesecake slices with dollops of whipped cream, a drizzle of chocolate sauce, or a sprinkling of crushed red velvet cookie dough crumbs to echo the layers inside. A handful of fresh berries can add a pop of brightness and contrast beautifully with the richness.
Side Dishes
This cheesecake shines on its own but pairs wonderfully with a cup of freshly brewed coffee or a glass of cold milk. If you want to get fancy, add a scoop of vanilla bean ice cream on the side for an extra creamy celebration of flavors.
Creative Ways to Present
For a beautiful party spread, consider serving this cheesecake in individual clear glasses layered with cookie crumbs, red velvet dough bites, and cheesecake filling. Another fun idea is to cut it into small squares and thread on decorative toothpicks for easy, irresistible bite-sized treats.
Make Ahead and Storage
Storing Leftovers
Once sliced, cover the cheesecake tightly with plastic wrap or keep in an airtight container in the fridge. It will stay fresh and delicious for up to 4 days—perfect for enjoying those dreamy layers anytime you want a sweet escape.
Freezing
This cheesecake freezes beautifully. Wrap individual slices or the entire cake tightly in plastic wrap, then foil, and freeze for up to 2 months. When you’re ready to indulge, thaw it overnight in the refrigerator for the perfect texture.
Reheating
Cheesecake is best enjoyed chilled, so instead of reheating, simply let frozen slices thaw slowly in the fridge. This preserves the creamy texture and vibrant flavors of your Cheesecake with Red Velvet Cookie Dough Recipe.
FAQs
Can I use regular food coloring instead of gel?
While regular food coloring can work, gel food coloring tends to give a more vivid red without adding extra liquid that might affect the cookie dough’s texture. Gel is the best choice for that bold red velvet color.
Is it necessary to use a springform pan?
A springform pan makes it easier to remove the cheesecake without damaging the sides, but if you don’t have one, a regular 9-inch cake pan lined with parchment paper can suffice—just be extra careful when removing the cheesecake.
Can I make this cheesecake dairy-free or vegan?
Substituting with dairy-free cream cheese and butter alternatives is possible but will slightly change the texture and flavor. Be sure to use vegan whipped topping and check your chocolate chips for dairy-free options to keep the recipe true to your dietary needs.
How do I prevent the cookie dough from mixing too much into the cheesecake?
Be gentle when layering the cookie dough and cheesecake filling—spread and crumble carefully without over-mixing. Chilling the crust first also provides a solid base to keep your layers distinct.
Can I prepare this recipe in advance for a party?
Absolutely! In fact, making the Cheesecake with Red Velvet Cookie Dough Recipe a day ahead allows it to set perfectly and frees up your time on the day of your event. Just keep it covered and refrigerated until serving.
Final Thoughts
This Cheesecake with Red Velvet Cookie Dough Recipe is an irresistible celebration of texture, flavor, and color all in one beautiful dessert. It’s definitely one to share with friends and family or to treat yourself to when you want something truly special. Don’t hesitate to try it out and watch how this show-stopper dessert quickly becomes a staple in your recipe collection—you’re going to love every bite!
Print
Cheesecake with Red Velvet Cookie Dough Recipe
- Prep Time: 30 minutes
- Cook Time: 0 minutes
- Total Time: 4 hours 30 minutes
- Yield: 12 servings
- Category: Dessert
- Method: No-Cook
- Cuisine: American
Description
Indulge in a luscious Cheesecake with Red Velvet Cookie Dough, featuring a crunchy chocolate cookie crust layered with rich red velvet cookie dough and a smooth, creamy cheesecake filling. This no-bake dessert combines the irresistible flavors of chocolate, cream cheese, and classic red velvet for an impressive treat perfect for any celebration or sweet craving.
Ingredients
Chocolate Cookie Crust
- 2 cups chocolate sandwich cookies, crushed
- 4 tbsp unsalted butter, melted
Red Velvet Cookie Dough
- 1 ¼ cups all-purpose flour
- 2 tbsp cocoa powder
- ½ cup unsalted butter, softened
- ¼ cup granulated sugar
- ¼ cup brown sugar, packed
- 2 tbsp milk
- 1 tsp vanilla extract
- ½ tsp red gel food coloring
- ½ cup mini chocolate chips
Cheesecake Filling
- 16 oz (2 packages) cream cheese, softened
- ½ cup powdered sugar
- 1 tsp vanilla extract
- 1 cup whipped cream (or whipped topping)
Instructions
- Prepare the crust: Mix the crushed chocolate cookies with the melted butter until fully combined to create a moist, crumbly base.
- Form the crust: Press this cookie mixture firmly into the bottom of a 9-inch springform pan. Chill the crust in the refrigerator while you prepare the filling to ensure it sets well.
- Mix dry ingredients for cookie dough: In a medium bowl, whisk together the all-purpose flour and cocoa powder evenly to combine.
- Cream butter and sugars: In another large bowl, beat together the softened butter, granulated sugar, and brown sugar until the mixture becomes light, fluffy, and creamy to incorporate air.
- Add wet ingredients and color: Stir in the milk, vanilla extract, and red gel food coloring into the butter-sugar mixture, mixing thoroughly until smooth and uniformly colored.
- Combine cookie dough: Gradually add the dry flour and cocoa mixture to the wet ingredients, stirring until just combined to avoid overmixing. Gently fold in mini chocolate chips. Set this red velvet cookie dough aside for layering.
- Prepare cheesecake filling: Using a mixer, beat the softened cream cheese, powdered sugar, and vanilla extract in a clean bowl until the mixture is smooth and creamy with no lumps.
- Fold in whipped cream: Gently fold the whipped cream or whipped topping into the cream cheese mixture until fully incorporated and light, creating a fluffy texture.
- Layer cookie dough: Spread half of the prepared red velvet cookie dough evenly over the chilled cookie crust, pressing down lightly to create a compact layer.
- Add cheesecake filling: Pour the creamy cheesecake filling over the cookie dough layer, smoothing the top with a spatula for an even finish.
- Top with remaining cookie dough: Crumble the remaining red velvet cookie dough over the cheesecake filling. Press some pieces together slightly to add texture and variation on top.
- Chill to set: Cover the assembled cheesecake and refrigerate for at least 4 hours, or preferably overnight, to allow the layers to firm up and flavors to meld perfectly.
- Serve: Once set, carefully remove the cheesecake from the springform pan, slice into 12 servings, and enjoy the rich combination of textures and flavors.
Notes
- Use a 9-inch springform pan for easy removal of the cheesecake.
- For best results, chill the cheesecake overnight to allow the flavors to develop fully and the texture to set firmly.
- Red gel food coloring provides vibrant color without adding extra liquid to the dough.
- Mini chocolate chips add texture and bursts of chocolate flavor throughout the cookie dough layers.
- Substitute regular whipped cream with dairy-free whipped topping for a lactose-free version.
- Ensure cream cheese is softened to room temperature for smooth mixing and a lump-free cheesecake filling.


