“`html
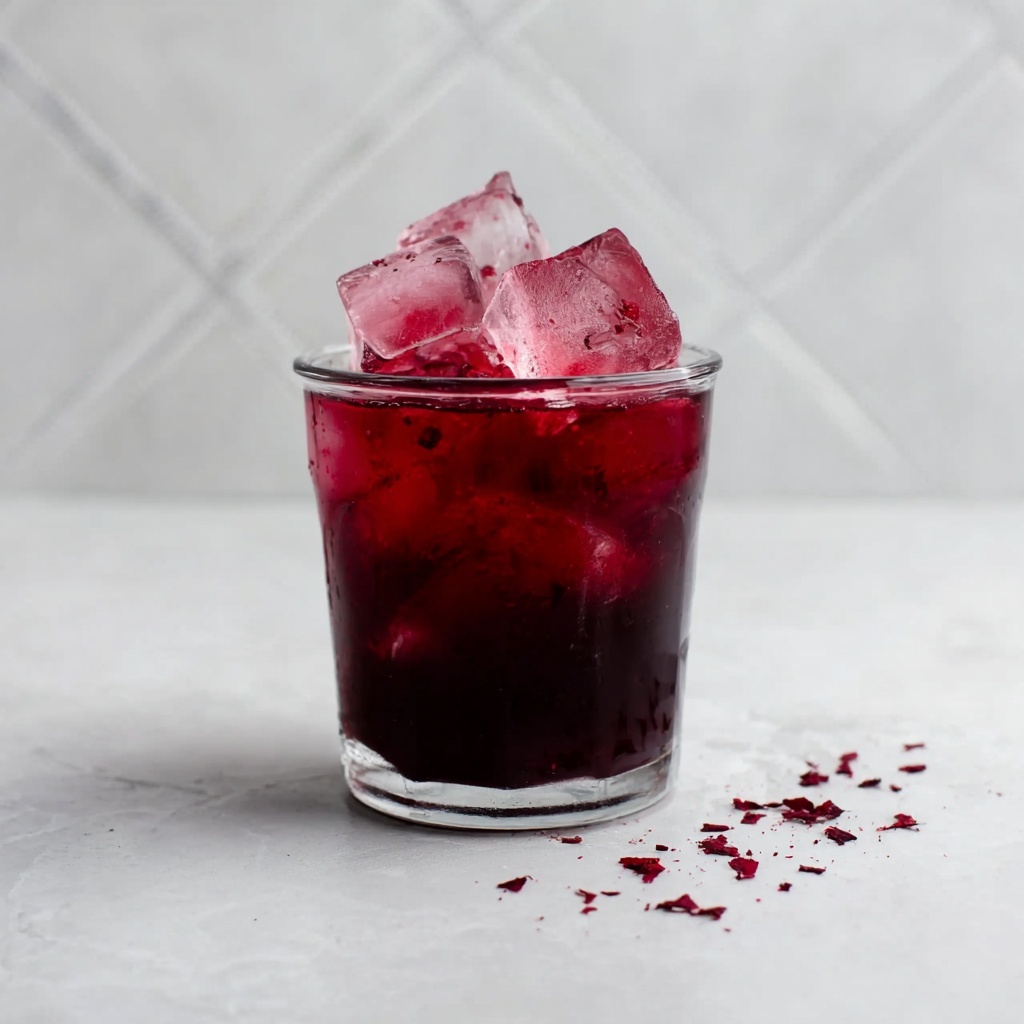
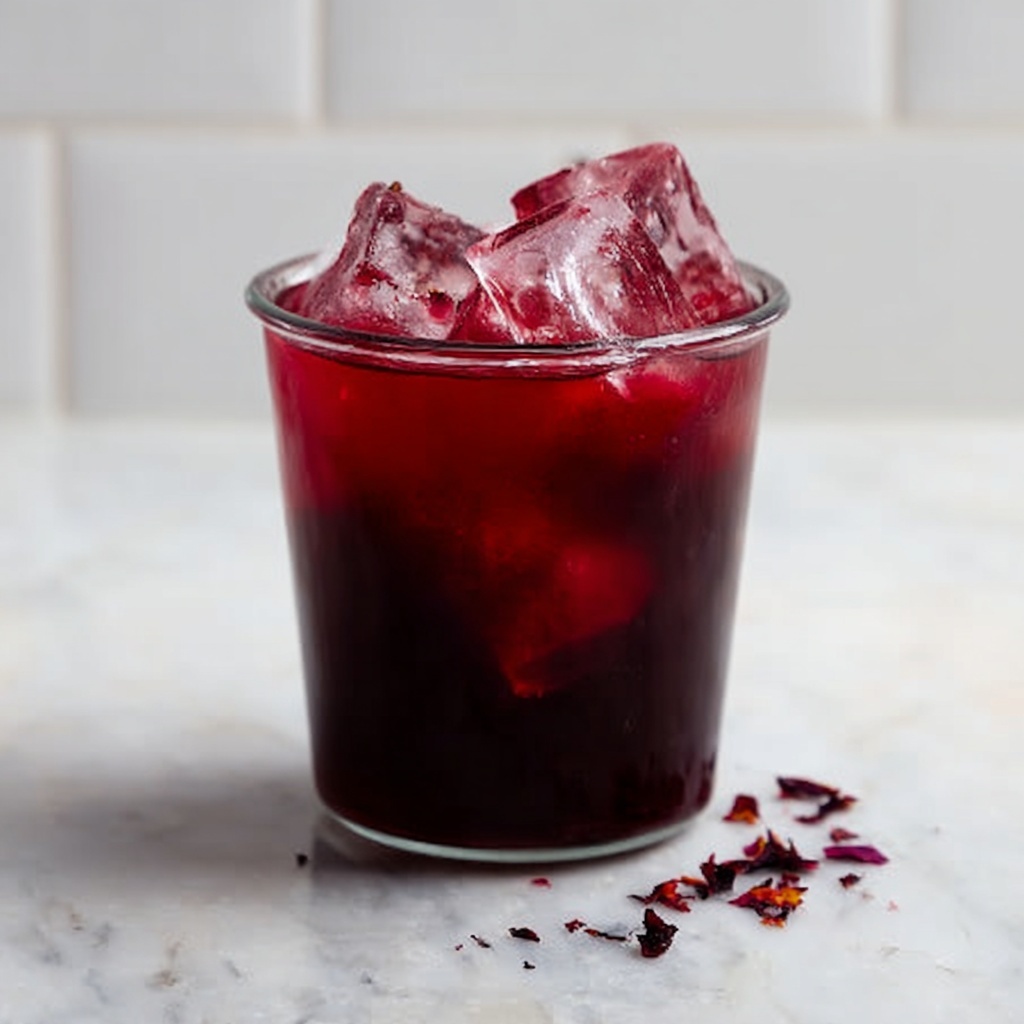
If you’re looking for a bright, thirst-quenching drink that brings a burst of fruity tartness with a floral twist, the Cherry Hibiscus Refresher Recipe is a must-try. This sparkling refresher combines the deep, juicy flavors of fresh cherries with the uniquely vibrant, slightly tangy hibiscus tea, all balanced by a hint of lime and sweetness from honey or cane sugar. It’s the perfect companion for sunny afternoons or whenever you want to treat yourself to a homemade, elegant drink that feels both revitalizing and utterly delightful. Once you make this Cherry Hibiscus Refresher Recipe, you’ll find yourself reaching for it again and again, whether to cool down or brighten up your day.
Ingredients You’ll Need
The beauty of this Cherry Hibiscus Refresher Recipe lies in its simplicity—each ingredient is selected to bring out layers of flavor and a stunning visual appeal. Every component plays its part, from fresh cherries providing natural sweetness and body to hibiscus tea that adds a gorgeous color and floral tang.
- Cherries (2 cups, pitted): Use ripe, juicy cherries for the freshest, most vibrant flavor and natural sweetness.
- Water (1 cup): Essential for simmering the cherries and turning their flavor into a concentrated syrup.
- Honey or cane sugar (1/2 cup): The sweetness that balances the tart fruitiness and hibiscus.
- Cherry syrup (3 tbsp): Homemade and packed with cherry goodness that defines the drink.
- Lime juice (2 tbsp): Adds a bright, zesty kick that wakes up the taste buds.
- Hibiscus tea (1/2 cup): Brewed to provide a deep ruby color and a refreshing floral tartness that’s signature to this refresher.
- Ice (lots): Key for chilling your drink perfectly and enhancing the refreshment factor.
- Salt (a pinch): Just enough to amplify the cherry syrup’s natural sweetness and flavors.
How to Make Cherry Hibiscus Refresher Recipe
Step 1: Prep Your Cherries
Start with pitting your cherries. You can use a cherry pitter, slice them carefully with a knife, or even push the pits out with a metal straw. This step is crucial because it makes the cherries ready for simmering, ensuring the syrup will have that pure cherry flavor without any bitterness from seeds.
Step 2: Craft the Cherry Syrup
Place your pitted cherries in a large pot along with water, honey or cane sugar, and just a pinch of salt. Heat this mixture over medium heat until it begins to froth. As the cherries soften, mash them gently with a fork or potato masher to release all their juicy goodness. Let the mixture continue simmering for about five more minutes to reduce and thicken into a rich, concentrated syrup that bursts with fresh cherry flavor.
Step 3: Strain and Store
Once your syrup has thickened to a luscious consistency, strain it through a fine mesh sieve into a bowl, separating the smooth syrup from the cherry pulp. Don’t toss that pulp—you can spread it over toast with almond butter for a tasty snack. Pour the strained syrup into a jar and refrigerate; this homemade cherry syrup is the heart of your Cherry Hibiscus Refresher Recipe.
Step 4: Brew the Hibiscus Tea
Now, brew about half a cup of hibiscus tea. Use dried hibiscus flowers and steep them in hot water for 5 to 7 minutes to get that vibrant ruby color and bright floral flavor that complements the cherries wonderfully.
Step 5: Assemble Your Refresher
Fill a glass with plenty of ice. Pour the fresh hibiscus tea over the ice, then add 3 to 4 tablespoons of your homemade cherry syrup. Squeeze in 2 tablespoons of lime juice to bring a lively acidity. Stir or shake vigorously until everything is well combined and beautifully chilled—then sip away the heat and dive into refreshing fruitiness!
How to Serve Cherry Hibiscus Refresher Recipe

Garnishes
Enhance the charm of your Cherry Hibiscus Refresher Recipe by adding a few whole cherries on a skewer or a thin lime wheel perched on the rim of your glass. Fresh mint leaves also add a lovely aroma and a pop of green that contrasts perfectly with the deep red hues.
Side Dishes
This refresher pairs beautifully with light and fresh dishes. Think crisp salads, grilled chicken, or seafood. It’s particularly lovely alongside Mediterranean mezze or a tangy cheese platter that complements the drink’s fruity and floral notes.
Creative Ways to Present
If you want to impress friends, serve your Cherry Hibiscus Refresher Recipe in mason jars or stemmed cocktail glasses. Rim the glass with colored sugar for a festive effect, or layer the drink over crushed ice and garnish with edible flowers to elevate the tropical vibe. The vibrant colors practically make the presentation irresistible.
Make Ahead and Storage
Storing Leftovers
The homemade cherry syrup can be stored in an airtight jar in the refrigerator for up to two weeks. This means you can whip up a quick Cherry Hibiscus Refresher anytime you like without starting from scratch each time.
Freezing
While the syrup freezes well in ice cube trays, it’s best to freeze the syrup cubes alone, not the full refresher mix. This allows you to thaw just what you need and mix with freshly brewed hibiscus tea and lime juice to keep the flavor fresh.
Reheating
Because the syrup is intended for cold drinks, reheating isn’t usually necessary. If you want a warm twist, gently warm the syrup before mixing, but keep the hibiscus tea served cold to maintain that refreshing contrast.
FAQs
Can I use frozen cherries in the Cherry Hibiscus Refresher Recipe?
Absolutely! Frozen cherries work well since they release their juice nicely when simmered. Just thaw them slightly before cooking to help the syrup develop rich flavors.
How long does this Cherry Hibiscus Refresher Recipe keep once made?
If you prepare the assembled refresher without ice, it can be refrigerated for up to 24 hours. However, for best taste and fizz, prepare it fresh whenever possible.
Is there a substitute for hibiscus tea?
While hibiscus tea is central to the drink’s character, you could try rosehip tea for a similar tart fruitiness or combine pomegranate juice with green tea if hibiscus is unavailable.
How sweet is the Cherry Hibiscus Refresher Recipe?
The sweetness is nicely balanced—you get the tang from hibiscus and lime, with cherry syrup and honey adding just the right level of natural sugar without being overwhelming. You can always adjust honey or syrup amounts to your preference.
Can I make a sparkling version of this refresher?
Yes! After mixing, simply top your Cherry Hibiscus Refresher Recipe with sparkling water or club soda for an effervescent twist that elevates the refreshing zing even more.
Final Thoughts
If you’re craving a drink that’s both stunning and bursting with layers of fresh flavor, I can’t recommend the Cherry Hibiscus Refresher Recipe enough. It’s surprisingly simple to make but so satisfying, with a beautiful color and refreshing taste that feels like summer in a glass. Next time you want to wow your friends or just treat yourself to something special, whip this up—you won’t regret it!
“`
Print
Cherry Hibiscus Refresher Recipe
- Prep Time: 10 minutes
- Cook Time: 10 minutes
- Total Time: 20 minutes
- Yield: 8 servings
- Category: Beverage
- Method: Stovetop
- Cuisine: American
- Diet: Vegetarian
Description
A refreshing and naturally sweet Cherry Hibiscus Refresher made with a homemade cherry syrup, tangy lime juice, and floral hibiscus tea. Perfect for a revitalizing summer beverage that combines fruity tartness with floral notes and a touch of sweetness.
Ingredients
Cherry Syrup
- 2 cups (350 g with pits) cherries, pitted
- 1 cup (225 g) water
- 1/2 cup (140 g) honey or cane sugar
- Pinch of salt
Refresher
- 3 tbsp (48 g) cherry syrup
- 2 tbsp (23 g) lime juice
- 1/2 cup hibiscus tea (brewed)
- Lots of ice
Instructions
- Pit the cherries: Start by pitting your cherries. You can easily do this using a metal straw to push through the cherry, slicing them in half and removing the seed manually, or using a cherry pitter tool for speed and convenience.
- Make the cherry syrup: Add the pitted cherries to a large pot along with water, honey or cane sugar, and a pinch of salt. Place the pot over medium heat on the stove and let it simmer until the cherries start to froth. Then gently mash the cherries with a fork or potato masher until soft. Continue cooking the mixture for an additional 5 minutes. This allows excess water to evaporate, creating a thick, concentrated cherry syrup.
- Strain and store the syrup: Once the syrup has thickened, strain it through a fine mesh sieve into a bowl to separate the liquid from the pulp. Reserve the cherry pulp to use later in recipes like cherry almond butter toast. Transfer the syrup to a jar and refrigerate until ready to use.
- Brew hibiscus tea: Prepare 1/2 cup of hibiscus tea by steeping dried hibiscus flowers in hot water for about 5 minutes, then strain the tea leaves out.
- Assemble the refresher: Fill a glass with lots of ice. Pour the brewed hibiscus tea over the ice, add 3 to 4 tablespoons of the cherry syrup, and 2 tablespoons of fresh lime juice. Stir or shake the mixture vigorously to combine all flavors well.
- Serve and enjoy: Your Cherry Hibiscus Refresher is ready to be enjoyed as a chilled, flavorful drink perfect for hot days or any time you need a fruity pick-me-up.
Notes
- You can adjust the sweetness by varying the amount of honey or sugar in the cherry syrup.
- Save the leftover cherry pulp for delicious recipes such as cherry almond butter toast.
- Use fresh lime juice for the best tangy flavor.
- Hibiscus tea can be found in specialty tea shops or online; make sure to brew it according to package instructions.
- Store cherry syrup in the refrigerator for up to 1 week.


